• Skip to primary navigation
  • Skip to main content
  • Skip to primary sidebar
  • Home
  • About
  • Contact
  • Privacy + Terms
  • Affiliates

The Chaos and the Clutter

  • Facebook
  • Twitter
  • Pinterest
  • Google Plus
  • RSS
  • Email
  • School at Home
  • Sensory
    • Sensory Processing Disorder
    • Awesome Sensory Play Activities
      • Sensory Bins
      • Sensory Bottles
      • Sensory Bags
  • Family Games
    • Minute to Win It Games
  • Special Needs Parenting
    • Childhood Anxiety
    • Reactive Attachment Disorder
    • Sensory Processing Disorder
  • Store
  • Course Login

Homeschooling

Under the Sea Theme Party

By Sharla Kostelyk

Just for fun, and as a kick off for our homeschool “under the sea” unit, I decided to throw together a little party.  We invited a few friends at the last minute, which only added to the fun and it was a great day.

Sensory bin: rice (easier clean up than sand), seashells, various undersea creatures, colourful seashell beads, glass rocks

Obviously, I wasn’t going to buy 20 bags of Goldfish crackers to fill the pail with, so I stuffed the pail with plastic grocery bags to almost the top and then added the fish crackers.  The popcorn represented coral.  The goggles and seashell necklaces we had around the house.  The blow-up fish and octopus I found for .99 cents each at Michael’s.  I found the cutest seashell cupcake liners and filled them with guppies (candy).  That was about the extent of my decorating other than the Finding Nemo cups, plates, napkin, bowls, and placemats that I happened to have in the storage room anyway.  I had planned the day already and was in the midst of setting things out the night before when I remembered that years earlier, I had bought a Finding Nemo party set for $9.99 that was still in the storage room!

  • various fish shaped fruit snacks
  • octopus chicken hot dog
  • applesauce ocean w/ blue whale swimming
  • goldfish crackers
  • shark and fish cheese
  • crab seashell pasta salad

These cupcakes were super easy to decorate.  I just iced them with buttercream icing tinted blue, added a pretzel stick fishing rod and a candy fish, then drew the fishing line with edible markers.  White icing would have looked better for the fishing line though.

To make things go as smoothly as possible, I made up the craft table ahead of time with the glue, scissors, paint, paintbrushes, googly eyes,  toilet paper rolls, tissue paper strips I had cut out, and jellyfish bodies my boys had cut out.

To make the octopus craft, make slits all the way around a toilet paper roll about halfway up.  Curl each one around a thick marker or your finger.  Paint it blue, including underneath the “arms”.  Allow to dry and then decorate with googly eyes, bingo dabbers, paint, or clay.

To make the jellyfish craft, cut the body shape out of construction paper and tape or glue strips of tissue paper to the bottom.  (when we cut out the body shapes, we used scalloped scissors along the bottom) Decorate by glueing googly eyes and making spots with Bingo dabbers or paint.

The crafts were the biggest hit of the party.  Even the youngest kids (2 and 3 years old) enjoyed making these.

I sent each of the kids home with a little bag of just a few things including more seashell beads, a stencil, ring, and sea life grow creature.  I got a pack of 12 ocean themed stencils for .99 cents at Michael’s.

Here are some more pictures of how the day went.  There were 14 kids there and no major mishaps, so that qualifies as a big success with me!

If you are looking for information on making sensory bins, you may be interested in my book. The Ultimate Guide to Sensory Bins

Filed Under: Crafts and Activities, Homeschooling, Sensory Bins

Titanic Party

By Sharla Kostelyk

Titanic Party

Einstein is obsessed with Titanic (obsession takes on a whole new meaning when you have a child with Asperger’s!). I have long learned that it is best to just go with his current obsession of choice rather than fight it. April 14 is the anniversary of the day the Titanic sank and he wrote it on the calendar and wanted to know how we were going to commemorate that day.

I told him that we would do something, but as it got closer, I realized that that day I had a hair appointment and that night was The Husband and my date night, so I sat Einstein down and let him know that we would have to do something on Friday instead. In a very serious voice, he told me that Friday would work because the 15th is the anniversary of the day that Titanic first touched down on the ocean floor!!!

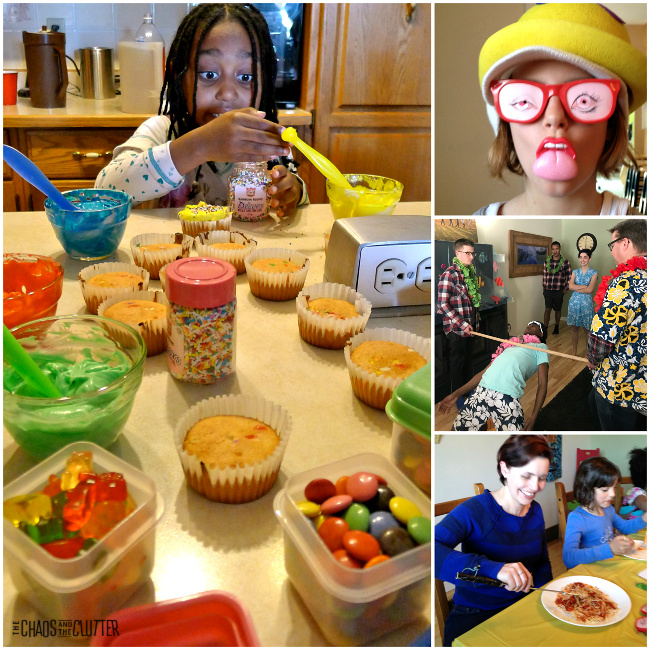
On the night the Titanic sank, they were serving a 7 course dinner in the first class dining room, so I decided to do the same for our Titanic party.  It may have been a bit on the ambitious side as I forgot to calculate that a 7 course plate service meal for 11 people would mean 77 dishes, so we were mixing and matching plastic plates with our fancy ones!

Here is the menu I made and cooked up for the evening:

The Husband made a playlist that included string quartet music (including the song the orchestra was playing while the ship sank) and songs from the Titanic movie, which we listened to during dinner and danced to.  I taught the kids which fork to use for which course and they sipped ginger ale out of wine glasses and loved that their napkins were folded into fans!  It was a very fun night!!!

Einstein, Snuggle Puppy, M., and Miss Optimism

Snuggle Puppy and Dancing Queen take a break from dancing in “the ballroom”!

(sorry M. about the eyes closed thing, but this is the only dinner picture I have of the “grown-ups table”!)

Dancing Queen, Granola Girl, and Einstein finish their salad course and sip ginger ale.  Note the crayons and Titanic colouring sheets for when boredom set in between courses!

Filed Under: Crafts and Activities, Homeschooling

Cool Crafts for Kids – African Masks

By Sharla Kostelyk

This art project is one that my kids loved doing and the finished products were fantastic.  It was inexpensive to do and easy to adapt for kids of different ages.

Cut pieces of different shapes and sizes in cardboard.  This is something that older children can do themselves, but for younger children, you will want to have the pieces cut ahead of time.  You can use cardboard in a variety of thicknesses.

Provide glue (hot glue sticks work best but to use these, they will need to be supervised) and paint.

Have the kids layer pieces of cardboard to create the look they want.  It’s a good idea to show them pictures of actual African masks to give them ideas.

When the pieces are layered and glued on the way things want them to be, provide the kids with paint and have them use their imaginations to create the masks the way they want them.

This craft is also great to tie in to a homeschool lesson about Africa.  There are many books and Internet sites that can aid you in this lesson and the craft can be a fun way to finish off and to add a hands-on aspect.

Filed Under: Crafts and Activities, Homeschooling

More Snow Day Activities

By Sharla Kostelyk

On a cold and snowy day, the kids easily start to get restless.  These activities will help to keep away the winter blues and redirect all that pent up energy!

In my first Snow Day Activities post, I concentrated on indoor activities that kids could do when it was just too cold to go outside.  This time, I thought I would concentrate on winter activities that actually incorporate the snow.

Snow Art.  Fill spray bottles with water and a bit of food colouring.  Send the kids outside and have them create masterpieces just by spraying the snow!  This is so easy to do and one that can entertain from toddlers to teens and every age in between!

snow painting

Snow Castles.  Using empty ice cream buckets, pails, sand toys, or moulds, the kids can pack the containers with snow and make snow castles instead of sand castles.  They can even add flags made from straws and paper to complete the look!

Back to Basics.  Sometimes we forget that the most fun in snow can be had by playing in it the way kids used to.  Making snow angels, building snowmen, making snow forts, making pictures on the snow with sticks, going tobogganing, snowshoeing, and cross country skiing are all things that are just as much fun now as they were when we were kids.  Snowball fights are fun too as long as there are ground rules set to keep it safe and fun for all.

Tracks.  Finding or creating tracks in the snow is fun and educational.  Have your kids try to find tracks in the snow and then using books or the internet, help them discover what type of animal made those tracks.  You can also have them play detective and try to figure out which family member made which human track by using clues such as foot size, treads, and weight distribution.

Bring Winter Inside.  When the temperature outside dips too low, bring the snow in for a fun change of pace.  You can do this by filling plastic buckets or even the bathtub with snow and then letting the kids use their imaginations to play.  They can use toy cars to make roads, make imaginary scenes using small toys or make “mountains” for their dolls to ski or toboggan down.

Of course a great way to end off a snow day activity is with a nice cup of hot chocolate and a snuggle under a warm blanket!

Filed Under: Crafts and Activities, Homeschooling

Snow Day Activities (indoor)

By Sharla Kostelyk

Today is way too cold to venture out, so I got to thinking about what indoor activities I could do with the kids to keep them (and me) from going crazy. Here are some easy ones that I came up with that could be made with household items.

Doll House or Castle.  Using empty boxes, help your child make a doll house or castle.  Imaginations, scissors, and markers are all you need.  If you really want to be creative, use scraps of fabric, pipe cleaners, and tiny boxes (such as match or toothpick boxes) to make curtains, lamps, and furniture for the house.

Faux Stained Glass.  Use up your broken crayon pieces by spreading out a sheet of wax paper and having the kids make crayon shavings on it using a pencil sharpener.  When they are done, fold the wax paper in half and iron it on a low temperature.  The kids can then make a frame for their creation out of construction paper.  They can make it look like a butterfly or a stained glass window.

Themed collage.  Have the kids create a collage using glue and pictures from a catalogue, magazine, or flyer.  Give them a theme such as “favourite things”, “foods that are healthy”, “things that fly”, “things that are red”, or “what I would buy if I had a hundred dollars”.

Masks.  Masks are a good way to change the mood.  They can be made using large paper bags, paper plates, stiff paper, or paper mache.  Feathers, glitter, sequins, ribbons, and beads can make the masks more interesting.  The kids can even then put on a play wearing their masks, which will help the hours pass more quickly on a rainy or snowy day.  If you don’t have supplies for mask making, face painting can also change the mood in the house and be used for make-believe.

Easy Shrinky Dinks.  Use empty small size potato chip bags or regular size chocolate bar wrappers.  Hole punch one hole near the corner and then place them on a baking sheet.  Put them in the oven at 325 degrees, keeping an eye on them.  They will shrivel and curl and then uncurl.  Remove from the oven when they are at least halfway uncurled.  Wait for them to cool.  They can then be made into keychains, zipper pulls, or jewelry.  Kids love this one!

For other great stay-at-home activities, be sure to check out these fun posts:

Creative Mail Ideas
More Snow Day Activities (outdoor)

Filed Under: Crafts and Activities, Homeschooling

Creative Mail For Kids – 7 Unique Ideas

By Sharla Kostelyk

Everyone likes to receive happy mail, which is pretty much anything other than a bill. You can use these ideas to have kids send mail to grandparents, friends, cousins, or pen pals.a mother helps her two young boys mail a letter in a mailbox. Text reads "Creative Mail Ideas for Kids"
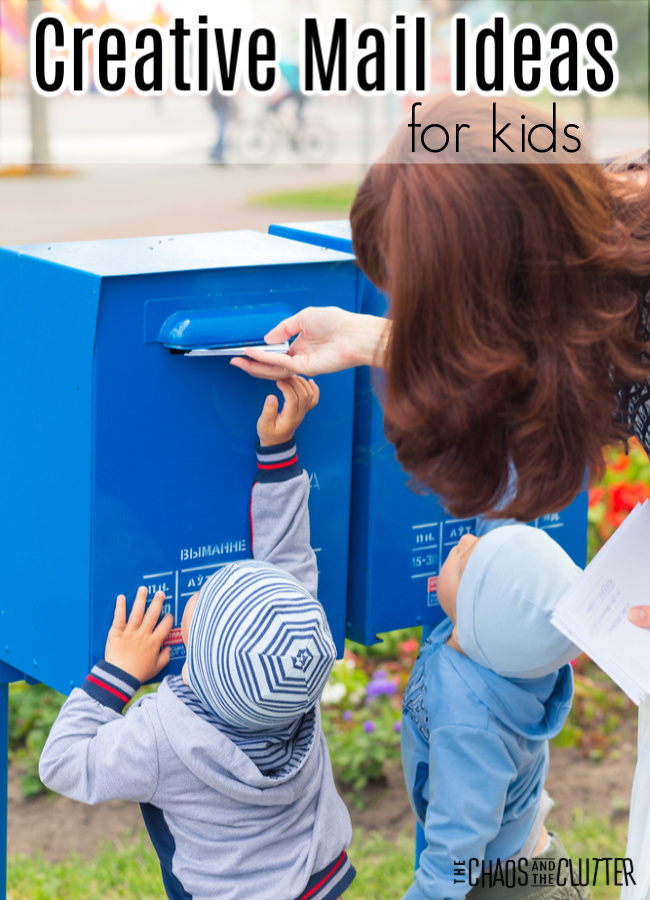
Writing letters is a great way for children to practise their writing skills and penmanship in a practical and fun way. Sending them (by “snail mail”) instead of e-mail is especially fun. Below are some suggestions for fun and creative mail they can send.

Creative Mail Ideas:

A Homemade Photo Postcard – Take pictures and let the your child turn them into postcards by sticking a white index card onto the back of them. They can then write a message, fill in the address, put a stamp in the corner and send their personalized postcard.

A Puzzle – Have your child draw a colourful picture on cardboard or thick card stock with a message for a friend or relative. If the child is old enough, have them cut the picture into puzzle pieces. If they are too young, you can cut the pieces for them. Pop the pieces in an envelope and mail to the intended recipient for a very fun greeting card. 

Invisible Ink – Have your child write a message or draw a picture in lemon juice on a paper. Include a note on a separate piece of paper explaining that in order to view the message, the recipient will have to heat the paper up over a candle. This one is as fun to receive as it is to make.

Mail a Hug – I love this idea! Kids can send one of their actual hugs to loved ones by tracing their outstretched arms. This is particularly heartwarming for situations when you can’t give your loved ones a hug in person. Find the full instructions here.

Building Suspense – One idea that can improve your child’s creative writing abilities as well as their desire is to have them write a story and send a grandparent, aunt, uncle, or friend one chapter at a time. The recipient will want to know how the story ends and will phone or write to ask the child, who will then feel encouraged in their writing and be spurred on to finish that story and to write others as well.

Secret Code – Your child can write a letter using a secret code. Be sure that they send a decoder along with the letter of course! Here are some secret codes kids can use.

Add a Sentence – This one is also good for building creative writing skills in your child. The way it works is that your child writes one sentence or one paragraph (depending on the age and writing level of the child) and sends it to the recipient. The recipient then adds another sentence or paragraph on to the story and sends it back. Your child then continues the story from there and this continues back and forth until the story is finished.

Sending and receiving mail is fun for any child (it’s fun for adults too!). If there isn’t a relative that your child can send mail to, consider asking a Senior’s care centre if there is a lonely resident there that your child can send letters to or find a pen pal for your child.

Check out these other fun activities for kids:

Sensory Scavenger Hunt

Theme Day Ideas for Family Fun at Home

Easy Indoor Sensory Activities at Home

Filed Under: Crafts and Activities, Homeschooling

  • « Go to Previous Page
  • Page 1
  • Interim pages omitted …
  • Page 21
  • Page 22
  • Page 23

Primary Sidebar

Categories

We are a participant in the Amazon Services LLC Associates Program, an affiliate advertising program designed to provide a means for us to earn fees by linking to Amazon.com and affiliated sites.

Copyright © 2025 • The Chaos and the Clutter • Site Design by Jeni @ The Blog Maven

Return to top of page

Copyright © 2025 · Chaos and the Clutter 2.0 on Genesis Framework · WordPress · Log in