• Skip to primary navigation
  • Skip to main content
  • Skip to primary sidebar
  • Home
  • About
  • Contact
  • Privacy + Terms
  • Affiliates

The Chaos and the Clutter

  • Facebook
  • Twitter
  • Pinterest
  • Google Plus
  • RSS
  • Email
  • School at Home
  • Sensory
    • Sensory Processing Disorder
    • Awesome Sensory Play Activities
      • Sensory Bins
      • Sensory Bottles
      • Sensory Bags
  • Family Games
    • Minute to Win It Games
  • Special Needs Parenting
    • Childhood Anxiety
    • Reactive Attachment Disorder
    • Sensory Processing Disorder
  • Store
  • Course Login

Crafts and Activities

Ghost Hands Campfire Fun

By Sharla Kostelyk

I’m not sure if moms and dads out there are going to hate me or thank me for introducing them to ghost hands! I’m not sure if I should thank my friend Christie for introducing it to my kids but I’m paying it forward by introducing it to the world!

Ghost Hands - the most fun you can have around a campfire!I warn you now. It’s messy. Sticky and messy. And yuck. But fun. So much fun!

We were over at our friends’ (and neighbours) house. It was the first warm Sunday afternoon of the Spring and we were enjoying a visit by the campfire after an outdoor spaghetti dinner. The sounds of approaching summer could be heard over the sound of the dirt bikes and quads the kids took turns riding. Later, the kids made s’mores while the adults visited.

Christie asked my kids if they had ever heard of “ghost hands”. They had not and she kindly decided to teach them. I wasn’t too thrilled with that at first since it’s so messy but it turned into the most fun our family has had in a long while.

The kids weren’t the only ones who were laughing! If you can get past the messy factor, you’re going to love this one! I know there will never be another campfire where my kids don’t ask to do ghost hands!

ghost hands…the most fun that can be had around a campfire!Ghost hands are about as cheap and easy as family entertainment gets!

You only need one item, marshmallows. You could of course do it anywhere but I would HIGHLY recommend you only do this outside!

This doesn’t have to be a campfire activity, but it does make sense to have it be because then everyone is already outside, having fun, and there are often marshmallows on hand to roast over the fire or to make s’mores with.

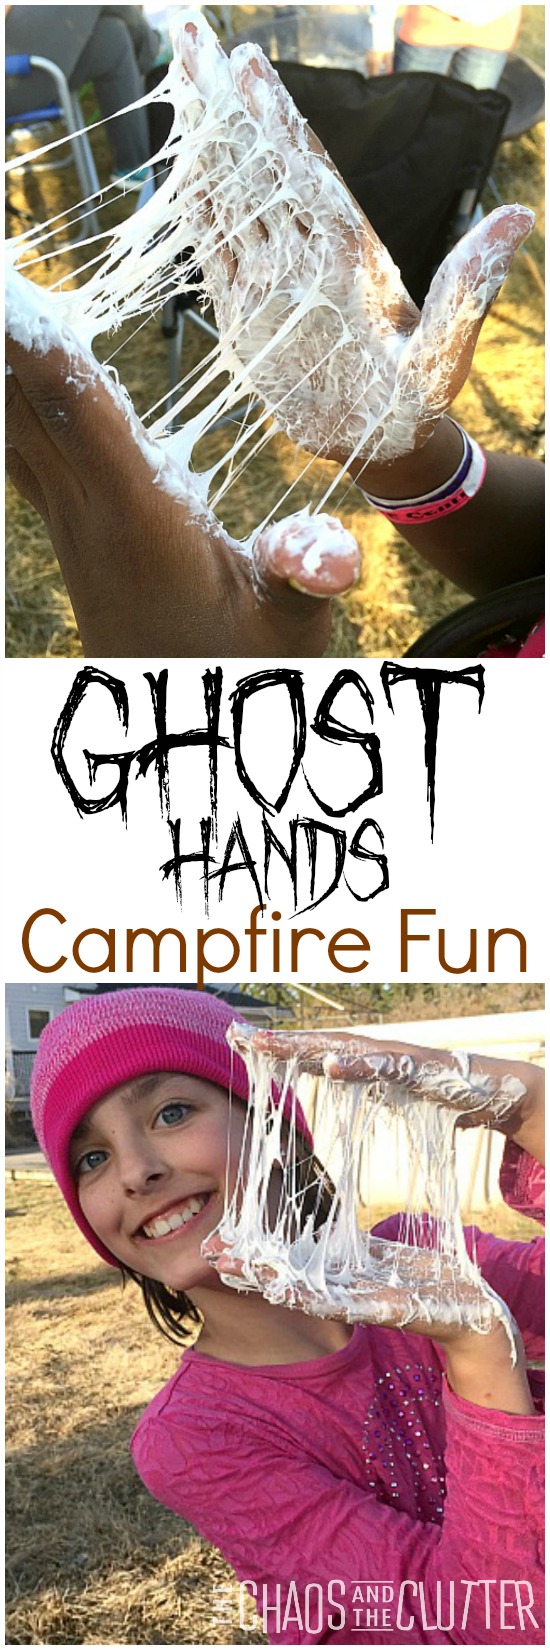
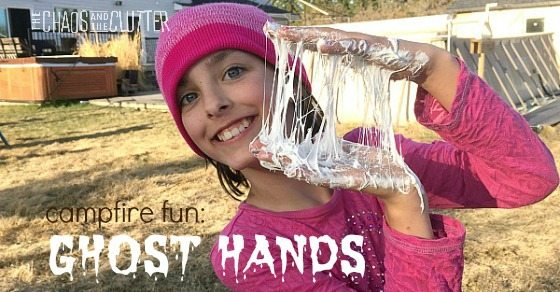
The ghost hands process is very straightforward. Take one large marshmallow and start to work it between your hands. Work it until it is squishy and just keep smooshing it. It will eventually get to a point where when you pull your hands apart, strings of ooey-gooey marshmallow mush will connect the hands. That’s when you know you have achieved Ghost Hands!

Now it’s up to you what you do with your ghost hands. You can play with the mess you’ve created and enjoy the sensory experience or you can chase your parents, siblings and friends around the yard, pretending that you are going to touch their hair with your ghost hands if you catch them!

You can put your hands down on the grass and the grass will stick to them, creating a sea creature hands type of effect. You can try to catch mosquitos in the white web you’ve created. There’s no end to the fun that can be had with just that one marshmallow! If you want to, you can even lick your hands (eww)!

Ghost Hands Fun
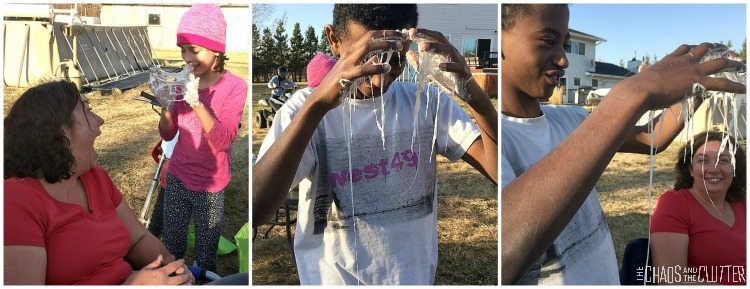
These pictures were taken before the kids got the idea to chase the adults around the yard, gooey hands outstretched, reaching for our hair! You can see Christie’s delight though in having taught my kids something that will surely be creating messes for me for years to come!

Note to parents:

This washes off easily. Just bring out a basin of warm, soapy water and your kids will lose their ghost hands and you won’t have to worry about them making sticky handprints in the house!

I wasn’t sure how this one would go over with some of our SPD (sensory processing disorder) kids but they loved it and there were no issues.

Join our free 5 part email series Sensory Solutions and Activities and get our Sensory System Behaviours Easy Reference Cards.
Minute to Win It Family Fun Night

Trampoline Games and Other Fun Trampoline Ideas

Waiting Rooms: a Parent’s Survival Guide

Filed Under: Crafts and Activities, Sensory Tagged With: sensory play

Paint Chip Sight Word Busy Bag

By Sharla Kostelyk

Busy bags do not have to only be enjoyed by pre-schoolers. They are a great tool for elementary aged students for reenforcing learning concepts and creating a quiet activity for them to do on their own.

Sight Words Busy Bag

Busy bags are one of the things I always bring with me in my little waiting room survival kit. They are also a good tool for the times when I need to work one-on-one with one of the kids and need something to occupy the other ones.

This particular busy bag is not only great for reenforcing the current sight words or spelling words that are being learned, it also costs nothing to make.

Materials needed:

  • paint chips (or card stock cut into rectangles)
  • permanent marker
  • large hole punch
  • medium or large resealable bag

In order to create these sight word cards, you will need two paint chips per word. Punch large holes in one of them. I used a heart shaped punch, but regular squares or circles would work just as well.

Next, lay the card with the holes punched in it on top of the other card so that you will be able to line up the words properly. Write lowercase letters on one card, through the holes made, and uppercase letters of the same word on the other. Place them all into a resealable bag for easy storage. This also makes them easy to transport.

Paint Chip Sight Word Match

The activity is much more challenging if you use different colours of paint chips for the two parts of the word so that the kids have to match them up based on the letters and not based on colour.

It’s a good idea to make some blank cards while you have the supplies out so that you are able to add more words as your child begins to expand their sight word repertoire.

Paint Chip Sight Word ActivityBusy Bags with Paint Chips

Waiting Rooms: a Parent’s Survival Guide

Teaching Strong Sentence Writing

If you are looking for more busy bag ideas, you may be interested in following my Activity Bags board on Pinterest.
Follow Sharla Kostelyk’s board Activity Bags on Pinterest.

Filed Under: Busy Bags, Crafts and Activities, Homeschooling

What to do With Old Socks

By Sharla Kostelyk

Do you have a pile of single socks because their pairs were eaten by the dryer or got lost or got a hole in them? I certainly do!

I pay the kids 10 cents a pair to find matches for them. They are surprisingly motivated by this so sometimes, the level goes down, but inevitably, the pile grows again and the basket I keep them in threatens to spill over. I used to go through them and find the ones that I haven’t seen the matches for in the longest time and throw them out. It always made me feel like I was wasting perfectly good socks to do that though, so I’ve come up with some other uses for them and now, none go to waste!

Do you have piles of unmatched socks? These household helps, crafts, games and activities are great ways for them not to go to waste!Image Copyright: / 123RF Stock Photo

What To Do With Old Socks:

-use them for rags.

-slip a sock onto the bottom of bottles of oil so that they don’t leave rings in your pantry.

-fill with rice and tie to make a homemade stress ball.

-use an elastic to secure a sock onto a yardstick or broom handle and use it to dust hard to reach places like ceiling fans and high ledges.

-put ice or ice packs in them.

-stop drafts by filling socks with other socks, rice or a filler and use them under doorways.

-wear them mismatched since that’s the style anyway!

-use them to make sock buns.

-turn it into an aromatherapy pillow.

-make an adorable no sew snake sock stuffie.

-make play donuts using men’s socks.

-do a fun math activity and play Socks in the Box.

-sew a sock monkey. Or take it up a notch and make a superhero sock monkey.

-make a hobby horse worthy of giving as a gift.

-make a bubble snake. These are really fun for the summer months!

Ideas for Old or Mismatched Socks

-sew an animal baby rattle.

-make puppets. Here’s a few examples: fox puppet, Olaf puppet, adorable and simple horse puppet, sock monsters, and silly sock puppets.

-make an Olaf snowman.

-make them into sock animals. The fuzzy owl is so cute!

-put on some music and do some sock mopping with your kids.

-make a sock pumpkin craft in the fall.

-play sock snowballs just for fun.

-make sock stuffed toys.

–craft with socks.

What about you? What do you do with your old or mismatched socks?

Filed Under: Crafts and Activities

Easy Button Hair Tie and Sock Bun

button hair ties

By Sharla Kostelyk

Have you ever wondered how to make a sock bun? This is the easiest way to do a sock bun. I’ll even walk you through it with a video.

Easy Button Hair Tie and Sock Bun (includes a video on how to make a sock bun)

My girls, particularly the older two are obsessed with sewing and designing. Miss Optimism, who is the oldest, can take a tablecloth and turn it into a pleated skirt in less than an hour!

Granola Girl is just starting to express an interest and only hand sews at this point, but she is the one who came up with this cute idea for a fabric hair tie. No jeans in the house were safe at that point as she wanted to make them for all of her friends!

For sock buns, you can use socks that have holes in the toes or a sock that’s lost its mate. This is perfect for reusing what would otherwise have been thrown out.

This button hair tie couldn’t be easier to make. All that is needed is an old pair of jeans, some thread and a few buttons.

Cut off a strip of fabric from the jeans and sew three (or more) brightly coloured buttons onto it. That’s it. You now have a cute hair tie.

easy button hair tie
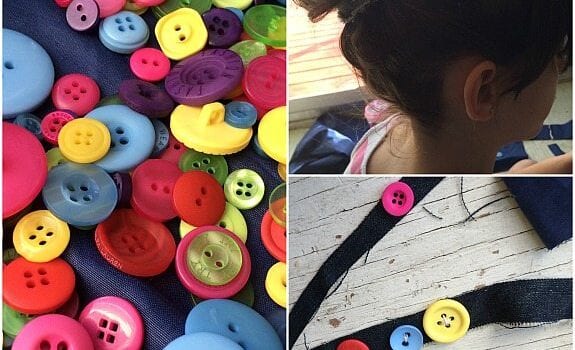
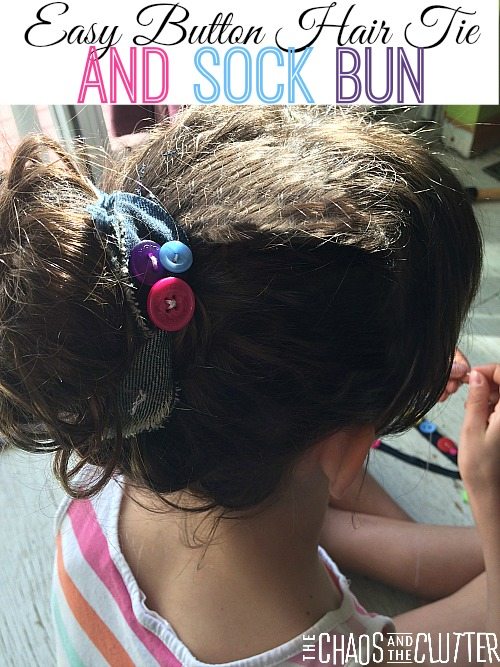
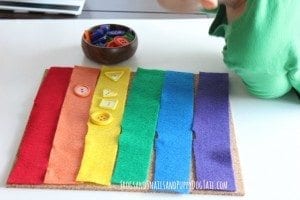
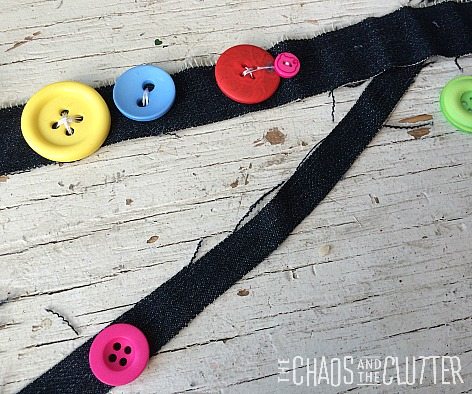
This is also great practise for sewing buttons!

The sock bun is a bit more complicated to explain, so I enlisted the help of Granola Girl and Miss Optimism to make a short video demonstrating exactly how to make a sock bun.

How to make a sock bun:

  1. Cut the toe end of the sock off and roll it up from the other side to create the sock bun.
  2. Make a high ponytail in the hair.
  3. Slip the sock bun onto the base of the ponytail.
  4. Spread the hair overtop and secure with another hair elastic.
  5. Gather the remaining hair and wrap around, securing with bobby pins.

All that is left at this point is to wrap the button hair tie around the sock bun to cover the stray pieces and give it a finished look. You can tuck the ends underneath or leave them out.

Since this project uses old jeans and old socks, preferably ones that are ripped or stained that might otherwise end up in the trash and old socks, the only cost is the buttons and thread, so this is a very frugal activity as well as a small lesson in re-using.

button hair ties
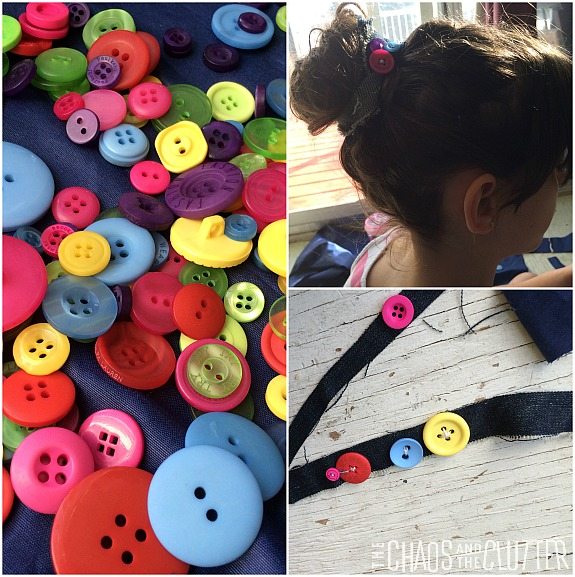
My girls have been proudly wearing them everywhere. Granola Girl says she feels like Rapunzel because when her hair is in the sock bun, it looks like she has so much hair!

Check out these other great ideas:

Dollar Store Minute to Win It Games Dollar Store Minute to Win It party

Create a Calm Down Kit for Your Child 

Filed Under: Crafts and Activities

Rainbow Busy Bags

By Sharla Kostelyk

We love busy bags! I use them all the time at home with our youngest while I am homeschooling the older ones and pack them to take with me whenever we are going to an appointment and may be spending time in a waiting room. We also use busy bags when traveling and my oldest daughter includes them in her Babysitting Kit.

7 Rainbow Busy Bags

I also love bright colours, so these rainbow busy bags are some of my favourites! I’ve included a variety of ideas some of which take moments to prepare and some which take a bit more prep time. Two things they do have in common though is that they are colourful and that they will be well loved by your little ones!

PomPom Rainbow Busy Bag from The Pleasantest Thing

PomPom Rainbow Busy Bag

Magnetic Shape Sticks Busy Bag from here on The Chaos and The Clutter

Magnetic Shape Sticks Busy Bag

Rainbow Lacing Busy Bag from Coffee Cups and Crayons

Rainbow Lacing Busy BagRainbow Color Shape Match Up from Frogs and Snails and Puppy Dog Tail

Rainbow Color Shape Match Up

Rainbow Color Sorting Busy Bag from Coffee Cups and Crayons

Rainbow Color Sorting Busy BagFelt Color Sorting Busy Bag from Powerful Mothering

Felt Color Sorting Busy Bag

Fine Motor Straw Necklace from Mess for Less

Fine Motor Necklace Making

You can also find more of our family’s easy Rainbow Busy Bags in our 7 Busy Bags for Teaching Colors and 7 Busy Bags Made with Paint Chips or by following my Activity Bags board on Pinterest.

7 Busy Bags with Paint Chips

Filed Under: Busy Bags, Crafts and Activities

Magnetic Shape Sticks Busy Bag

By Sharla Kostelyk

This is a really easy busy bag to assemble and has great bright colours. The sticks can be lined up to create a rainbow or they can be used to make shapes.

Rainbow Magnetic Stick Busy Bag

To make this as simple as possible, you can buy coloured popsicle sticks, but you can also extend the activity by using plain popsicle sticks and having your child help you paint them. Once dry, you can then create the busy bag.

Materials needed:

  • popsicle sticks
  • adhesive magnet stip, cut into smaller pieces
  • mini cookie sheet or the lid from a tin container
  • large resealable bag
  • optional: glue to further secure the magnets

Magnetic Shape Sticks Busy Bag
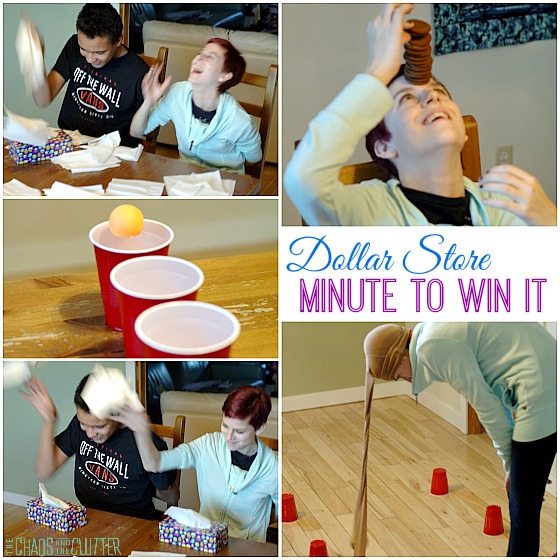
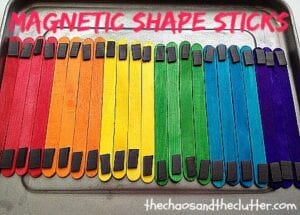
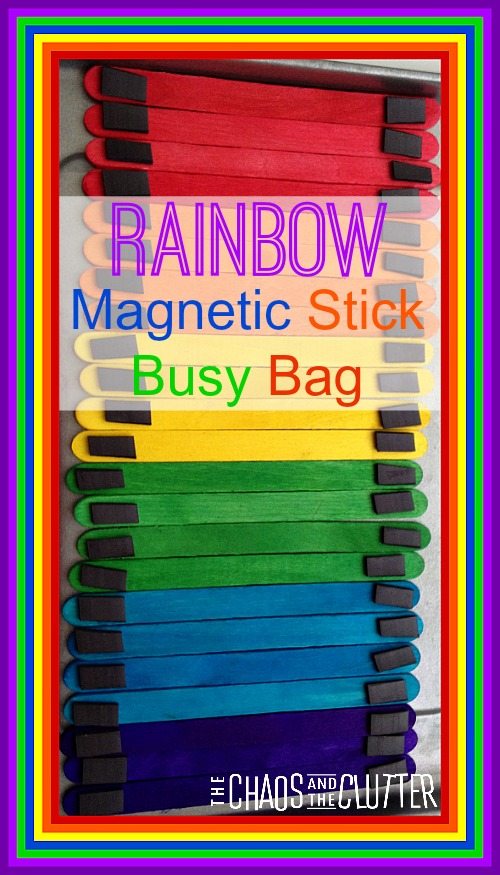
To create this busy bag, simply attach magnet pieces to each end of the popsicle sticks. I used the adhesive kind of magnet strip, but I found that I still needed to glue them in place as the adhesive didn’t hold well enough.

Place the now magnetic sticks in a large resealable bag with a mini baking tray or the lid from a tin container. The sticks can now be used to create shapes and patterns. They can also be used as tally marks when counting or playing other games.

Magnetic Shape Sticks
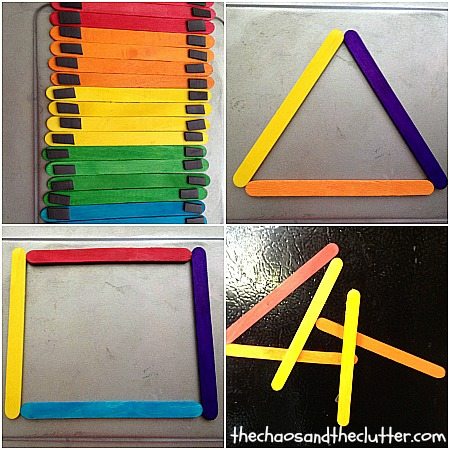
They can be used to play on the fridge or any other magnetic surface such as a white board or an outside door. This is a great teaching tool for reinforcing shape and colour concept with preschoolers.

Of course, as with all kids’ activities, caution and proper supervision should be used. The magnetic pieces could be a choking hazard to young children.

If you are looking for more busy bag ideas, you may be interested in following my Activity Bags board on Pinterest.

Follow Sharla Kostelyk’s board Activity Bags on Pinterest.

3 Busy Bags with Popsicle Sticks

5 Busy Bags with Pipe Cleaners

7 Busy Bags for Learning Colours

7 Busy Bags with Paint Chips

Filed Under: Busy Bags, Crafts and Activities

  • « Go to Previous Page
  • Page 1
  • Interim pages omitted …
  • Page 20
  • Page 21
  • Page 22
  • Page 23
  • Page 24
  • Interim pages omitted …
  • Page 35
  • Go to Next Page »

Primary Sidebar

Categories

We are a participant in the Amazon Services LLC Associates Program, an affiliate advertising program designed to provide a means for us to earn fees by linking to Amazon.com and affiliated sites.

Copyright © 2026 • The Chaos and the Clutter • Site Design by Jeni @ The Blog Maven

Return to top of page

Copyright © 2026 · Chaos and the Clutter 2.0 on Genesis Framework · WordPress · Log in