• Skip to primary navigation
  • Skip to main content
  • Skip to primary sidebar
  • Home
  • About
  • Contact
  • Privacy + Terms
  • Affiliates

The Chaos and the Clutter

  • Facebook
  • Twitter
  • Pinterest
  • Google Plus
  • RSS
  • Email
  • School at Home
  • Sensory
    • Sensory Processing Disorder
    • Awesome Sensory Play Activities
      • Sensory Bins
      • Sensory Bottles
      • Sensory Bags
  • Family Games
    • Minute to Win It Games
  • Special Needs Parenting
    • Childhood Anxiety
    • Reactive Attachment Disorder
    • Sensory Processing Disorder
  • Store
  • Course Login

Sharla Kostelyk

Bubble Wrap Easter Eggs

By Sharla Kostelyk

We are loving doing Easter crafts. The kids are planning to decorate the house for our annual Easter bash. So far, they have their Tape Resist Easter Crosses ready to hang up and they were eager to create something else to add to the decor.

Bubble Wrap Easter Eggs

To create these, you will need:

  • paper (we used fingerpaint paper)
  • paint (we used acrylics)
  • paintbrushes
  • bubble wrap
  • scissors

I bought our bubble wrap and fingerpaint paper at the dollar store which made this a very inexpensive project as well.

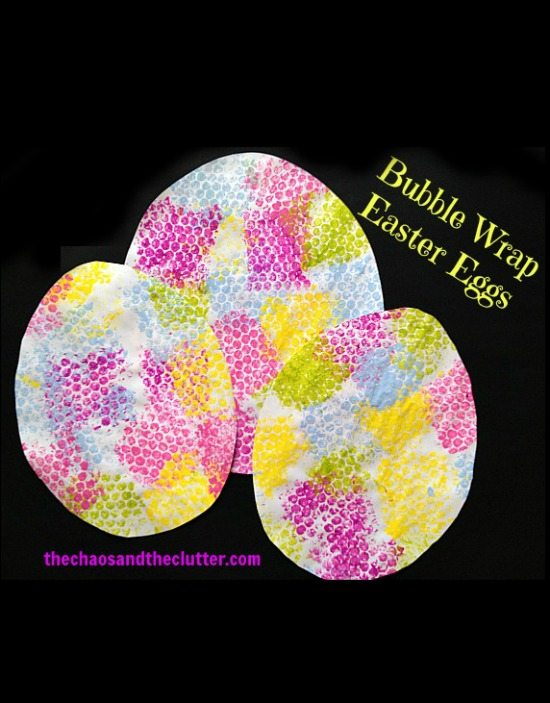
I cut the bubble wrap into squares. We began with the full papers. The kids painted the squares of bubble wrap using paintbrushes and then stamped them onto their papers. Some of the younger kids had a hard time managing to hold the square of bubble wrap and paint it at the same time so I painted for them and they stamped.

Bubble Wrap Easter Egg Craft
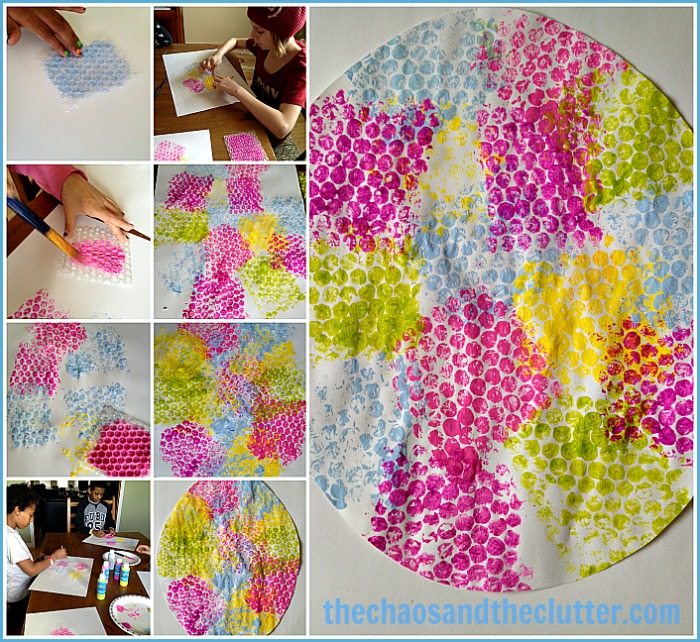
After the paint dried, we cut the papers into the shape of large Easter eggs. It was a challenge for some of my sensory seeking kids not to give in to the temptation to press down too hard and pop the bubbles in the bubble wrap! They waited until we were finished with the squares before they gave in to the urge to pop all the bubbles.

If you are looking for other Easter ideas, you may be interested in following my Easter board on Pinterest.

Filed Under: Crafts and Activities

Cubism Art for Kids

By Sharla Kostelyk

A few weeks ago, The Husband and I went away on a getaway to Arizona. While we were there, we visited a Celebration of Fine Art, which was an amazing display of 100 artists. Many of the artists were there creating as we watched and we were able to ask questions and find out more about their process. It was interesting and inspiring!

One of the artists we spoke to was William Barnhart. We were in awe of one of his sculptures and found his other work quite fascinating. This artwork is something our family worked on together and it was inspired by his style of paintings. He uses black outlines and bright colours to create almost a stained glass effect. He has done figure studies and this is evident in his work. We went with those concepts to create our own artwork inspired by his.

Cubism Art for KidsI bought black puffy fabric paint and a large foam board at the dollar store and lay out some designs using the puffy paint. In keeping with the art I was inspired by, I made sure there were some figures that could be made out but kept most of it ambiguous.

cubism art beginning stage
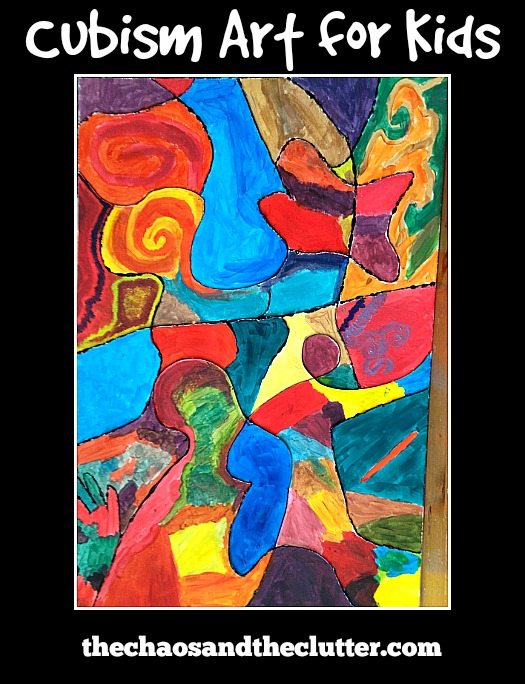
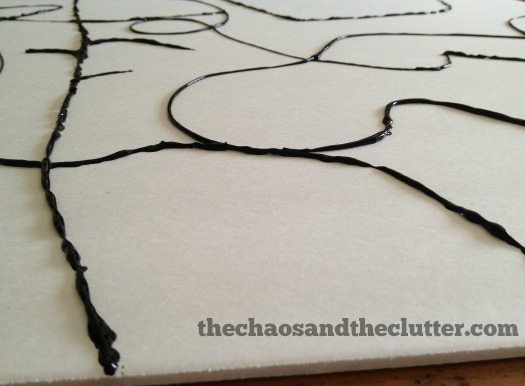
We let the puffy paint dry overnight because I wanted to be absolutely sure it didn’t smudge. When we were ready to complete our piece, it happened to be a Saturday, so even The Husband got in on the painting. It was a very relaxing family morning and we are so pleased with the results!

The only instruction we gave the kids was to use bright colours and their imaginations. We used acrylic paint for our artwork but tempera or oil would work as well. We let them experiment with mixing their own colours. Sometimes they chose to paint an entire area between the black borders one colour while other times they created their own colour lines within one section.

Creating Cubism Art with Kids
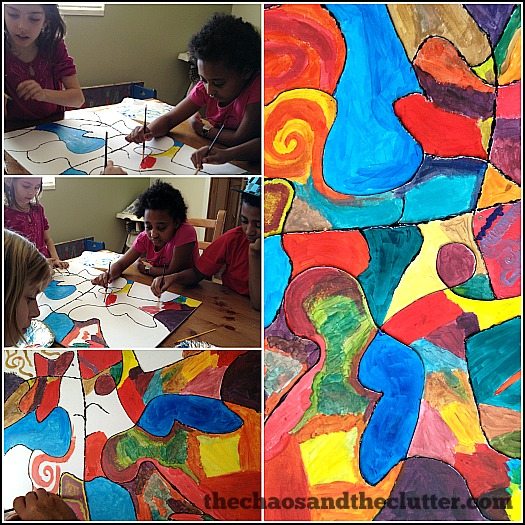
I love the bright colours! We are planning on hanging this piece in our entryway and are quite proud of our first family collaborative artwork!

Filed Under: Crafts and Activities

Tape Resist Easter Cross

By Sharla Kostelyk

I am so happy with the way these turned out! I imagined them a certain way in my head but my ideas don’t always translate that well in reality so I was pleasantly surprised when these were even better than I had envisioned!

Tape Resist Easter Art Project
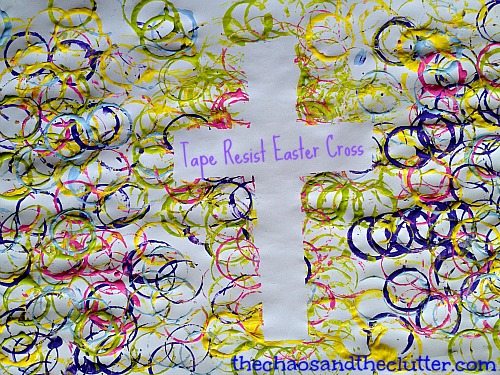
This Easter art project is very easy to make. Materials needed:

  • paper (we used fingerpaint paper)
  • plastic eggs
  • masking or painter’s tape (we used masking tape)
  • paint (we used acrylic)

Using the masking or painter’s tape, mark a cross on your paper. Open the plastic eggs and dip one half in paint. It is easiest to use the same colour egg as paint so that you can re-use without having to wash the paint off in between. Stamp the egg onto the paper. When the paint is dry, carefully revealing a cross underneath the tape.

Tape Resist Easter Cross

This is one of those sneaky activities where your kids are learning and not realizing it. It is a great colour matching activity as they can dip the same coloured egg into the paint colours. It’s also excellent fine motor practise using the rounded eggs.

These pictures make beautiful decorations for Easter. My kids really enjoyed making these. Snuggle Puppy asked right away if we could hang them up for people to see at Easter time.

We used medium sized plastic eggs for our art but you could easily use the large or small size or a combination of sizes to create different looks.

This Easter art activity would be great to do in a group such as in a Sunday school class or at an Easter celebration. If you are looking for similar activities, you may want to follow my Christ-centered Easter board on Pinterest.

Filed Under: Crafts and Activities

Surviving Public Bathrooms with a Child with Sensory Issues

By Sharla Kostelyk

For the parents of a child with sensory needs, a trip to a public restroom is like walking into a minefield. The hand dryers that sounds like jet engines, the automatic flush toilets that are equally as loud, the automatic sinks, the paper towel dispensers…can all make for a very difficult experience. I’m guessing that whoever designed these places did not have a child with sensory issues!

6 Tips to Surviving Public Bathrooms with a Child with Sensory Issues

For parents of children with SPD (sensory processing disorder) or even kids who just have sensory issues, the fear of those gosh-darn-it-just-plain-awful public toilets are enough to have you avoiding outings altogether.

For children who are sensory avoidant (sensory defensive), these bathrooms are a nightmare. With the loud noises, the strong wind that comes out of the hand dryers that literally moves the skin like some kind of futuristic science experiment, the unexpected surprises thanks to so many things being automated, the potpourri of smells, and the glare of the lights, it’s no wonder for them they can be a very scary place.

For children who are sensory seeking, these bathrooms have the opposite effect. They are like a playground of sensory stimulation with their sights and sounds and smells! In these cases, the trips to the bathroom are more of a nightmare for the parents than for the child.

Lucky me (!), I have kids with both types of issues so those trips to restrooms in malls, airports, restaurants, recreation centres, theatres, grocery stores, museums, and other locations are something I used to dread. Over time, I have gathered some tricks and secrets that have made this less of a challenge for our family.

public bathroom tips for children with sensory issues

Here are some tips that I’ve acquired over the years to make these trips to public washrooms a bit more bearable:

Avoid them when possible

This may seem like an obvious solution, but it is a highly effective one. Whenever possible, avoid using the restroom in public buildings. This means not only reminding all of your children to use the washroom before you leave home but also being sure to use it yourself just before leaving. There is no way to ensure that you will never have to use a public restroom, but using the “facilities” at home before going out will at the very least cut back the amount of times you have to face the public ones.

Covering the automatic flush sensor

Carry small stickers or post it notes with you in your purse to cover the automatic flush sensor. This way, your child won’t have to fear the terrible noise going off without warning and can pee in peace!

Familiarity helps

Whenever possible, visit public restrooms that are familiar to you and your child. This will make it easier both because it is familiar and because you can both be better prepared and know what to expect. It’s not always a possibility but if you can always shop at the same grocery store and park near the same entrance to the mall, you can increase the chances that the restrooms will be ones your child is more comfortable with.

Giving them advance warning

Talk to your child ahead of time about what they can expect in a public washroom. Let them know that you will be there with them, supporting them and helping them in any way you can. Encourage them to talk openly with you about which parts you find the most challenging. Address their fears. Brainstorm ideas together for ways to avoid or minimize those challenges.

For sensory seekers, lay out the expectations before you go in. Dayna from Lemon Lime Adventures says that she tells her son that he can only touch things one time. Having expectations such as these laid out beforehand will lessen problems while there. Another suggestion would be for kids to keep their hands in their pockets.

Come prepared

Other than bringing small stickers or post it notes for covering the automatic flush sensors (which are also good for covering the sensors on the taps and hand dryers as well), you can also bring sound dampening earmuffs or noise blocking headphones to keep out the loud and sudden noises that can occur. Even if you are able to cover the sensor on the toilet your child is using, you can’t cover the sensors on the toilets other people are using! Bring hand sanitizer or antibacterial wipes to wash up with so that you can avoid the sink area entirely. This not only allows you to avoid the water, but the powerful dryers as well.

Acknowledge the challenges and give praise

Surviving that minefield is a praise-worthy accomplishment for both you and your kiddo. Acknowledge that you know it wasn’t easy for them and are proud of them for their efforts.

Thankfully, the terror that public washrooms used to hold for my kids is losing its grip as they get older and as they get better skills under their belt for dealing with their sensory needs.

Join me for a free 5 part email series, Little Hearts, Big Worries offering resources and hope for parents.


If you have a child with sensory issues, you may be interested in reading:

Money Saving Sensory Solutions

Must Haves for Kids with Sensory Issues

Create Your Own Anti-Anxiety Kit for Children

Filed Under: Sensory, Special Needs Parenting

Easter Egg and Bunny Sensory Bin

By Sharla Kostelyk

I like to keep a stash of coloured rice on hand for things just such as this. Since I had already dyed the rice, I was able to throw this sensory bin together really quickly.

Easter Egg and Bunny Sensory Bin
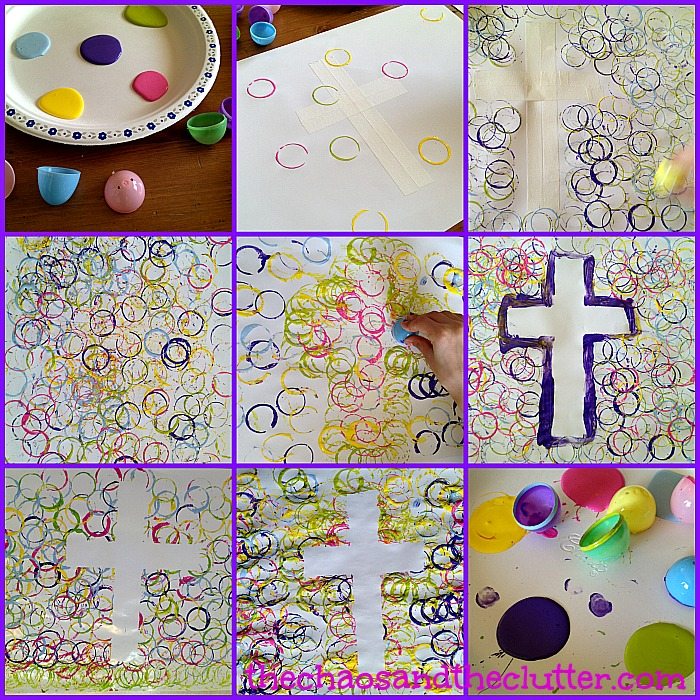
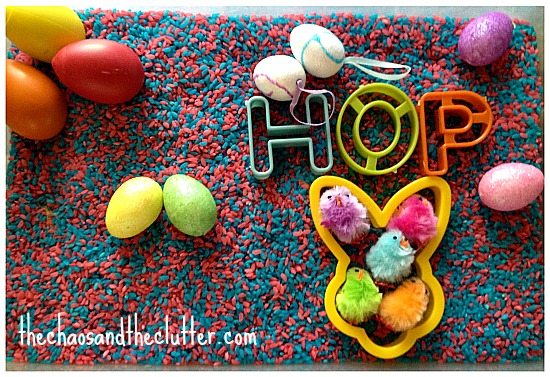
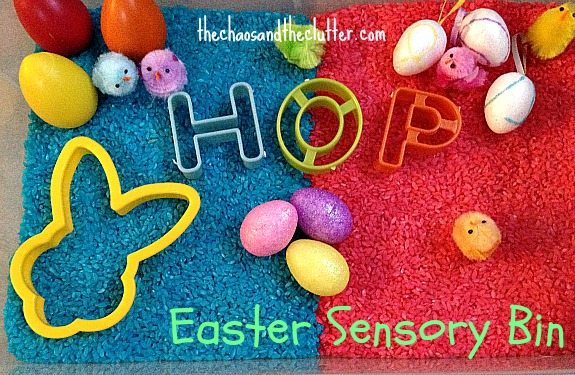
To make this Easter sensory bin, I used blue and pink rice, egg shakers (a really great sensory tool!), glittered foam eggs, styrofoam eggs, fuzzy chicks, a bunny cookie cutter, and cookie cutters to spell out the word “HOP”.

The kids enjoyed this bin but it was Granola Girl who took the biggest liking to it. She especially seemed to like to group things by colour. She also liked to keep the blue and pink rice on their respective sides. Unfortunately, I didn’t get a picture after any of her sessions with the bin. I did manage to get this picture of the bin after Snuggle Puppy finished playing with it. He obviously had no issues with mixing the different colours of rice!

Hop Easter Sensory Bin

You may also want to check out our Christ-centered Easter sensory bin from last year. If you are looking for more sensory bin ideas or information, you may be interested in my book and by following my Sensory Bins board on Pinterest.

The Ultimate Guide to Sensory Bins

Join me for a free 5 part email series Sensory Solutions and Activities and get your Sensory System Behaviours Easy Reference Cards.

Filed Under: Sensory, Sensory Bins Tagged With: sensory bin, sensory play

Charlie & the Chocolate Factory Notebooking Printables

By Sharla Kostelyk

Our family really enjoys Roahl Dahl books including Charlie and the Chocolate Factory. It is such a fun book to do as a read-aloud. We read it earlier this year and did a small study to go along with it.

Here are a few ideas to accompany the book Charlie and the Chocolate Factory:

Homeschool Share has a Free Chocolate Unit Study.

We made a Candy Sensory Bin just for this unit.

Making our chocolate playdough recipe would be a great activity to go along with this book.

This chocolate tasting activity from Homegrown Friends looks like it would be fun.

The Imagination Tree has Willy Wonka and the Chocolate Factory playdough.

I have created a free 15 page printable pack to accompany a Charlie and the Chocolate Factory unit study. It contains notebooking pages, a word search, a vocabulary words worksheet, and some fun writing activities.

By downloading these Charlie & the Chocolate Factory Notebooking Pages printables, you are agreeing to the Terms of Use.

Charlie & the Chocolate Factory Printable Notebooking Pages PackIf you are looking for other activities to accompany book studies, you may be interested in following my Book Activity Ideas board on Pinterest.

Filed Under: Homeschooling, Printables

  • « Go to Previous Page
  • Page 1
  • Interim pages omitted …
  • Page 98
  • Page 99
  • Page 100
  • Page 101
  • Page 102
  • Interim pages omitted …
  • Page 128
  • Go to Next Page »

Primary Sidebar

Categories

We are a participant in the Amazon Services LLC Associates Program, an affiliate advertising program designed to provide a means for us to earn fees by linking to Amazon.com and affiliated sites.

Copyright © 2026 • The Chaos and the Clutter • Site Design by Jeni @ The Blog Maven

Return to top of page

Copyright © 2026 · Chaos and the Clutter 2.0 on Genesis Framework · WordPress · Log in