• Skip to primary navigation
  • Skip to main content
  • Skip to primary sidebar
  • Home
  • About
  • Contact
  • Privacy + Terms
  • Affiliates

The Chaos and the Clutter

  • Facebook
  • Twitter
  • Pinterest
  • Google Plus
  • RSS
  • Email
  • School at Home
  • Sensory
    • Sensory Processing Disorder
    • Awesome Sensory Play Activities
      • Sensory Bins
      • Sensory Bottles
      • Sensory Bags
  • Family Games
    • Minute to Win It Games
  • Special Needs Parenting
    • Childhood Anxiety
    • Reactive Attachment Disorder
    • Sensory Processing Disorder
  • Store
  • Course Login

Sensory Bins

Lemonade Sensory Soup

By Sharla Kostelyk

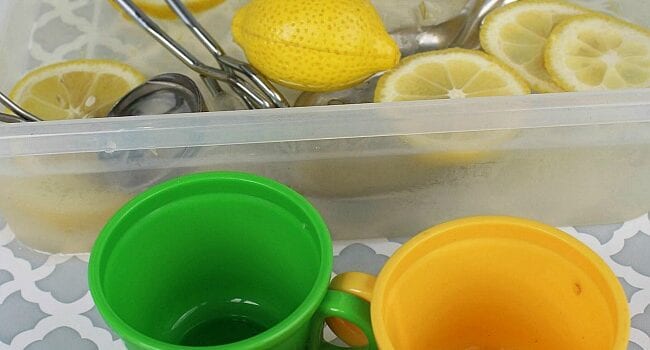
Have the feeling of summer any time of the year with this lemonade sensory bin water play activity. Give kids the opportunity to explore through many senses. In the colder months, you can bring a bit of sunshine in by creating this bin inside. And in the Spring or Summer, this is a great sensory play activity for outside. Lemonade Sensory Bin #sensorybins #sensorybin #sensoryplay #sensory #sensoryactivities
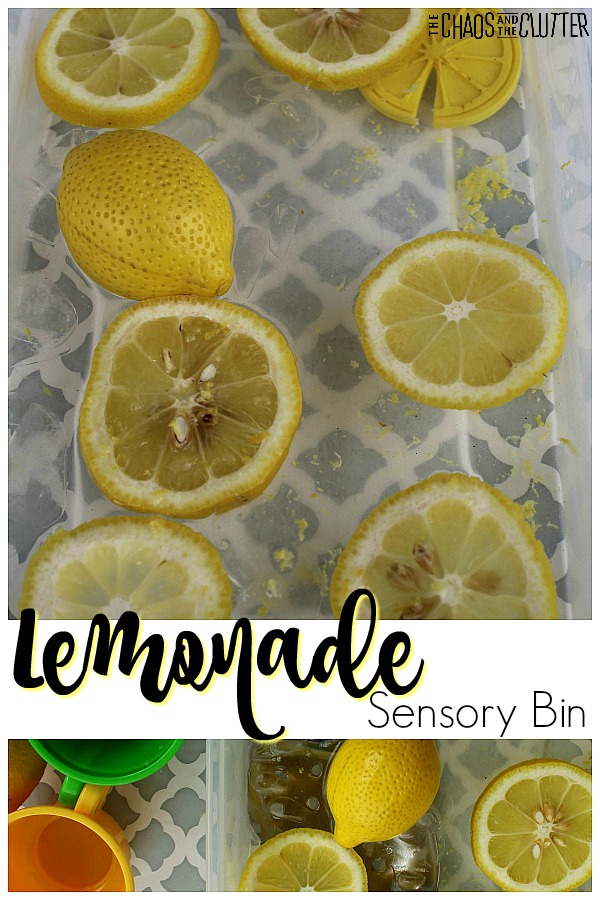
This lemonade sensory bin offers olfactory, tactile, gustatory, and visual sensory feedback.

Olfactory (smell) – Kids can smell the lemons.

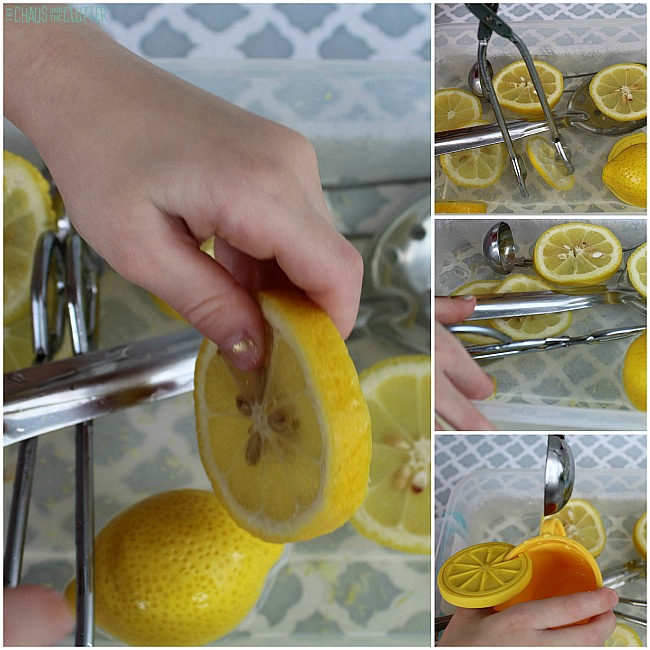
Tactile (touch) – Children have the opportunity to explore temperature with the cold of the ice. They can discover textures with the feel of the outside of the lemon contrasting with the inside, the seeds, the water, the ice, and the added kitchen tools.

Gustatory (taste) – This is a sensory activity where tasting is encouraged. Some kids will love the sour taste while others will not. But this gives them the chance to talk about their thoughts on the taste of the lemons.

Visual (sight) – The bright colour of the lemons against the water really pops. Most children will find this activity visually appealing. 

Lemonade Sensory Bin:

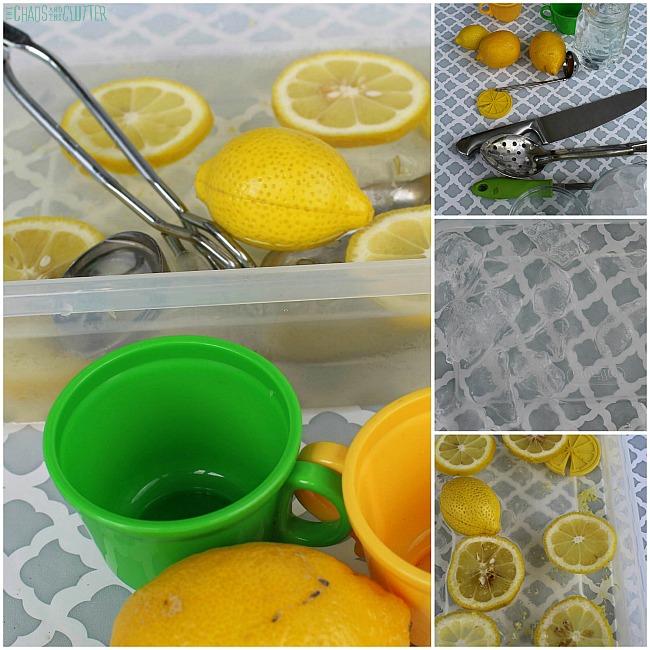
You’ll want to prepare this sensory bin immediately before your child plays with it so that the ice doesn’t melt before they begin to play.

Materials needed:

  • lemons
  • ice cubes
  • water
  • tongs
  • ladle
  • slotted spoon
  • plastic cups
  • bin
  • optional: zester
  • play food lemons or play lemon slices
Directions:
  1. Pour several cups of water into a plastic container.
  2. Slice several lemons. (This step should be done by an adult or by an older child with adult supervision.)
  3. Add a few cups of ice cubes to the bin.
  4. Float the lemon slices in the bin.
  5. If desired, you can zest some lemon peel into the water. This will add more scent.
  6. Add spoons, ladles, tongs, cups, or other kitchen gadgets to the bin.
Invite your child to play in the bin. They can touch, squeeze, smell and even taste the lemon slices. Kids can pretend to be making lemonade or lemon soup. playing in Lemonade Sensory Bin
The opportunity to taste and smell the lemons will also provide a chance for vocabulary practise as they learn or reinforce words like “yellow”, “sour”, “fresh”, “bright”, “cold”, and more.
This sensory invitation to play activity is great for kids of all ages. As with all sensory play activities, adult supervision should be used.
Check out some of our other olfactory sensory activities:
Coffee Sensory Bin Coffee Sensory Bin at The Chaos and The Clutter
Calming Lavender Sensory Bin Water Play Lavender Sensory Bin
Peppermint Scented Playdough Invitation to Play 

Filed Under: Sensory, Sensory Bins Tagged With: sensory play

Birthday Cake Sensory Bin

By Sharla Kostelyk

You don’t have to wait for a birthday for the fun to begin. This birthday cake sensory bin allows for a party anytime! Birthday Cake Sensory Bin #sensorybins #sensoryplay #sensory #kidsactivities
Kids will love to pretend they are baking and decorating. The birthday theme is also a lot of fun. Who doesn’t love a birthday?!

Birthday cake sensory bin:

Materials needed:
  • 1/2 cup of shampoo
  •  2 Tablespoons of water
  • 1 cup of flour
  • sprinkles
  • silicone cupcake molds, small cake pans, muffin tins, and small dishes for forming “cakes”
  • washi tape
  • small craft sticks (popsicle sticks)
  • battery operated votive candle
  • tissue paper in orange, yellow or red
  • baking dish or a plastic bin with a lid
  • optional: birthday cake scented candle or wax melt
Make the birthday cake dough:
  1. Add one cup of flour, 2 Tbsp. of water and 1/2 cup of shampoo to a medium bowl.
  2. Stir. As the ingredients start to bind together, finishing mixing with your hands.
  3. If the dough feels sticky, you will add a little more flour, no more than 1/4 cup.
  4. Test the dough for stickiness. If it is still sticky, add a little more flour and continue to mix until it doesn’t stick to your hands.
Make pretend candles:
  1. You will need a length of washi tape that can cover a craft stick on both sides.
  2. Allow the tape to slightly overlap the craft stick and place small squares of tissue paper on the top of the stick. You can layer orange and yellow tissue paper to resemble a flame.
  3. Fold the tape up to cover the other side of the craft stick and secure the tissue paper.
  4. Trim the edges of the tape on the sides of the craft stick using scissors.
  5. Cut the tissue paper to resemble a flame.
  6. You can use the play candles for other activities as well.How to make play candles
Assemble the birthday cake activity bin:
  1. Pour a bottle of sprinkles in the bottom of the dish or storage container you plan to use.
  2. Add the birthday cake dough.
  3. Place small dishes like play food dishes, silicone cupcake molds, and small baking dishes in the bin.
  4. Add the fake candles and a battery operated votive candle.

Sensory play benefits of this bin:

Invite your child to explore the sensory activity. They can form mini cakes or cupcakes, decorate them with sprinkles and add candles to serve birthday cake.
This is imaginative play at its finest. Children will also benefit from the sensory experiences. The squeezing together of the dough provides proprioceptive feedback. They will also be receiving visual and tactile sensory input. If you add the optional scented candle or wax melt, they will also be engaging their olfactory sensory system. 

Join me for a free 5 part email series Sensory Solutions and Activities (just pop your email into the box below) and get a printable list of 175 Great Sensory Ideas.

These other sensory bins may also interest you:
Birthday Party Sensory Bin 
Cloud Dough Sensory Bin 

Filed Under: Sensory, Sensory Bins

Bee Life Cycle Sensory Bin

By Sharla Kostelyk

A bee life cycle sensory bin is a hands-on way to reinforce learning for kids on this topic. You can use this bin in a science unit or at a sensory station in your home or classroom.Bee Life Cycle Sensory Bin #sensorybin #sensoryplay #beelifecycle #kidsactivities #science
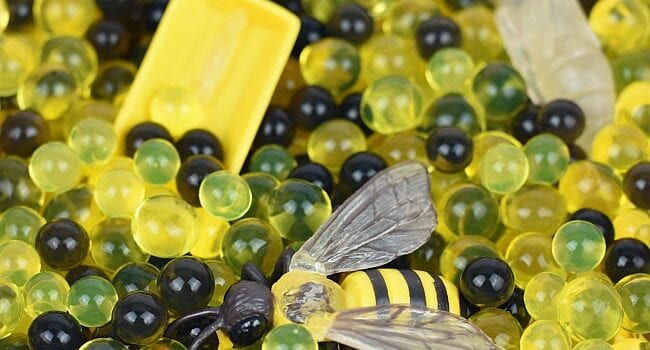
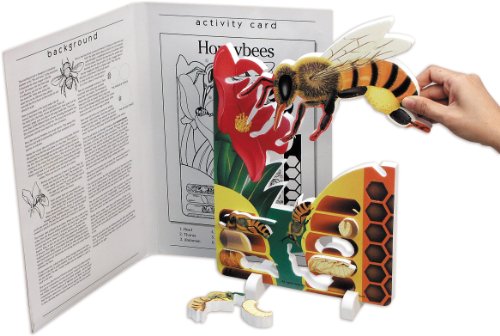
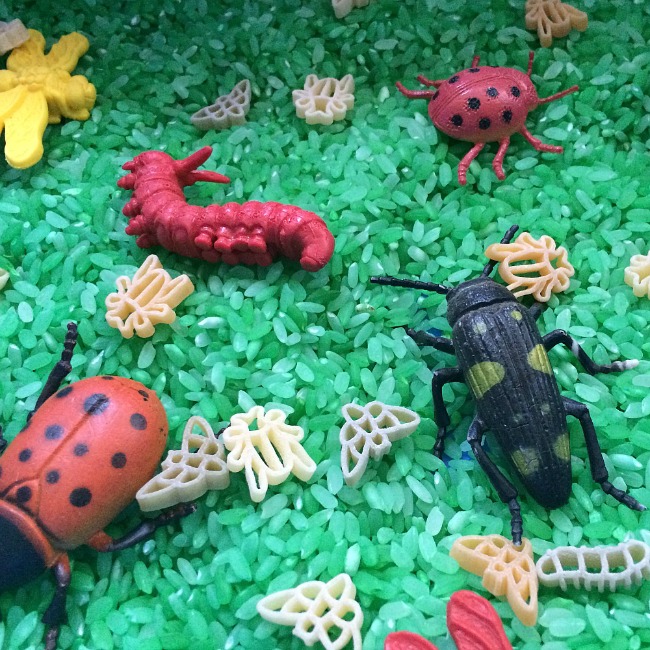
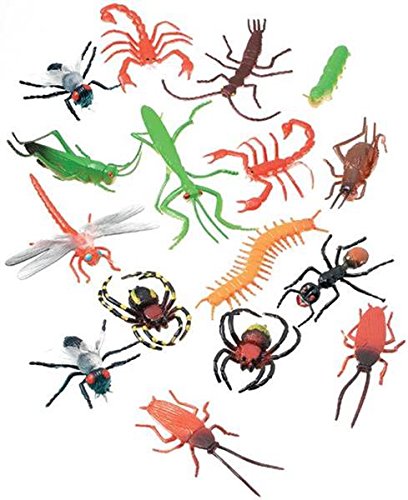
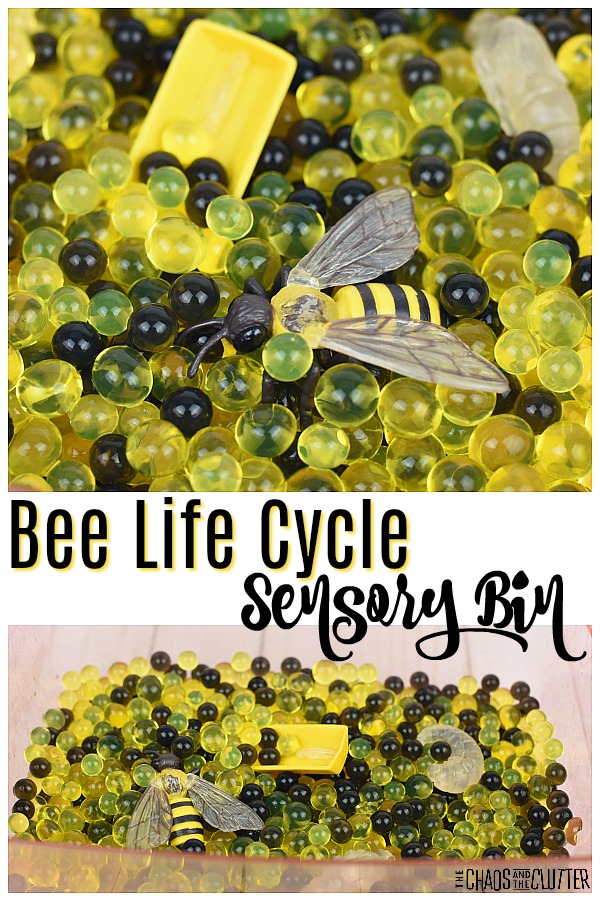
Walk kids through the transformation of a bee from egg to larva to pupa to a mature honey bee. You can either add everything to the bin all at once, or you can add them in after the amount of time they would happen in real life.

In that case, you would add the egg on the first day and it would “hatch” into the larva after 3 or 4 days, so you could add the larva on that day. The next stage takes between 6 and 11 days depending on whether the bee is a future queen or a worker bee.

Bee Life Cycle Sensory Bin:

Materials needed:

  • plastic bin
  • black and yellow water beads
  • the life cycle of a honey bee pack
  • optional: small jar of honey to touch, taste, and smell

Life Cycle of a Honey BeeLife Cycle of a Honey BeeLife Cycle of a Honey BeeYellow Water BeadsYellow Water BeadsYellow Water BeadsBlack Water BeadsBlack Water BeadsBlack Water Beads

  1. Place the water beads in a plastic container. I used three packs of yellow beads and one pack of black water beads.
  2. Add water.
  3. Allow the water beads to expand fully (this will take several hours) before adding the items from the life cycle of a bee package.

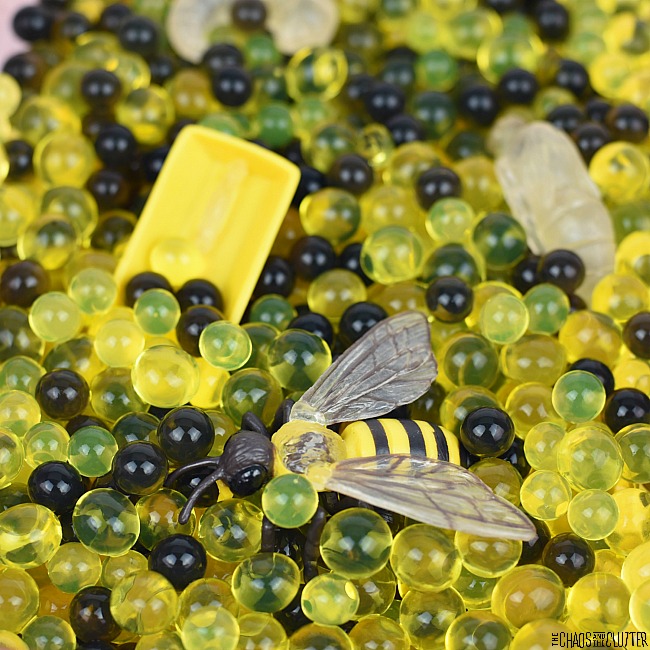
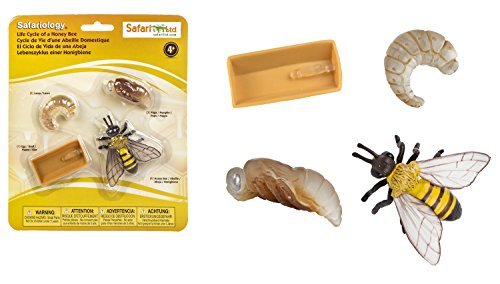
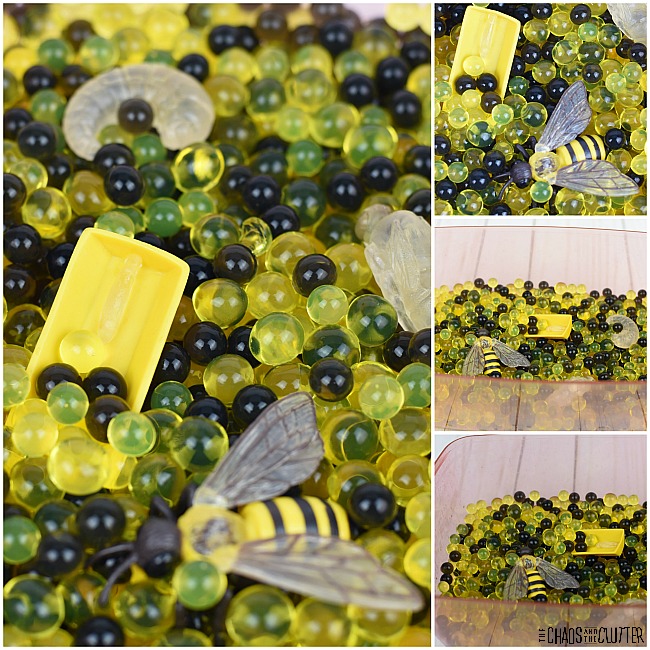
Kids can use their hands to dig in the bin and touch each of the stages in the honey bee cycle. If you’ve included some honey, they will also be able to use their sense of taste and smell to enhance their learning.

This sensory bin engages the visual and tactile sensory systems and if honey is included, it also engages the olfactory (smell) and gustatory (taste) systems as well. This is hands-on learning at its best.

If you’re doing a learning unit on bees, here are some other great resources to check out:

Free Bee Life Cycle Printables from Homeschool Preschoool

How to Make a Bee Habitat from Natural Beach Living

Printable Life Cycle of a Bee Layer Book from Passionate Curiosity

Books that would go along well with this unit:

Are You a Bee?Are You a Bee?Are You a Bee?Book Plus Bee Life Cycle Foam ModelBook Plus Bee Life Cycle Foam ModelBook Plus Bee Life Cycle Foam ModelThe Life and Times of the HoneybeeThe Life and Times of the HoneybeeThe Life and Times of the HoneybeeThe Life Cycle of a HoneybeeThe Life Cycle of a HoneybeeThe Life Cycle of a HoneybeeThe Bee BookThe Bee BookThe Bee BookFive Bizzy Honey BeesFive Bizzy Honey BeesFive Bizzy Honey Bees

Check out some of our other science related sensory bins:

Solar System Sensory Bin Solar System sensory bin glows in the dark

Insect Sensory Bin 

Filed Under: Sensory, Sensory Bins Tagged With: sensory bin, sensory play

Seek and Find Sensory Bin

By Sharla Kostelyk

This seek and find sensory bin is so simple and yet, so much fun. Kids will love searching through to find their hidden items. This Seek and Find Sensory Bin is so much fun for kids! #sensorybins #sensoryplay #sensory
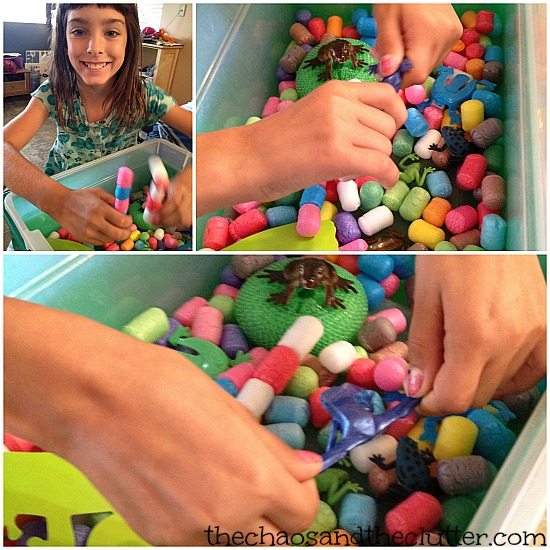
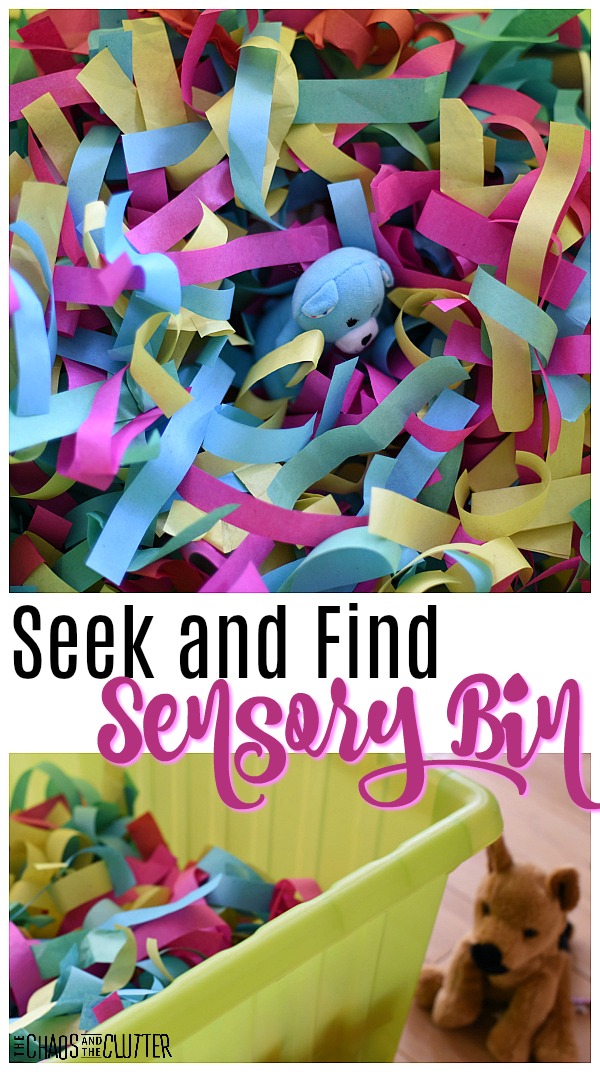
For younger kids, this sensory bin can almost mimmic a peek-a-book type of effect. You can drop a toy in and it disappears until they find it and it reappears again.

Seek and Find Sensory Bin:

Materials needed:

  • multicoloured paper shreds (we actually got ours from inside those confetti popper things, but you can cut or tear tissue paper, use paper scraps, or leftover Easter grass)
  • small toys or stuffed animals
  • plastic bin 
  1. Fill a plastic bin with paper shreds.
  2. Toss in a few favourite toys or stuffed animals.
  3. Have your child go “seek and find” the toys.
  4. Throw the toys back in and repeat!

Seriously, that’s it! I love the simplicity of this sensory bin.

You don’t need to put too much thought into this. You don’t need expensive sensory items. This is just a wonderful, simple activity that kids will enjoy.

For younger kids, this bin is a great way to reinforce the concept of object permanence. They see the object before it goes in, then it disappears under the paper shreds, but they are able to find that it still exists when they find it again.

It has that peek-a-boo type of factor that kids just love!

As long as this is used with supervision and the toys used are large enough not to be a choking hazard, this sensory bin is safe for use with babies and toddlers.

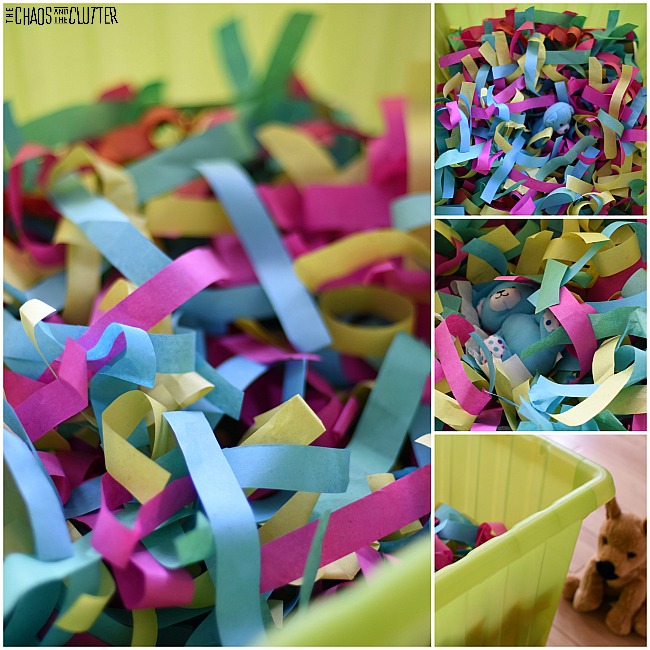
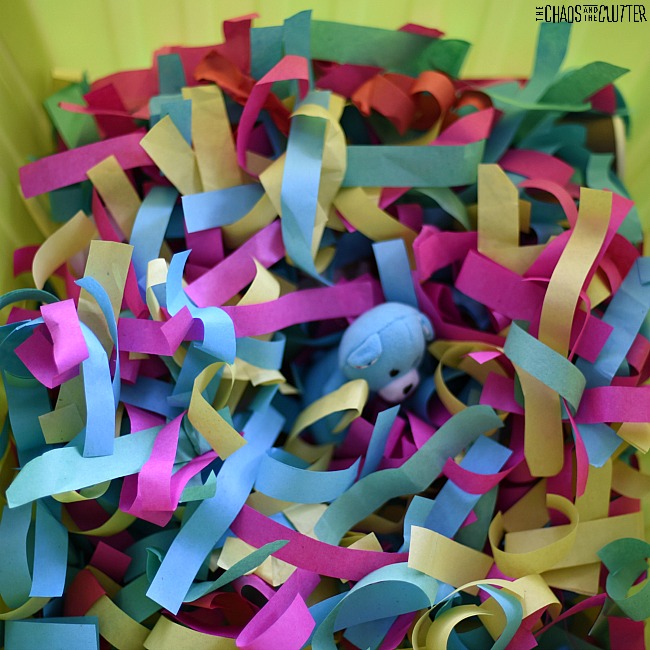
This activity engages the visual and tactile sensory systems. If you place the bin on the ground and your child bends over to go through it looking for their toy, then it also engages the vestibular sensory system. And the crunching of the paper can provide auditory input as well.

Check out some of our other sensory bins:

Seaside Sensory Bin 

Calming Lavender Sensory Bin Calming Lavender Sensory Bin

Sky Sensory Bin 

Filed Under: Sensory, Sensory Bins Tagged With: sensory play

Insect Sensory Bin with Pasta

By Sharla Kostelyk

This Insect Sensory Bin is a great addition to a preschool unit on insects or Spring. It has a variety of textures and colours. This adds to both the visual and tactile sensory experiences.

Insect Sensory Bin #sensory #sensoryplay #sensorybins #sensoryscience
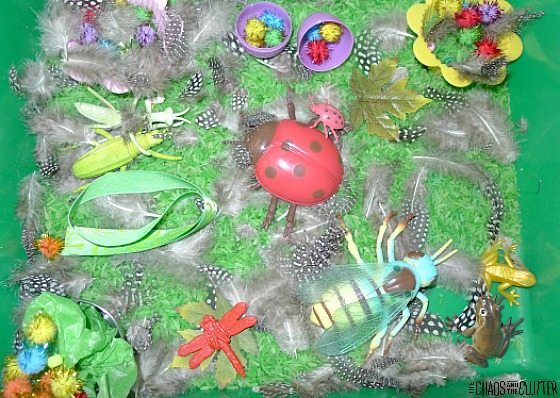
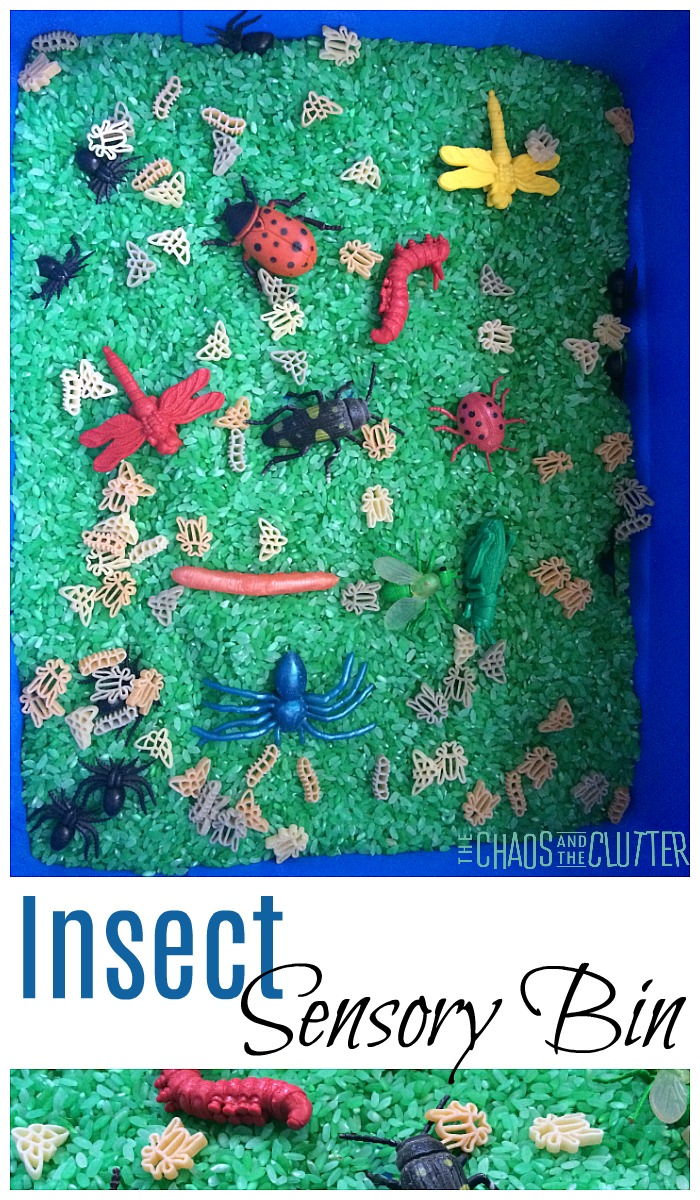
We used this sensory bin while studying insects in our homeschool. The kids enjoyed playing in it. The green rice looks like grass and made us look forward to Spring.

My kids were quite surprised that there was a pasta shaped like insects! We used some of the pasta for the sensory bin and cooked the rest for lunch. This created a gustatory (taste) sensory experience for them as well.This particular sensory bin was one of the ones we had made in our sensory bin swap. That meant that when the kids and I got to the insect unit in our science, I could easily just dump the contents of the bag into a bin and voila!

Insect Sensory Bin:

  • rice dyed green*
  • insect shaped dry pasta
  • toy bugs
  • stretchy insects
  • spiders (see note below on spiders)

*you can find a tutorial on how to dye rice for sensory play here.

Bug Shaped PastaBug Shaped PastaBug Shaped PastaStretchy BugsStretchy BugsStretchy BugsPlastic Bugs and ArachnidsPlastic Bugs and ArachnidsPlastic Bugs and Arachnids

A note about the dyed rice:

When you’re finished using this sensory bin, you can store the green rice in a resealable plastic bag. The green rice makes a nice sensory bin base for a lot of different themes because it looks like grass. You can also use it inside sensory bottles or bags.

Spiders are not insects:

Yes, I know that spiders are not an insect. The kids wanted to add them and we actually used it as a compare and contrast science lesson on why they are not an insect. If you prefer to have this be an authentic insect sensory bin, simply leave the spiders out!

Ideas to expand the learning:

  • Add magnifying glasses to the sensory bin.
  • Set out books about insects and let the kids try to match them up.
  • Add scoops, small cups, and tweezers for fine motor skill practise.

You may also be interested in checking out these sensory bins:

Frog Sensory Bin Frog Sensory Bin Play

Spring Sensory Bin 

Filed Under: Sensory, Sensory Bins Tagged With: sensory bin, sensory play

Snowflake Sensory Bin

By Sharla Kostelyk

This snowflake sensory bin is very simple. It has a clean look to it. It is a very inviting sensory play activity for kids. And it’s so pretty!Snowflake Sensory Bin #sensoryplay #sensorybins #winter #sensory
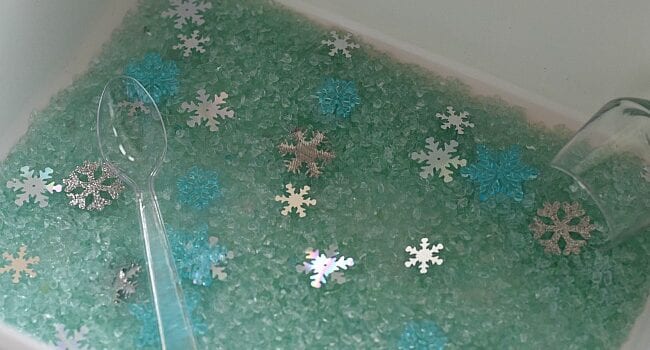
You can use this in a preschool classroom or at home. It encourages scooping and pouring and hands-on discovery.

Materials needed:

  • plastic tub
  • light blue or light green glitter gravel*
  • snowflake confetti
  • plastic snowflakes
  • silver fabric snowflakes
  • clear plastic spoon
  • small clear container

*I buy my glitter gravel at the Dollar Store. I like it as a sensory play material. It provides a different texture and you can purchase it in a variety of colours. And it’s extremely cheap!

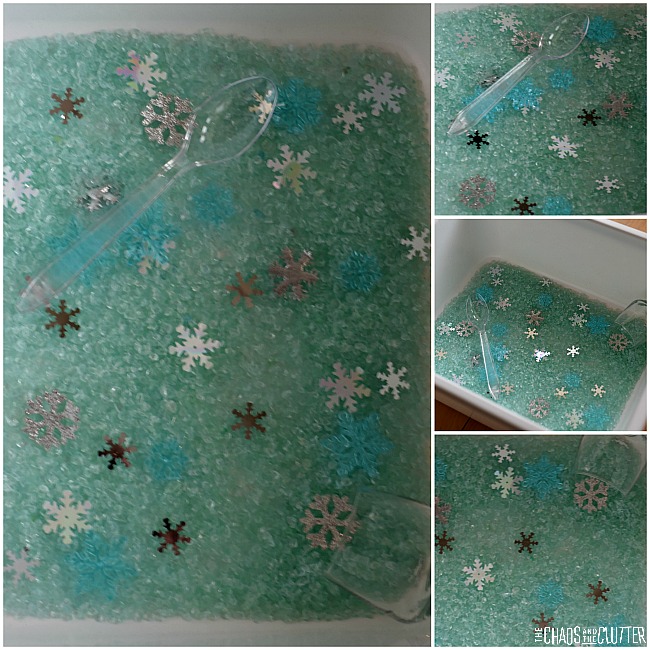
This bin is a cute way to bring a bit of winter indoors.

You can also use this activity as a way to talk about snowflakes and how they are all unique. Kids can research how snowflake are formed as a science project and use this hands-on activity as a way to reinforce their learning.

The snowflake sensory bin gives tactile, visual, auditory, and proprioceptive feedback. The spoon and the scoop provide opportunities for fine motor practise. 
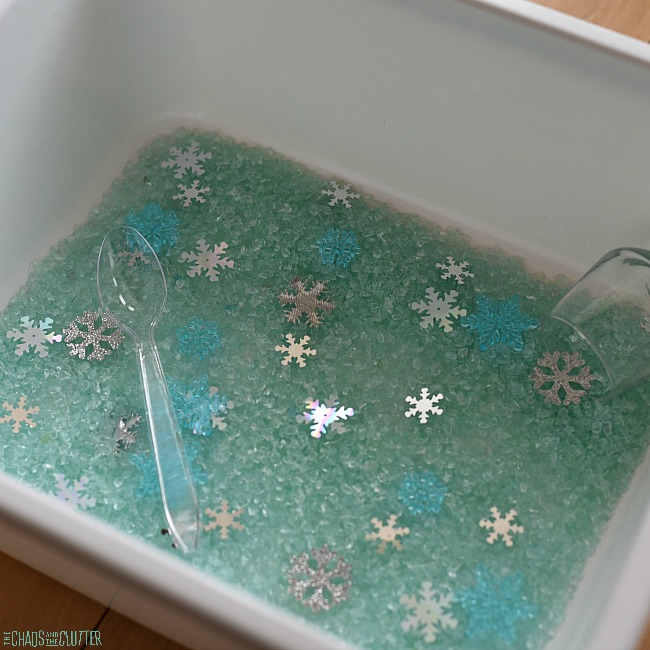
My kids really liked the sound the glitter gravel made when they scooped it. They also loved the soothing colours.

Please note that this sensory tub contains small pieces that are a choking hazard. Adult supervision should be used with this or any other sensory play activity.

Other great winter themed sensory bins:

Frozen Sensory Bin Frozen inspired sensory bin

Penguin Sensory Bin (my kids REALLY loved that one!)

Penguin Sensory Bin

Winter Sensory Tray Winter Sensory Tray on a mirror

Filed Under: Sensory, Sensory Bins

  • « Go to Previous Page
  • Page 1
  • Interim pages omitted …
  • Page 5
  • Page 6
  • Page 7
  • Page 8
  • Page 9
  • Interim pages omitted …
  • Page 18
  • Go to Next Page »

Primary Sidebar

Categories

We are a participant in the Amazon Services LLC Associates Program, an affiliate advertising program designed to provide a means for us to earn fees by linking to Amazon.com and affiliated sites.

Copyright © 2026 • The Chaos and the Clutter • Site Design by Jeni @ The Blog Maven

Return to top of page

Copyright © 2026 · Chaos and the Clutter 2.0 on Genesis Framework · WordPress · Log in