• Skip to primary navigation
  • Skip to main content
  • Skip to primary sidebar
  • Home
  • About
  • Contact
  • Privacy + Terms
  • Affiliates

The Chaos and the Clutter

  • Facebook
  • Twitter
  • Pinterest
  • Google Plus
  • RSS
  • Email
  • School at Home
  • Sensory
    • Sensory Processing Disorder
    • Awesome Sensory Play Activities
      • Sensory Bins
      • Sensory Bottles
      • Sensory Bags
  • Family Games
    • Minute to Win It Games
  • Special Needs Parenting
    • Childhood Anxiety
    • Reactive Attachment Disorder
    • Sensory Processing Disorder
  • Store
  • Course Login

Sharla Kostelyk

Christmas Card Ornaments

a paper ornament hangs on a pine tree

By Sharla Kostelyk

Have you ever wondered what to do with the stack of old Christmas cards you have? These ornaments are the perfect solution!

We make these every couple of years. This craft is easy enough for the kids to do but the ornaments are nice enough to give as gifts.

Christmas Card Ornaments at The Chaos and The Clutter

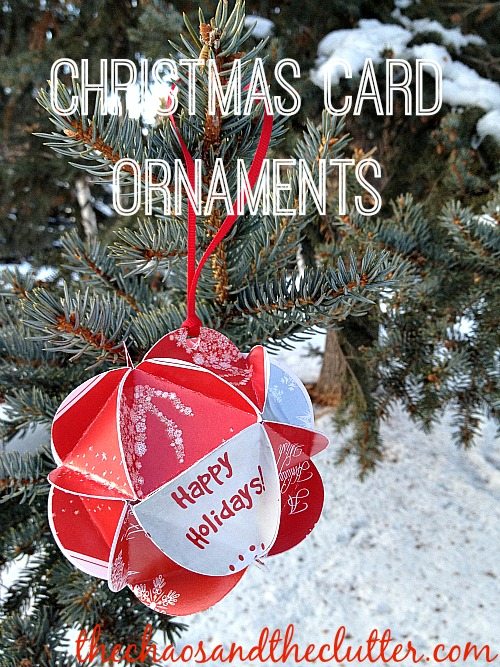
I like to wait until I have a fairly large pile of cards to choose from so that I can match up colours or designs that I think will go nicely together, but even four or five cards is enough to create one of these ornaments.

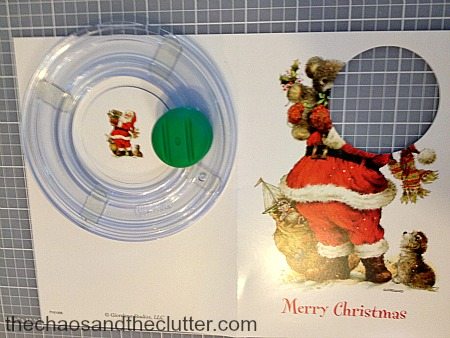
When I first started making these, I used to trace circles using a glass and pencil on the back of the cards and then cut them out by hand.

Thankfully, there are now tools that can be used to make cutting the circles much faster! There are now circle cutters and circle punches that make cutting circles a breeze! I used a circle cutter from my scrapbooking days.

How to Make Christmas Card Ornaments

Materials needed:

  • greeting cards
  • glue sticks
  • hole punch
  • ribbon or string
  • scissors or a circle cutter

Instructions:

  1. Start by cutting 20 circles.
  2. Next, fold each circle into a triangle, creating three sides.
  3. Glue the side of one with the side of another in groupings of five, eventually creating a sphere.
  4. Next, decide where you want the top of the ornament to be and hole punch at the top. Thread a ribbon through and your ornament is complete!

You can cut randomly or pre-plan based on colour, pattern or picture. I grouped mine so that we could make one with blues, one with whites and silver, one with reds, one with puppies, one with pine cones and several of the word “Peace”, and one with geometric shapes and sharp contrasts. If you have several of the same card, you can also create really interesting patterns with them.

cutting circles for holiday ornamentsYou can often find pictures on the back or inside of the card that work well so don’t forget to check there!

making Christmas card ornaments by folding greeting cards
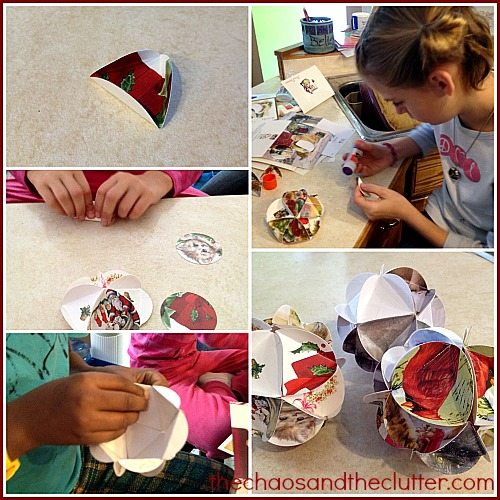
It’s fun for the kids to see their 3D circle start to take shape.

circle Christmas card ornaments hanging on pine trees outside
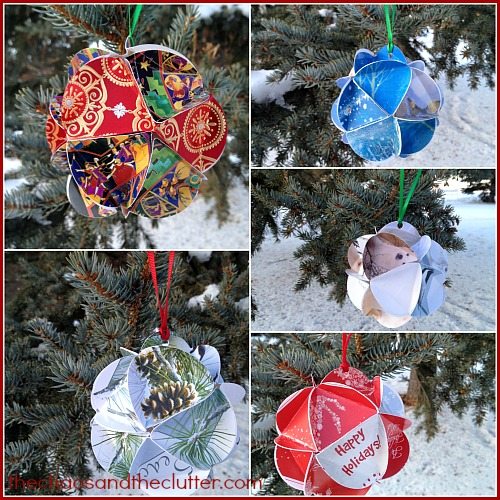
Each one is unique because of the different patterns and colours on the greeting cards. 

Making holiday ornaments using recycled materials is inexpensive and fun.

Filed Under: Christmas, Crafts and Activities

Winter Art Tutorials

By Sharla Kostelyk

Art is not a talent I possess. My mom is an artist (oil painting mostly) and my brother is an artist (photographer and graphic designer). I’ve even seen some sketches my dad did many years ago that clearly show he is gifted as well but it skipped right over me! I have creative talents outside of art but the best I can draw is a stick man, so I have never felt much confidence in teaching art to my kids.

Winter Art Tutorials at The Chaos and the Clutter

In the past, we have done some artist studies and the kids have attended homeschool art classes regularly. This year, the instructor for the homeschool art classes had complications with her pregnancy and the classes were cancelled so I was no longer able to farm out this part of my kids’ education! I’ve been procrastinating on doing any art teaching, telling myself that since we do crafts, it’s almost the same thing.

I had heard of a series of books on chalk pastels that had very good instructions and finally decided to take the plunge. We own two of the books in the series, Chalk Pastels Through the Seasons and A Simple Start in Christmas Chalk Pastels (full disclosure here: I bought the first one and asked Tricia if she was willing to send me the other one in order to try it out and review it and she kindly agreed so I was provided the other one for free but am sharing my honest opinion of how it worked for us).

I ordered the special paper from Amazon (although you can apparently use printer paper instead) and bought a starter set of 24 chalk pastels from a craft store nearby.

Before you sit down to do art with chalk pastels, be sure to have some wipes (baby wipes work well) or wet washcloths and paper towels. Also, use art smocks or wear clothes that you don’t mind getting coloured because the chalks stain. And they get everywhere. We also sprayed our finished artwork with acrylic sealer but hairspray would work to seal them also. This is an important step so that they don’t smudge or smear onto other things.

Normally, the mess of the project would be enough to have me not do it again or to not even attempt it in the first place, but this is worth the mess!

Since the books are in ebook format, I brought my laptop to the table along with the supplies and had it there to reference while we worked through the lesson. If you don’t have a laptop or tablet, the lessons are short enough that you could jot the steps down ahead of time or even remember them if your memory is better than mine!

The first one we did was a Christmas star. I was surprised at how easy it was to go through the steps with the kids and have the finished projects all work so well. The other thing that really struck me was how calm my kids were during the art lesson. The relaxing atmosphere this created is actually the main reason we went on to do another lesson the next day and then to do yet another lesson today. I have one planned for tomorrow as well!

Christmas Star in Chalk Pastels
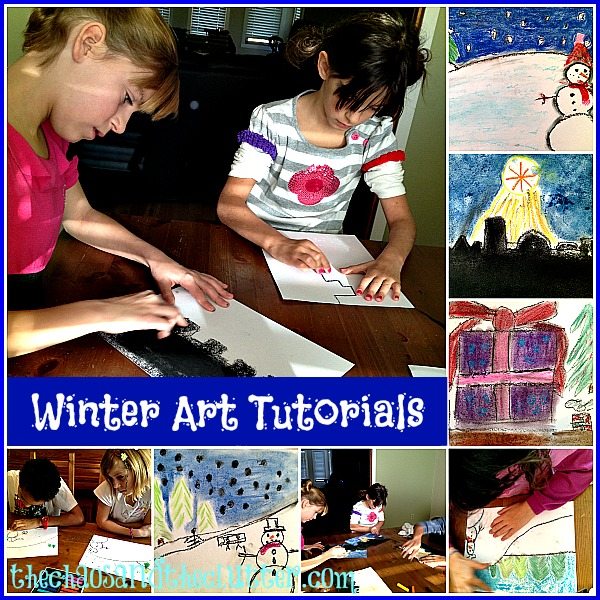
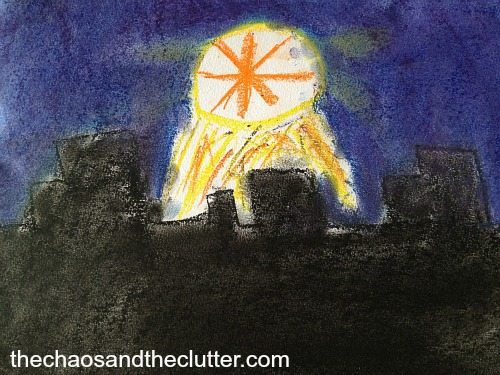
The second one we tried was a winter snowman scene. One of the things that I most appreciate about the book is that is gives the basic instructions but encourages individual artistic expression. You can see from the pictures below how different each of the kids’ pictures turned out. Some added tobogganers, another added a chair lift and a skier, one of them even has the snowman’s head fallen off beside him!

Snowman Chalk Pastel Art
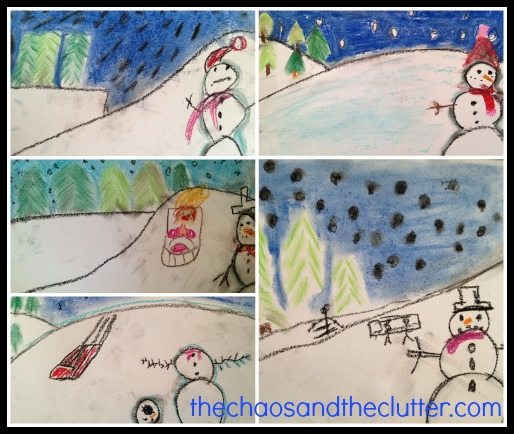
The one we did today was a present and again, the kids all put their own spin on it. Granola Girl drew hers beside a Christmas tree with other smaller presents. Einstein made striped wrapping paper and Dancing Queen drew a picture of Jesus on hers. Miss Optimism made hers in pretty girly colours!

Christmas gifts in Chalk Pastels
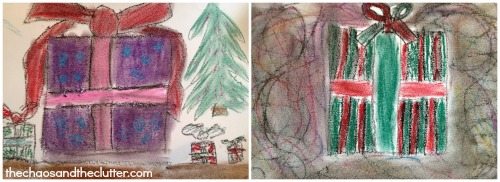
The art sessions have been such a success that the kids have even asked if they can stay at the table longer and work on their own creations. I was blown away by this one made by Snuggle Puppy without a tutorial or instruction of any kind using many of the techniques we had been learning about in our sessions:

Chalk Pastel Art
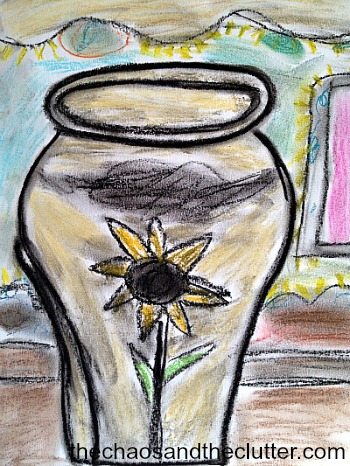
I’m loving our morning art sessions and look forward to this becoming a regular part of our homeschooling routine. The kids are finding it relaxing and are learning a lot about different techniques and methods. They are also gaining confidence as they learn.

A Simple Start in Christmas Chalk Pastels is available for just $4.99 or you can purchase the Chalk Pastels Through the Seasons bundle of 3 books valued at $16.93 for $12.99.

Seasonal Chalk Pastel Bundle

Filed Under: Christmas, Crafts and Activities, Homeschooling

What Does a “Typical” Homeschool Family Look Like?

What Does a Typical Homeschool Family Look Like?

By Sharla Kostelyk

What does a typical homeschool family look like? The answer may surprise you! What Does a Typical Homeschool Family Look Like?A few weeks ago, someone in my local homeschool community expressed not feeling like she fit into the group because of some things that she felt made her different. Others chimed in right away to share similar feelings.

Some expressed that since some of their kids attended public school or because they were school at home instead of unschoolers or other such things that they viewed as differences, they felt like outsiders. It struck me right away that I also feel that our family stands out for certain reasons. Therefore, I have often felt like we don’t fit into the homeschooler mould.

Human nature is that we want to feel like we belong, that we fit in. I don’t know that there is a typical homeschool family anymore though.

As far as homeschool families go, there are working homeschoolers, single parents, adoptive families, military families, unschoolers, families with some kids in public school and some being homeschooled, families living abroad, first year, large families, families with an only child, blended families, former teachers now teaching their own children, and many others.

There is so much diversity now among homeschool families that every homeschool family is a typical homeschool family!

I decided to share with you some actual homeschool families. Perhaps you will see a bit of yourself in one of their stories and it will help you to know that you are not alone. All of us are “normal” in our own unique way.

Real Life Homeschool Families:

Sam is married to her high school sweetheart who became a preacher and is a mother of six blessings. She went into the world of homeschooling kicking and screaming. Three of her children attended public school, the oldest making it to the sixth grade. She is determined that the youngest three will never step foot in a public school door.

While homeschooling always seemed like something other people did {and they just weren’t right in the head}, homeschooling has been the perfect fit for their family. Her home isn’t always quiet, her children are not great at math, and you will easily discover that fun and laughter {sometimes very loud laughter} abound far more than science projects.
 
Things changed a lot in the Kelley house when Sam went back to work over the summer, and now they find themselves in an even smaller homeschool niche, the working homeschool mom family. Although it isn’t ever easy, it is always worth it.

homeschool family 1

Caitlyn is the proud geek-mom to two children. Her kindergartner son loves superheroes, dinosaurs, and is using comic books to learn to read. Her toddler daughter doesn’t talk much but she’ll dance like a maniac if she hears classic rock or grunge music. Her husband served 8 years in the US Army and the family spent the last 3 years of his service living in England, which was an amazing experience that they thoroughly enjoyed. The whole family loves hiking, gaming, and listening to the How to Train Your Dragon series on audio book.

homeschool family 2

Alisha is the wife of Jason, a minister who travels all over the world teaching in Bible schools, churches and pastors’ conferences. She is the homeschooling mom of three kids, one of which recently graduated. As a work-at-home mompreneur, she is the owner a health and fitness business, as well as a mixed-media artist. She is the author of the book, God Said So (31 Bible Truths Every Kid Should Know). Alisha blogs at Flourish.

homeschool family 3

LaToya is a single mom of two boys. She is the first person in her family to homeschool. Her oldest son is all over the autism spectrum: SPD, ADHD, and ODD.

homeschool family 4

As a teen mom, Shannen beat the odds and stereotypes by diving into her newfound faith, finishing a bachelor’s degree, and starting her blended family (in that order). Shannen homeschools her 14 year old daughter, and is excitedly awaiting the homeschool years for her 3 year old and 8 month old in the coming years.
homeschool family 5

The Bussingers are a military family currently stationed in South Korea. Aadel stays home and unschools their three kids, ages 13, 8, and 3. She also works freelance writing jobs, blogs, and attends full-time online college working towards her counseling degree. This is their 9th year of homeschooling.

homeschool family 6

Stacey is the mom of 4 kids. Her oldest son is a freshman at college, her daughter is a sophomore in high school, her second son in 7th grade and her third son in 4th grade. Her oldest daughter follows a classical mode of education but due to learning needs, the youngest 2 boys follow a delight-directed education. Their annual income is less then $35,000 but they still manage to homeschool. Stacey works part-time for a homeschool publisher.

homeschool family 7The Browns are Christian homeschoolers who are now in their 6th year of schooling. Michael and Renee were married for 12 years before they were blessed with the unexpected blessing of a child through an adoption they had not sought out but gladly welcomed.

Their one son who is now 10 years old doesn’t follow any typical grade level for learning. For a few subjects he is working in the 4th or 5th grade level while other subjects he is working at higher levels of learning. For example, he is currently working in high school level geometry.

They chose to homeschool so that they could customize an education to meet his unique learning style while providing that education in a faith filled environment.  You can read more about the Brown family at Renee’s Blog, Great Peace Academy.

homeschool family 8Jen is a Catholic homeschooler. She and her husband recently moved their whole family to pursue a dream to be closer to the ocean. They have six children, all of whom joined their family through International adoption (from Russia, South Korea and the Caribbean).

Jen is also a fitness enthusiast. She shares that homeschooling many children and children with special needs can be done!

homeschool family 9And then there’s me. Sharla is the mom of seven kids who apparently hasn’t had time to get a family picture since the one below at a wedding two years ago when she still had long hair! Five of her kids are adopted and have special needs. One of her sons is graduated and her second oldest is attending his third year in a brick and mortar school and loving it while she homeschools her younger five kids. She works from home as a writer and blogger.

typical homeschool family #10Do you consider yourself a typical homeschool family? What are some of the things that you think make your family unique to homeschooling or that fit the mould you have envisioned for homeschoolers?

Filed Under: Homeschooling

Christmas Sticky Tree

By Sharla Kostelyk

The creative vision for this activity was inspired by Angela at TeachingMama. She made a Fall Sticky Tree for her boys a few months ago and I knew that my kids would really enjoy doing one so I went out and bought the main supplies and then time got away from me and before I knew it, it was no longer fall! Snow covered the ground and an autumn activity no longer seemed like it would fit in, so I improvised!

Christmas Sticky Tree at The Chaos and The Clutter

To make this, I used poster putty to attach clear contact paper to our patio window. (For those who are not familiar with it, contact paper is sticky on one side.) I used two sheets of contact paper side by side to create the width that I wanted. I kept the backing on the contact paper until it was stuck to the window and then peeled away the backing.

I used a green Sharpie (permanent marker) to draw the outline of a Christmas tree. I then provided the kids with a pile of things they could use to decorate the tree: tinsel garland, light Christmas balls, pompoms, metallic pompoms (note: the metallic pompoms didn’t stay on very well and most fell off after the first day), felt stars, large glittered foam star, beads, foam candy canes and foam ornaments.

Christmas Sticky Tree Sensory Activity
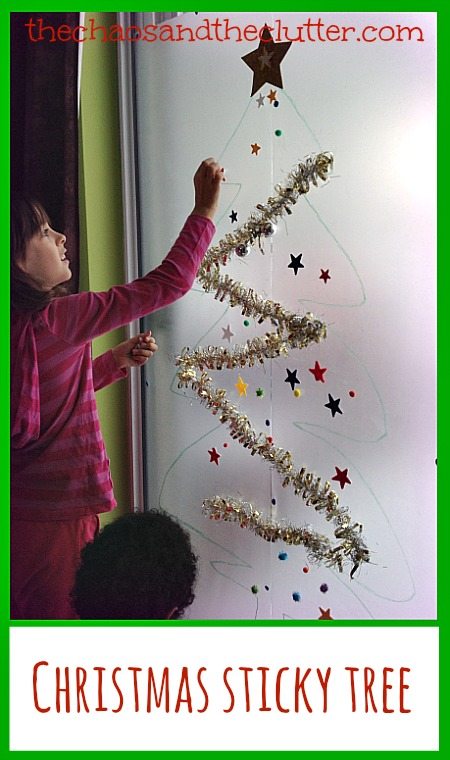
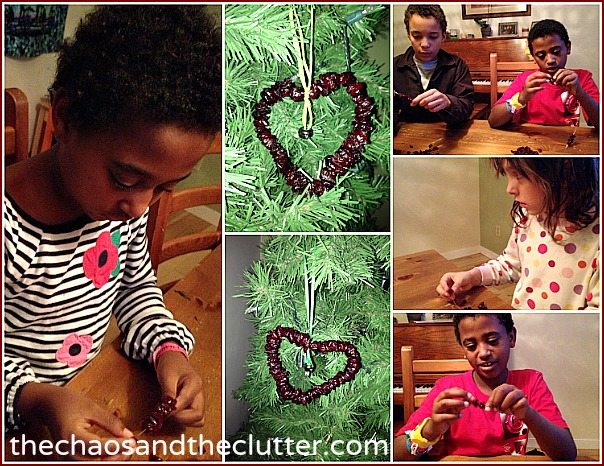
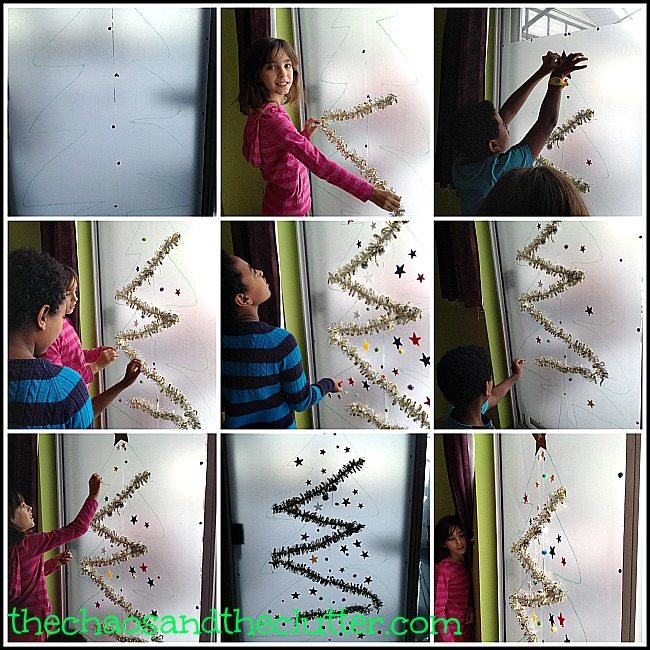
The kids really appreciated the creativity of being able to decorate this tree without any instruction or limitations. I would say that it held the attention of my girls a bit better than my boys and I’m not sure if that is because of the activity itself or just the moods on the day it took place. My boys generally enjoy craft activities as much as my girls do. It was a good holiday sensory activity for all the kids and involved both fine motor and to some extent, gross motor as well.

The activity was more of a success than I had anticipated in that now, several days later, when I pass by the tree, I see that even more has been added to it including paper ornaments that the kids have coloured on paper and cut out. It’s always nice to see an activity that expands and takes on a life of its own. Other than the metallic pompoms which did not stay on very well, everything else is still sticking to the tree and it’s been four days since we first made it.

Christmas Sticky Tree - easy set up and can be used again and again
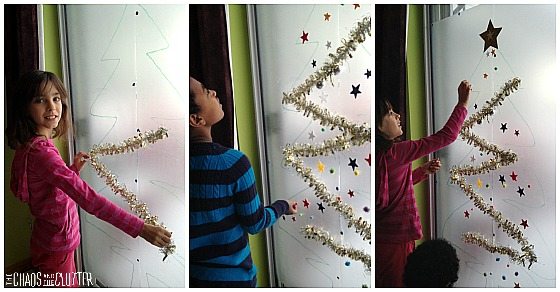
This was a hands-on and easy way to begin to decorate our homeschool classroom for the holidays!

If you would like to see other ideas for Christmas crafts and activities, you may want to follow my Christmas Crafts board on Pinterest.

Filed Under: Christmas, Crafts and Activities, Sensory Tagged With: sensory play

Christmas Cranberry Ornaments

By Sharla Kostelyk

These ornaments smell wonderfully, look great on a tree and make wonderful gifts or they can be attached to gifts as a nice addition to the wrapping.

Christmas Cranberry Ornament

I first made these ornaments about 15 years ago. At the time, my kids weren’t old enough to make them with me but I decided to make them with them this year. They really enjoyed it. In fact, they found the process of stringing the cranberries very relaxing and they are planning to make more.

assembling cranberry ornaments at The Chaos and The Clutter

supplies needed:

wire (we used 22 gauge floral wire)
wire cutters
dried cranberries (we used Craisins)
silver jingle bells
raffia or ribbon

Cut a piece of wire to 14 inches. This should be done by an adult or older child with adult supervision.

String dried cranberries onto the wire. Again, the ends of the wire are sharp so this is something that should be done by older children or be closely supervised. Fill the wire with dried cranberries until there is just a bit of exposed wire on either end. Twists the ends of the wire together and then fold down the ends. Move the cranberries over to cover the closure. I like to have the closure at the side as it’s less noticeable there. Shape the ring into a heart.

attaching cranberry ornaments
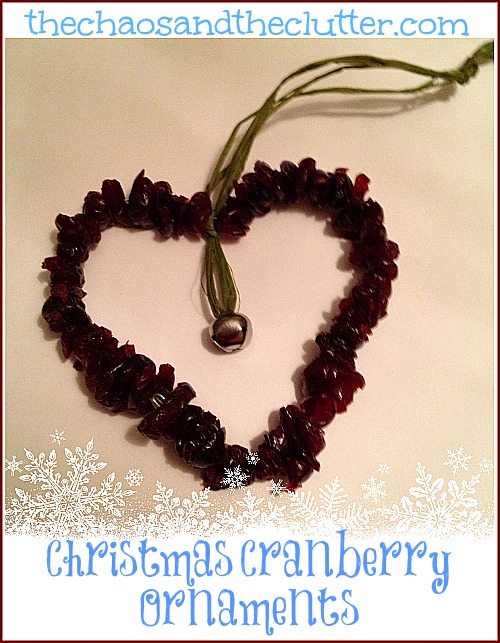
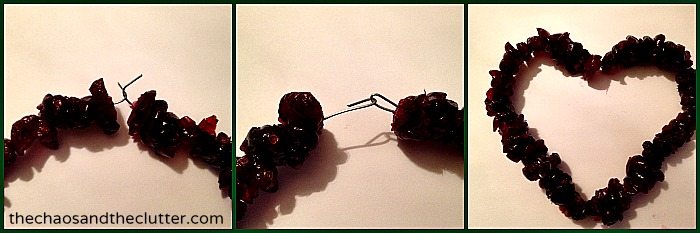
String a jingle bell onto a piece of ribbon or raffia and place a knot above a small loop. Place the knot beneath the wire at the dip in the heart and attach it to the ornament by knotting again just above the wire. Create a loop to hang the ornament with and put one last knot at the top.

cranberry ornaments

My kids enjoyed making these so much that they want to be able to make them on their own as gifts. I put all the supplies into a bag and have it ready for them to create with.

cranberry ornament supplies
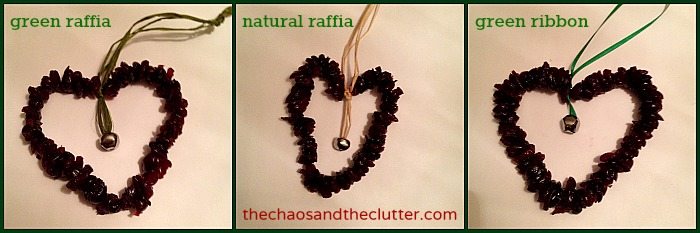
If you are interested in more Christmas crafts or activities, you may be interested in following my Christmas Crafts board on Pinterest.

Filed Under: Christmas, Crafts and Activities

Milky Slime Recipe

By Sharla Kostelyk

The other day, I saw a cute carton of chocolate milk slime at the bookstore (strange place for slime). The carton made for cute packaging but it’s been my experience that things like store bought slime and such don’t tend to be as good as homemade slime so I tucked the idea away.

Easy to make Chocolate Milk Slime from The Chaos and The Clutter

Today, Snuggle Puppy was having a hard day. A hard day. The Husband is away and that triggers all kinds of abandonment and trauma issues for Snuggle Puppy given his past history.  After an awful morning and a challenging start to the afternoon, I remembered something I had heard in a podcast from Dr. Karyn Purvis about parenting a child with trauma that recommended sensory activities every two hours for kids from hard places. I know that sensory activities are usually very effective for calming kids so I decided to give it a try.

I got Snuggle Puppy to help me make our chocolate milk slime. I didn’t have borax which most of the online homemade slime recipes call for so I made this slime with items I had in the house.  This fun slime uses shampoo and water!

Milky Slime Recipe

You will need:

2 1/4 cups corn starch
1/2 cup unscented shampoo*
2/3 cup chocolate milk
1 Tbsp. water

optional: brown paint or food colouring

*Note: It’s not necessary to use unscented shampoo, but if you use regular shampoo, it will smell like the shampoo and not like chocolate milk.

How To Make Milk Slime:

  1.  Add the shampoo to the corn starch in a large mixing bowl.

chocolate milk slime

2.  Slowly stir in the chocolate milk a little bit at a time.

3. Then add the water and mix well.

My Slime Is Too Runny

If when you pick up the chocolate milk slime it’s too runny, you can add a bit more corn starch.  Alternatively, if you find that it’s not runny enough, you can add a bit more water or wet your hands and then handle the dough.

If you want it to look more the colour of chocolate milk, you can add a bit of brown paint or brown food colouring. I didn’t have any on hand so ours was only slightly coloured by the chocolate milk itself.

Chocolate Milk Slime

This milk slime is obviously NOT EDIBLE because of the shampoo!

Fun Slime

Snuggle Puppy absolutely loved this sensory activity!  It really turned his day around. The expressions on his face tell it all!

playing with chocolate milk slime

He spent about half an hour playing with the milk slime and then later went back to play with it again. He found it had hardened a bit but as soon as he added just a bit more water, it was back to the right consistency. When he was finished playing with it the second time, we put the goop into a resealable plastic bag and sealed tightly to store for another day.

Storing Your Slime

***UPDATE*** Due to a comment on The Chaos and The Clutter’s Facebook Page from a very astute reader, I realized that since this has actual chocolate milk in it, it needs to be stored in the fridge. Alternatively, you could play around with using chocolate syrup and water instead of the chocolate milk.

Looking for more sensory play ideas for calm kids?

Grab your copy of 25+ easy to make recipes. >>> SENSORY RECIPES

Includes cool slimes, ooblecks, playdoughs, cloud doughs, kinetic sand, and more, all in one handy guide.


Click here for more fun slime ideas:

Unique Types of Slime

Cool Slime Recipes

Cool Spider Slime

Halloween Slime

Stretchy Slime Recipe

Glow In The Dark Glitter Slime


Filed Under: Sensory Tagged With: sensory play, slime

  • « Go to Previous Page
  • Page 1
  • Interim pages omitted …
  • Page 103
  • Page 104
  • Page 105
  • Page 106
  • Page 107
  • Interim pages omitted …
  • Page 128
  • Go to Next Page »

Primary Sidebar

Categories

We are a participant in the Amazon Services LLC Associates Program, an affiliate advertising program designed to provide a means for us to earn fees by linking to Amazon.com and affiliated sites.

Copyright © 2026 • The Chaos and the Clutter • Site Design by Jeni @ The Blog Maven

Return to top of page

Copyright © 2026 · Chaos and the Clutter 2.0 on Genesis Framework · WordPress · Log in