• Skip to primary navigation
  • Skip to main content
  • Skip to primary sidebar
  • Home
  • About
  • Contact
  • Privacy + Terms
  • Affiliates

The Chaos and the Clutter

  • Facebook
  • Twitter
  • Pinterest
  • Google Plus
  • RSS
  • Email
  • School at Home
  • Sensory
    • Sensory Processing Disorder
    • Awesome Sensory Play Activities
      • Sensory Bins
      • Sensory Bottles
      • Sensory Bags
  • Family Games
    • Minute to Win It Games
  • Special Needs Parenting
    • Childhood Anxiety
    • Reactive Attachment Disorder
    • Sensory Processing Disorder
  • Store
  • Course Login

Simple Science

Honeycomb Sensory Activity

hexagons made of cardboard filled with honeycomb cereal on a yellow paper

By Sharla Kostelyk

Ready to celebrate the bees and spring? Our fun and engaging Honeycomb Sensory Activity is a great way to start exploring the world of bees while also providing unique sensory feedback to help your child thrive. Interesting supplies. Fun Activities. A unique smell. Taste-worthy ingredients. When playtime comes, what more could any child want? 

The top half of the image shows the hexagons filled with honeycomb and bees. The bottom half of the image shows the hexagons before they are filled, with a child's hands holding a scoop. In the center, text reads "Honeycomb Sensory Activity."

If you aren’t sure why your child needs sensory play, read The Importance of Sensory Play for Children. It highlights all of the various developmental milestones directly impacted by sensory experience. It’s huge.

From fine motor skills to neural pathways to emotional regulation, sensory play builds up a child in all of the right ways. And it’s not a huge lift for the parent either. In fact, your child might get so engrossed in playtime you have a moment or two to breathe or a chance to fix a home-cooked meal (or ten) while they play at the kitchen counter.

You might have to put up with a little bit of mess every once in a while, but that’s a small price to pay. This type of play is a win for everyone, and we have so many ideas you will never run out. 

How to Make A Honeycomb Sensory Activity

Supplies Needed

  • Honeycomb Cereal
  • Empty Toilet Paper Rolls
  • Yellow Construction Paper
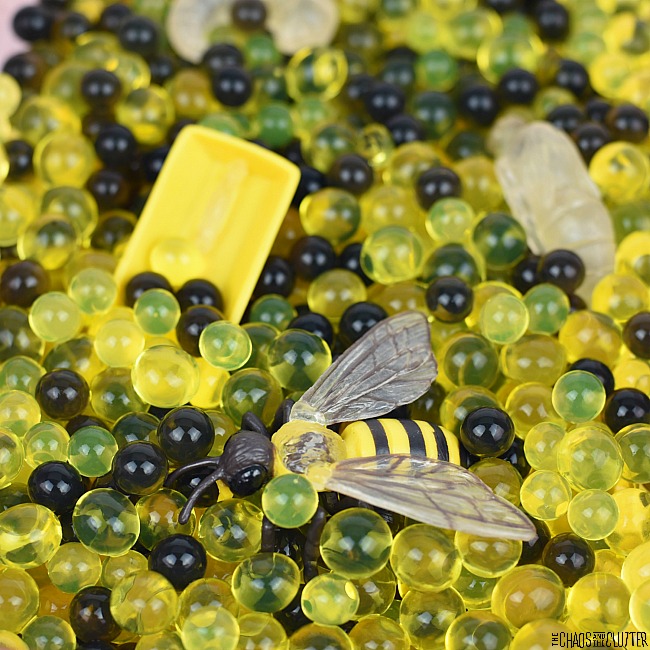
  • Small Toy Bees
  • Scoop or spoon

A collage of four equal squares shows 1) an image with the supplies: honeycomb cereal, toilet paper tubes, scissors, bees and construction paper, 2) an image of cut toilet paper tubes being flattened and folded, 3) an image of hexagons made from toilet paper tubes, and 4) an image of setting up the hexagons with the other supplies for sensory play.

Step-By-Step Instructions

  1. Flatten the toilet paper roll and cut it into sections. You need at least 7.
  2. Shape each section into hexagons.
  3. Place the hexagons on the paper in a honeycomb shape.
  4. Let kids scoop the honeycomb cereal into the toilet paper roll honeycomb.
  5. Let them add bees to the honeycomb if they want to.
  6. Encourage kids to talk about the cereal’s feel, smell, and taste.

Tips to Assemble your Honeycomb Sensory Play Activity

  • Use edible bees instead of toy bees for a fun treat. This is great for little ones who put everything in their mouth. We love this adorable option. This makes it a mostly taste-safe play experience as long as you can keep the cardboard out of their mouths.
  • To easily shape the hexagons, take a flattened section. Move to a spot â…“ of the way across. The remaining section should be twice as big. Pinch each side there to form a rectangle. Then pinch the sides once more halfway across the long side of the rectangle.
  • To form the big honeycomb, place one hexagon on the paper. Then, add hexagons so they touch each side of the first one all the way around. You should have a total of seven once you’re done.

A small child's hands hover over a scoop of honeycomb cereal and hexagons are placed on yellow construction paper where honeycomb cereal has started to be scooped into the hexagons. A plate of honeycomb cereal sits nearby.

Make Sensory Play Even More Valuable with These Tips

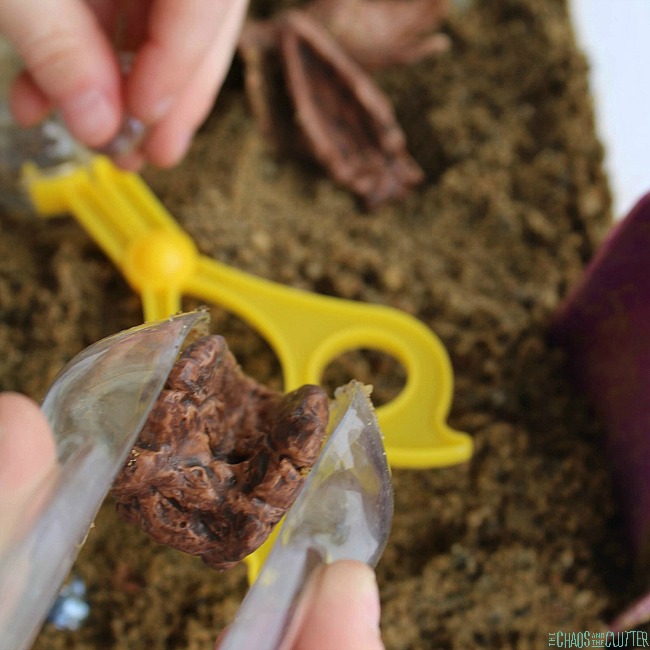
Provide tongs for little hands and encourage your child to pinch the tongs to move the honeycomb. This works a different set of hand muscles necessary for later skills like scissors and pencil grip. You can also encourage your child to pick up the honeycomb between thumb and forefinger to practice pincer grip. 

Give your child a scoop or spoon so that he or she can work on hand-eye coordination and muscle coordination moving scoops of honeycomb into the hexagon shapes. 

If your child has experience with scissors, you can have them help with the cutting and folding of the toilet paper tubes to make hexagons. Just remember to demonstrate (don’t just describe), go slowly, and allow imperfection. This will add one more layer of working on fine motor skills, following directions, and hand-eye coordination. 

Ways to Extend This Sensory Play Activity

Practice counting. Have your child figure out how many pieces of cereal or how many bees will fit in each hexagon. You can also practice subtraction, addition, and if you write a number in each hexagon, one-to-one correspondence and number recognition.

Talk about shapes. Show your child images or objects shaped like hexagons and talk about the number of sides, etc.

Talk about beehives and honeycomb. Look at close-up images of beehives and bees found on the internet and compare the bees honeycomb to the one you made and the cereal.

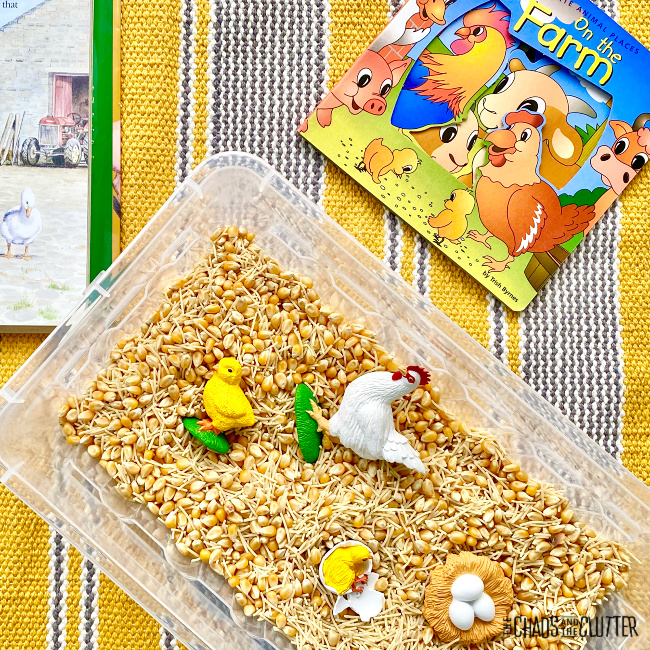
Make our Bee Life Cycle Sensory Bin and learn about the life cycle of bees.

Practice verbal skills. Ask your child to describe the cereal and other supplies — what does it look like, how does it feel, what is the taste and smell, etc.  

Read books about bees and talk about how bees eat, how honey is made and what the bees do for our world. 

Get into the science. Do this bee pollination experiment, a fun honeycomb experiment, or watch a scientific video about bees together. 

Make bee crafts or bee artwork and display it. 

Contact a local beekeeper or ask your county extension office if they have any kind of bee education programs where you can taste honey, taste honeycomb, and learn about bees from a master.

Hexagons are placed on yellow construction paper and filled with honeycomb cereal. Bees have been placed in most of the hexagons. This is the honeycomb sensory activity.

Books to Read about Bees

  • Give Bees a Chance by Bethany Barton
  • What if There Were No Bees by Suzanne Slade
  • It Starts with a Bee by Jennie Webber
  • The Honeybee by Kirsten Hall
  • UnBEElievables: Honeybee Poems and Paintings by Douglas Florian
  • The Honey Makers by Gail Gibbons
  • The Beeman by Laurie Krebs
     

Filed Under: Sensory, Simple Science Tagged With: sensory play

Colourful Celery Experiment

a boy looks at celery stalks in coloured water

By Sharla Kostelyk


A few years ago, one of our daughters decided to do the celery experiment for her science fair project. This is such an easy project for kids to do. a girl smiles as she looks at a blue celery stalk in blue water. Other colours of celery are visible. Text reads "Colourful Celery Science Experiment"
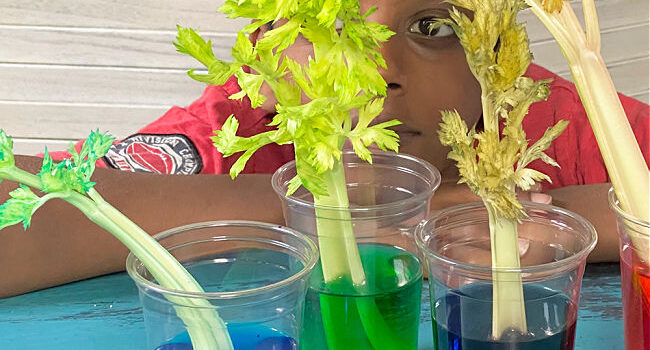
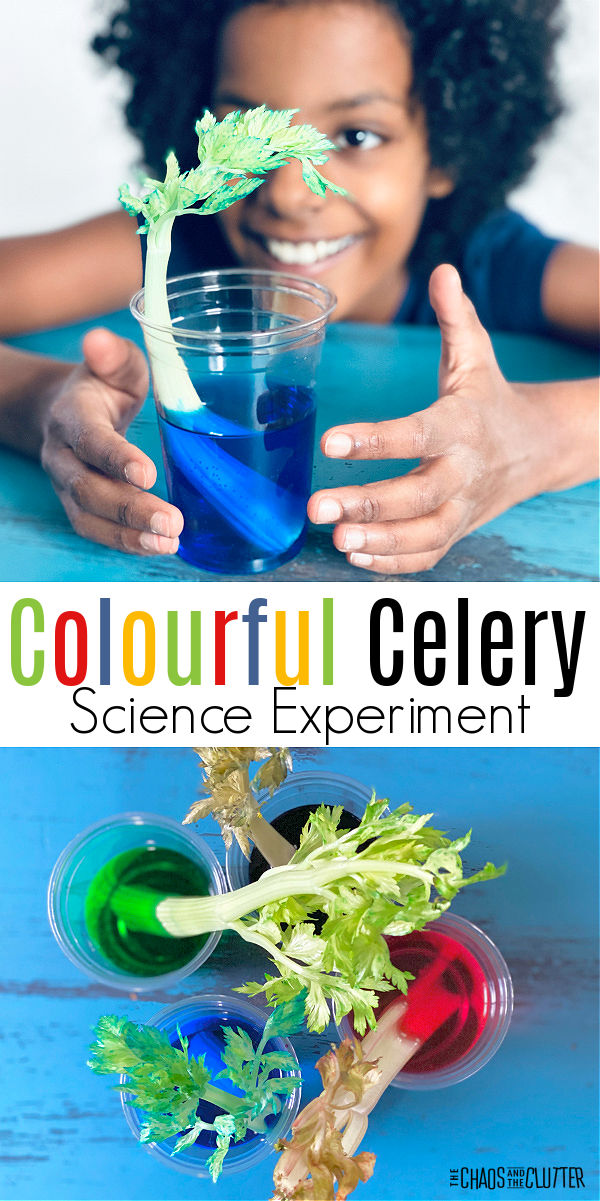
Kitchen science experiments are a great way for kids to learn. They are using materials that are familiar to them. This experiment uses celery, food colouring, and water which are all things that are familiar to most kids.

Hands on learning is so much more effective for retention. This particular experiment uses simple items that are cost effective and easy to find rather than expensive, hard-to-find materials. 

Kids are able to observe the changes happening and delight in the process.a boy looks at celery stalks in coloured water

Colourful Celery Experiment:

Supplies needed:

  • celery stalks
  • clear cups
  • food colouring
  • water

Instructions:

  1. Fill the plastic cups a little more than half full with water. 
  2. Add some drops of food colouring to each cup (one colour per cup) and stir.
  3. Cut the bottom ends off celery stalks.
  4. Place one freshly cut celery stalk in each cup. 
  5. Invite kids to make a hypothesis. What do they think will happen? Depending on their age, they can colour a picture or write out what they think will happen.
  6. Each child can watch what happens and write or colour their observations.

celery stalks in cups of coloured water and changing colour themselves
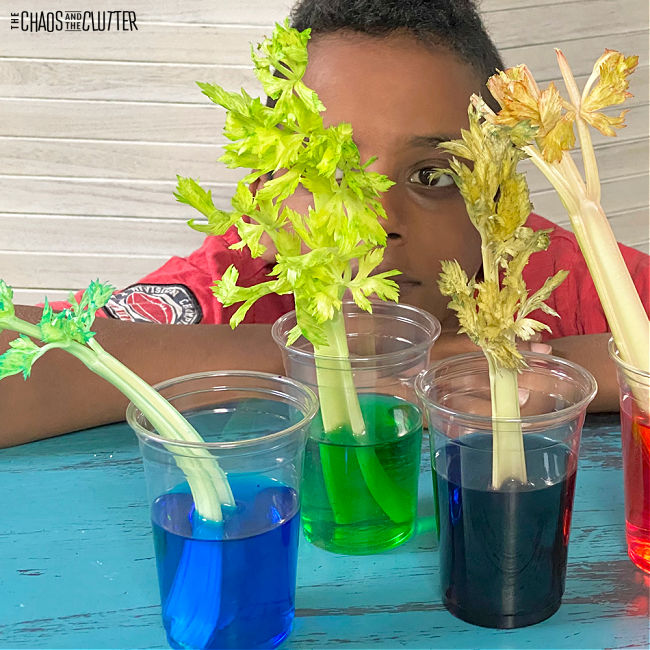
The colour will climb up the celery stalk through the capillaries which shows how plants pull up the water and nutrients. This is a great visual explanation. The results are more noticeable if you leave the leafy part on the celery. a stalk of celery sits in a glass of blue water and its leaves have a blue tinge to them
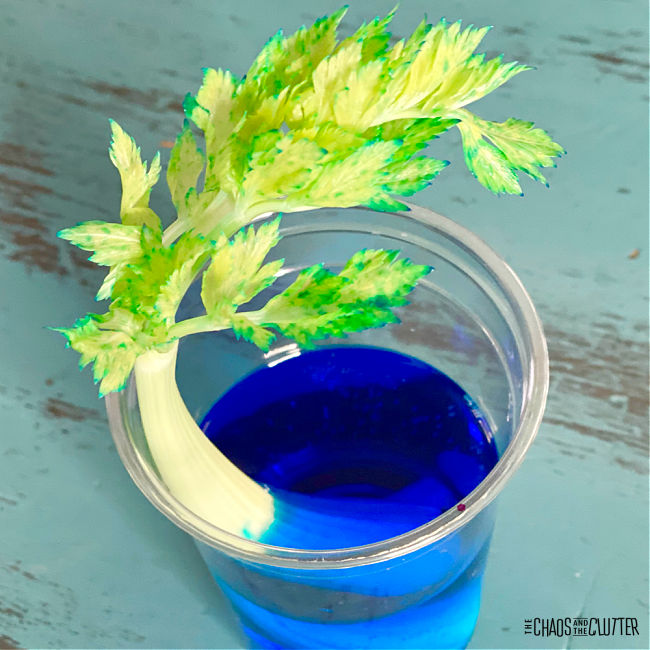
This is such an easy science experiment to do and a great visual aid for kids learning about plants and osmosis!

For older kids:

If you’re doing this experiment with kids who are older or are capable of a deeper understanding,  you can expand the learning into how water moves from the roots in the soil to other parts of the plant or tree such as the leaves and stem. This takes place in the xylem which are vein-like tubes similar to the capillaries in the celery. 

Here are some links for further research on this:

  • Thirsty Plants: How Plants Get Water from the Soil to their Leaves
  • Evapotranspiration and the Water Cycle
  • Osmosis and Osmotic Pressure

For younger kids:

If you’re doing this with littles, you can get out a magnifying glass and take a closer look at the capillaries at the bottom of the celery. Note that they are hollow, kind of like little straws. Once the coloured water has risen in them, you’ll be able to see the colour at the entrance of the capillary. 

For her science fair presentation, our daughter showed pictures of the process, wrote out the process, and drew what happened. We put all of it on a tri-fold presentation board and she was able to answer the judges questions about what she had learned through this. 

4 cups with a different colour of water in each and one celery stalk in each
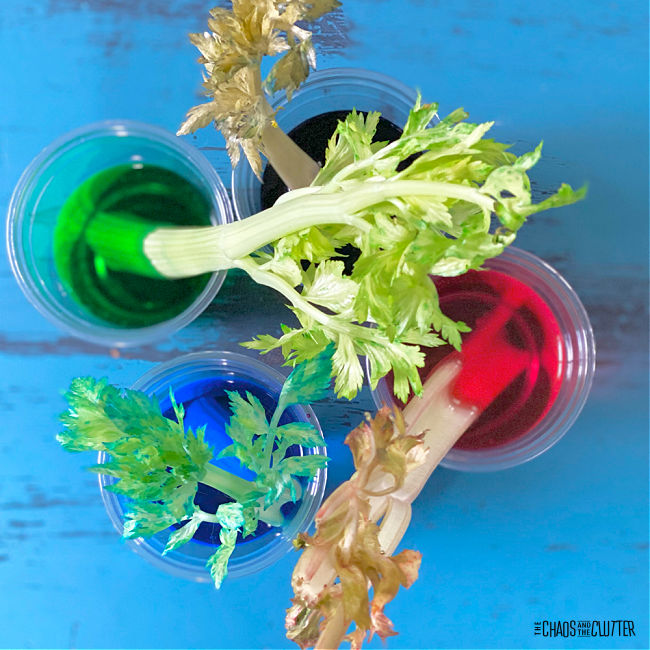
When I started homeschooling and began to incorporate hands-on science fun into our days, it made me wish that I had had the opportunity to do more of that kind of learning when I was in school. I know that many schools now recognize the importance of this and are doing experiments in the classrooms. Learning by doing is learning that lasts. 

Check out some of our other awesome science activities:

Melting Ice Experiment

Easy Earthquake Experiment

How Fold Mountains FormThis is a great hands-on science experiment to explain how fold mountains are formed.

Layers of the Earthhand holding half a ball with layers of colour and a book open to a page about the layers of the Earth

Filed Under: Homeschooling, Simple Science

Science Sensory Bins for Hands-on Learning

By Sharla Kostelyk

Science sensory bins for hands-on learning allow kids to explore through their senses and interact with what they are studying. They are a great way to increase interest and engagement.

collage of images with text that reads "Science Sensory Bins hands-on learning"Hands-on learning is also a great way to increase retention of concepts. Sensory bin are easy to set up but offer a big payoff in terms of interest and interaction. 

Science Sensory Bins for Hands-on Learning

Human Body Sensory Bin

Admittedly, this one is a bit gross, but kids love getting their hands in there and exploring the organs and body parts!

Dig for Fossils Sensory Bin

Learn about dinosaurs and fossil excavation with this hands-on activity.

Bee Life Cycle Sensory Bin

Water beads are the filler for this simple yet effective way to help kids learn the bee life cycle.

Life Cycle of a Chicken Sensory Bin

This sensory play idea includes suggestions for expanding the learning as well as free printables for a farm or chicken unit study.

Magnets, Magnets, and More Magnets

Invite your child to discover the world of magnets in this interactive science experience.

Sea Turtle Life Cycle Sensory Bin

Sea turtles are fascinating. Give your child the opportunity to explore in this simple to make sensory tub.

Praying Mantis Life Cycle Sensory Bin

Bring this sensory play station to your home or classroom as kids learn about these interesting insects.

Solar System Sensory Bin

Photo Credit: team-cartwright.com

How To Make a Tasty Dino Dig for Toddlers and Preschoolers (STEM Fun!)

Create your own archeological dinosaur dig with this fun sensory treat! Dig like a real scientist through the jello Earth layers to dig up your dinos.

Photo Credit: activelittles.com

Hand Washing Experiment for Kids

Proper hand washing experiment for kids using a sensorial water bin.

Photo Credit: www.thekeeperofthememories.com

Whale Investigation Station for Preschoolers

Learn about whales with this Whale Investigation Station for little kids!

Photo Credit: faithandgoodworks.com

Swamp Sensory Bin

Bring the swamp indoors.

Photo Credit: www.adabofgluewilldo.com

Ocean Sensory Bin Sorting Activity

Practise matching and sorting with this ocean themed sensory activity.

Photo Credit: preschooltoolkit.com

Marble Roll STEAM Activity in the Sensory Bin

Combine sensory and science to explore how a marble rolls through different sensory bin fillers.

Photo Credit: teachingmama.org

Arctic Animals Sensory Bin

Photo Credit: www.funlittles.com

Create a pond sensory bin

Explore the possibilities in this pond wildlife habitat small world play activity.

Photo Credit: littlebinsforlittlehands.com

Icy Ocean Sensory Bin And Ice Melt

An icy ocean science activity transforms into a fantastic ocean water sensory bin! Explore the ocean with an under the sea science and sensory play activity!

Using these ideas for science sensory bins, you can expand on a unit study or introduce a new concept to your child or students. 

You may also be interested in reading:

Layers of the Earth Science Project

Easy Earthquake Experiment

Easy Outdoor Sensory Activities


Filed Under: Homeschooling, Sensory Bins, Simple Science

Simple Science: Earthquake Experiment

By Sharla Kostelyk

In the past few weeks, we’ve been learning about the Earth’s layers (you can see how to make a Layers of the Earth model here), tectonic plates, volcanoes, and earthquakes. For the teaching on earthquakes, I wanted to give the kids a hands-on activity that would help them remember what they learned.lego bricks and wooden blocks on a cookie tray. Text reads "hands-on science Earthquake Experiment"
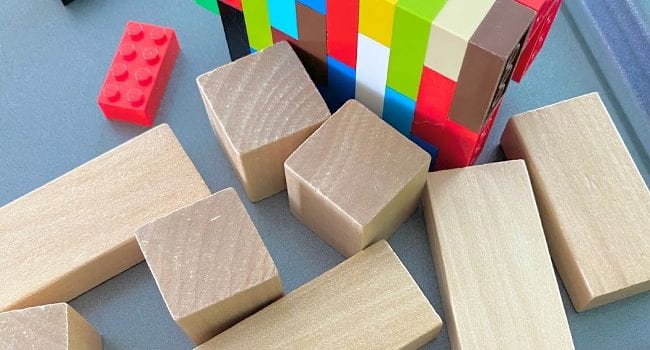
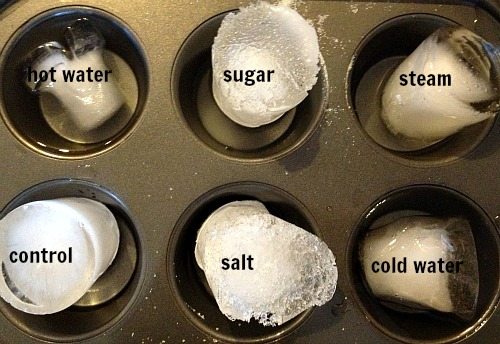
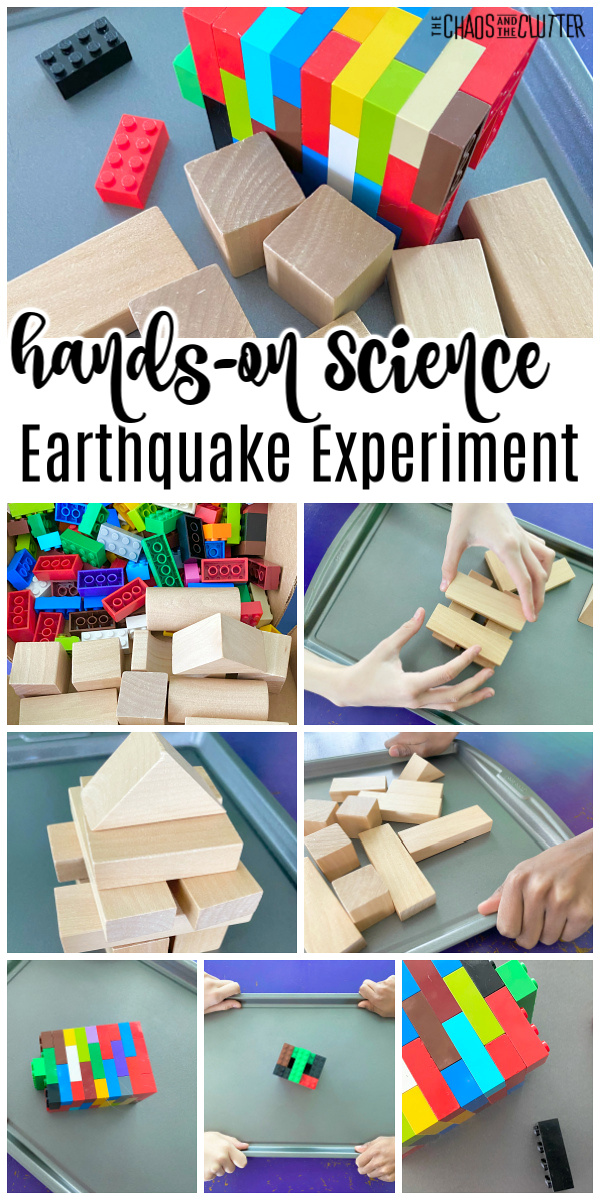
This earthquake experiment is simple and requires very few items to create. This can easily be done at home and chances are, you already have the items you’ll need. 

Earthquake Experiment:

Supplies needed:

  • metal cookie sheet
  • wooden blocks
  • Lego bricks

Directions:

  1. First, have the students construct a tower on the cookie sheet using the wooden blocks.
  2. Have two of the kids sit on either side of the cookie sheet and shake it as if there were an earthquake. Not surprisingly, when we did this, the tower crumbled with very little shaking and the blocks fell.

The metal cookie tray is meant to represent a tectonic plate and the shaking represents the shifting that happens with an earthquake.

Directions Part Two:

  1. Next, work together to construct a tower with interlocking Lego blocks. Our kids, are always excited when Lego and school collide! Made it approximately the same height and shape as the wooden block tower. For us, it took much longer of course to make the Lego brick tower, which led to a discussion about how sometimes doing things the right way takes more time.
  2. Set the new tower on the cookie sheet and have two kids sit on either side (in order for the experiment to be as scientific as possible, we wanted to use the same people so that they could attempt to create the same earthquake force). At first, they recreated the same shaking they had the first time and the tower stayed intact.
  3. Simulate a larger, more powerful earthquake. When we did this, they became more and more forceful with the shaking, eventually lifting the tray up and banging it up and down as well as side to side before they were able to knock the tower over and dislodge a few of the bricks.

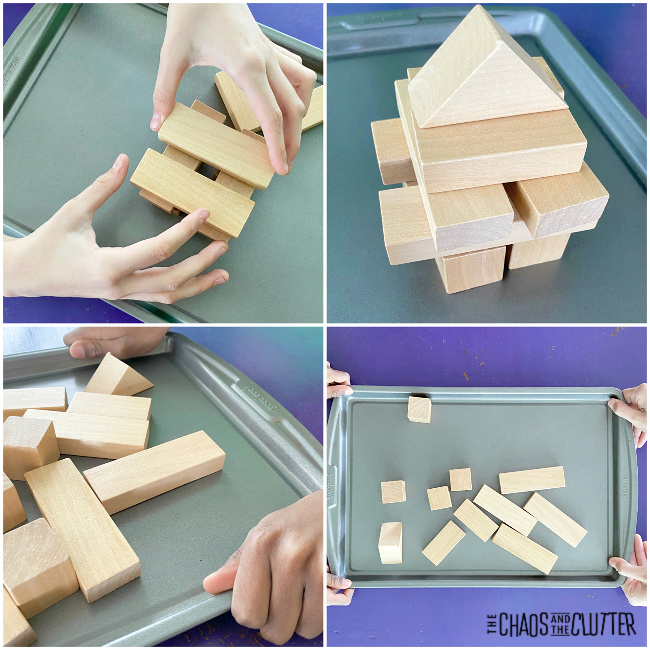
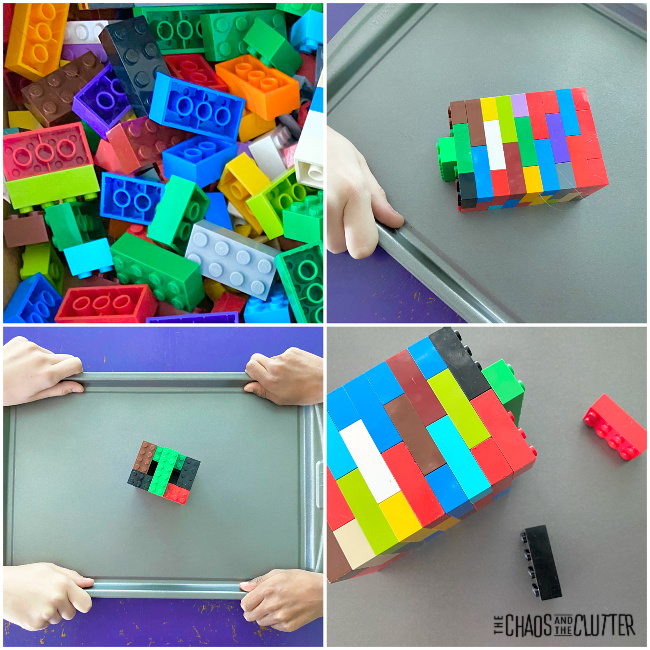
This simple earthquake experiment is an easy way to demonstrate to kids why buildings in earthquake-prone areas need to be built differently to withstand the fallout of the quakes.

Ways to expand your learning about earthquakes:

  • Experiment to show the destruction of earthquakes along fault lines
  • Seismic Waves
  • Tectonic Plates, Earthquakes, and Volcanos
  • What is an Earthquake?

Books for Kids about Earthquakes:

Why Do Tectonic Plates Crash and Slip? Geology Book for KidsWhy Do Tectonic Plates Crash and Slip? Geology Book for KidsWhy Do Tectonic Plates Crash and Slip? Geology Book for KidsEarthquakes and Other Natural DisastersEarthquakes and Other Natural DisastersEarthquakes and Other Natural DisastersTummy Rumble Quake: An Earthquake Safety BookTummy Rumble Quake: An Earthquake Safety BookTummy Rumble Quake: An Earthquake Safety BookEarthquakes! - An Earthshaking Book on the Science of Plate TectonicsEarthquakes! – An Earthshaking Book on the Science of Plate TectonicsEarthquakes! - An Earthshaking Book on the Science of Plate TectonicsJump Into Science: EarthquakesJump Into Science: EarthquakesJump Into Science: Earthquakes


You may also be interested in these other easy science activities for kids about the Earth:

Layers of the Earth Hands-On Science Activity

Making GroundwaterScience Groundwater Experiment

How do Fold Mountains FormThis is a great hands-on science experiment to explain how fold mountains are formed.

Filed Under: Homeschooling, Simple Science

Layers of the Earth Hands on Science Activity

hand holding half a ball with layers of colour and a book open to a page about the layers of the Earth

By Sharla Kostelyk

When teaching students about the structure of the Earth, this 3D layers of the Earth project really helps bring it to life. Using a hands-on activity like this helps kids be able to conceptualize what they’re learning and be able to retain it. 3D model made with modelling clay. Text reads "Layers of the Earth Science Project"
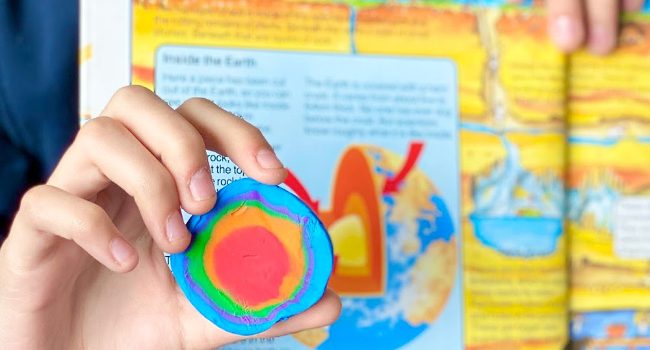
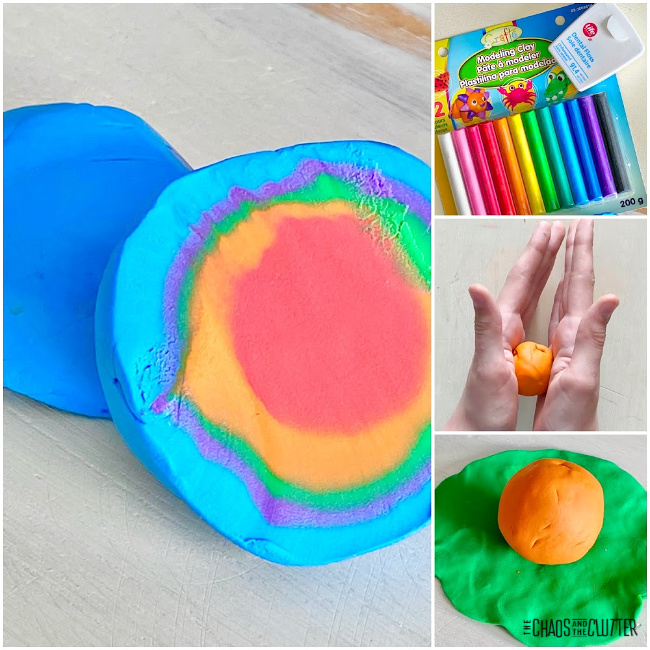
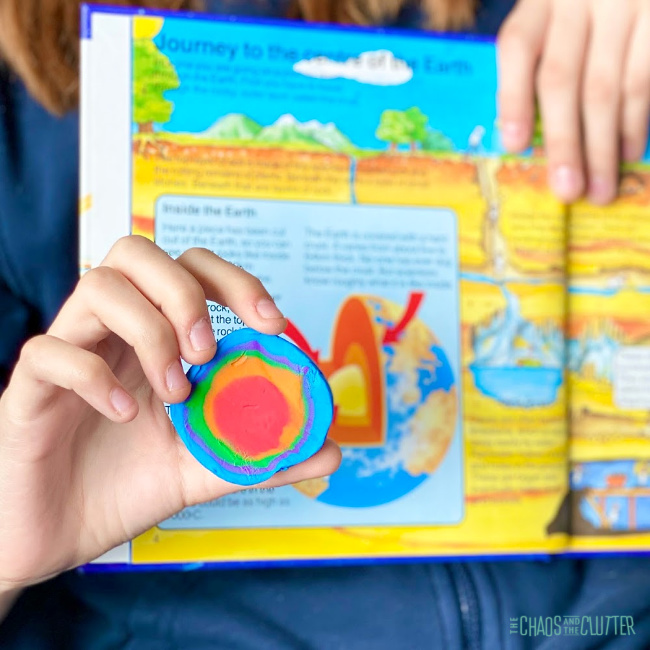
This project is super easy to make with minimal supplies. Watch the video below to see exactly how to shape your layers of the Earth visual model. 
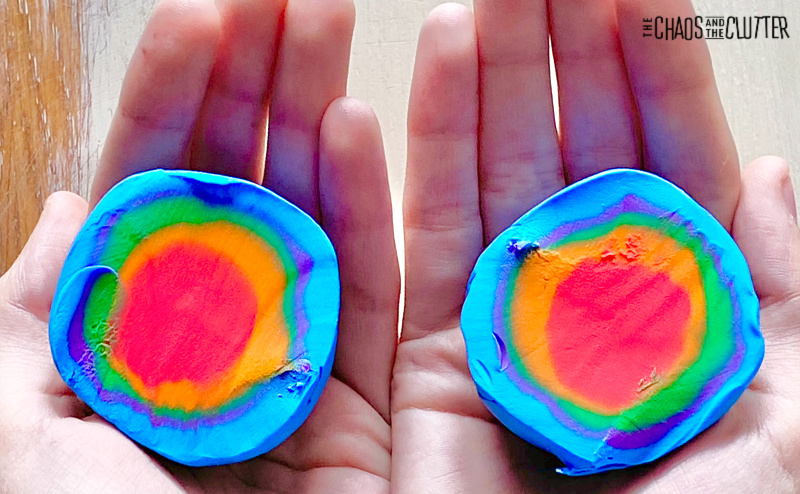
Layers of the Earth Activity:

To create this 3D model of the layers of the Earth, you will need just a few easy-to-acquire supplies. 

Supplies needed:

  • 5 colours of modelling clay
  • waxed dental floss

Directions:

  1. Form a ball to represent the inner core. We chose red to represent the intense heat of the inner core.
  2. Next, roll out a circle of another colour and wrap around the ball and roll gently. This next layer represents the outer core.
  3. Each subsequent colour will need more modelling clay than the last. You will need a colour to represent the lower mantle, another for the upper mantle, and the outer layer for the crust.*
  4. Once your ball of 5 layers of modelling clay is complete, use a piece of waxed dental floss to cut the ball down the middle, revealing all the layers underneath.

*Be sure not to press the layers too firmly together so that the colours don’t mix.

Ways to expand on this activity:

  • Have your child draw a diagram depicting the layers and labelling them. 
  • Set out books about the Earth for your child to peruse. 
  • Hang up a learning poster in your classroom or home to give kids another visual cue.
  • Make a Layers of the Earth Soap with the kids.
  • Make some Layers of the Earth Pudding Cups as a related snack.

Earth Books to go along with this science unit:

The Ultimate Book of Planet EarthThe Ultimate Book of Planet EarthThe Ultimate Book of Planet EarthMy First Book About Our Amazing EarthMy First Book About Our Amazing EarthMy First Book About Our Amazing EarthThe Big Earth BookThe Big Earth BookThe Big Earth BookEarth and Space Coloring Book: Featuring Photographs from the Archives of NASAEarth and Space Colouring Book: Featuring Photographs from the Archives of NASAEarth and Space Coloring Book: Featuring Photographs from the Archives of NASA


You may also be interested in these hands-on science activities for kids:

Melting Ice Experiment

Human Body Sensory Bin

Colour Mixing Sensory Bottle

Filed Under: Homeschooling, Simple Science

Life Cycle of a Chicken Sensory Bin

By Sharla Kostelyk

Hands-on learning is the best kind of learning. Let kids explore farm animal science in this Life Cycle of a Chicken Sensory Bin. This lesson can be used with preschoolers and students in early elementary.popcorn seeds, dry noodles, chicken, egg, chicks. Text reads "Life Cycle of a Chicken Sensory Bin"

You can set up this sensory bin as part of a Farm unit. It’s a cute way to introduce the farm unit or set up a sensory station in your home or classroom. This is also a super cute activity to do in the springtime. 

Life Cycle of a Chicken Sensory Bin:

Supplies needed:

  • plastic bin
  • popcorn seeds
  • dry noodles (like the kind you use in chicken noodle soup ironically!)*
  • life cycle of a chicken pack
  • optional: scoops or spoons

Note: *I found my dry noodles at the bulk foods store.

Directions:

  1. Place the popcorn kernels and dry noodles in a plastic bin.
  2. Add the figures from the life cycle of a chicken pack.
  3. Invite your child to explore and play.

Ways to expand this activity:

  • Set out books about farm animals and/or chickens nearby to expand on this activity.
  • Talk about the sounds chickens make and have your child imitate the noise.
  • Discuss what kinds of things we use eggs for.
  • Make a recipe that uses eggs together. 
  • Learn more about chickens and raising chickens using the resources listed below.
  • Visit a local farm. 
  • Raise chicks. 
  • Print off this puzzle. Cut out the pieces for kids to assemble.

The stages of development of a chicken are:

  1. egg development
  2. hatchling
  3. chick
  4. pullet (adolescent)
  5. chicken

If your kids want to learn more about chickens, here are some resources to help you expand their knowledge:

Life Cycle of a Chicken Puzzle (free printable)

Life Cycle of a Chicken Printable Cards

Chick to Hen Life Cycle Craft

Learn the 4 key stages of the chicken life cycle.

How to Collect and Clean Chicken Eggs

Chicken Farm Animals: Baby to Grown

All About Chickens for Kids and Teachers

Sign up to download your FREE Chicken Life Cycle printable puzzle.

Check out some of our other Life Cycle Sensory Bins:

Sea Turtle Life Cycle Sensory BinBee Life Cycle Sensory Bin

Praying Mantis Life Cycle Sensory Bin

Filed Under: Homeschooling, Printables, Sensory Bins, Simple Science Tagged With: sensory play

  • Page 1
  • Page 2
  • Page 3
  • Interim pages omitted …
  • Page 5
  • Go to Next Page »

Primary Sidebar

Categories

We are a participant in the Amazon Services LLC Associates Program, an affiliate advertising program designed to provide a means for us to earn fees by linking to Amazon.com and affiliated sites.

Copyright © 2025 • The Chaos and the Clutter • Site Design by Jeni @ The Blog Maven

Return to top of page

Copyright © 2025 · Chaos and the Clutter 2.0 on Genesis Framework · WordPress · Log in