• Skip to primary navigation
  • Skip to main content
  • Skip to primary sidebar
  • Home
  • About
  • Contact
  • Privacy + Terms
  • Affiliates

The Chaos and the Clutter

  • Facebook
  • Twitter
  • Pinterest
  • Google Plus
  • RSS
  • Email
  • School at Home
  • Sensory
    • Sensory Processing Disorder
    • Awesome Sensory Play Activities
      • Sensory Bins
      • Sensory Bottles
      • Sensory Bags
  • Family Games
    • Minute to Win It Games
  • Special Needs Parenting
    • Childhood Anxiety
    • Reactive Attachment Disorder
    • Sensory Processing Disorder
  • Store
  • Course Login

sensory bin

Rainbow Soap Foam

a black child's hand is reaching up from a bin of soap foam holding blue and pink soap foam. The bin contains areas of pink, blue, purple, and yellow soap foam.

By Sharla Kostelyk

I used this fun recipe to create a sensory bin of sorts for the kids to play in. This rainbow soap foam activity was part art activity, part sensory, part colour mixing science experiment, and all fun!

Rainbow Soap FoamRainbow Soap Foam Recipe:

Materials needed:

  • food colouring
  • water
  • Palmolive dish soap
  • hand mixer
  • optional: glitter

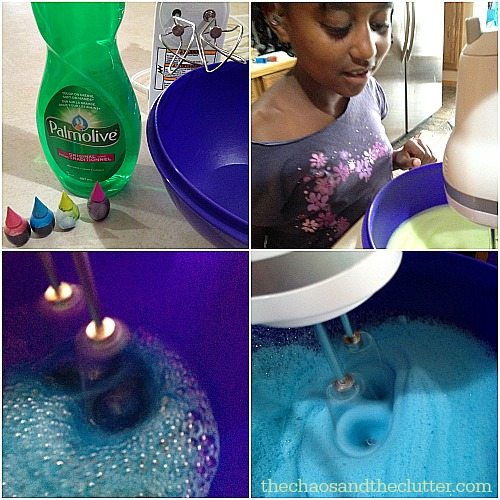
1. In a bowl, add 1/4 cup water, 2 Tbsp. Palmolive dish soap and 5-10 drops of food colouring. I also added some glitter in the same colour as the food colouring to this step.

2. Mix on high with a hand mixer for about 2 minutes, until peaks form.

3. Put the foam into a shallow bin. On a rainy day, you could put it into the bathtub.

4. Rinse the bowl and beaters and follow the instructions again using a different colour of food colouring. Repeat until the desired number of colours are created, adding each to the bin.

making soap foam

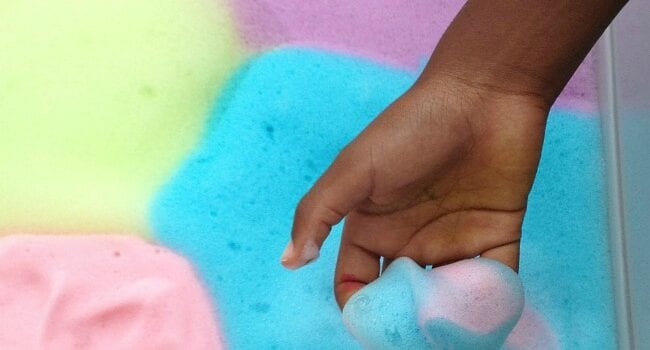
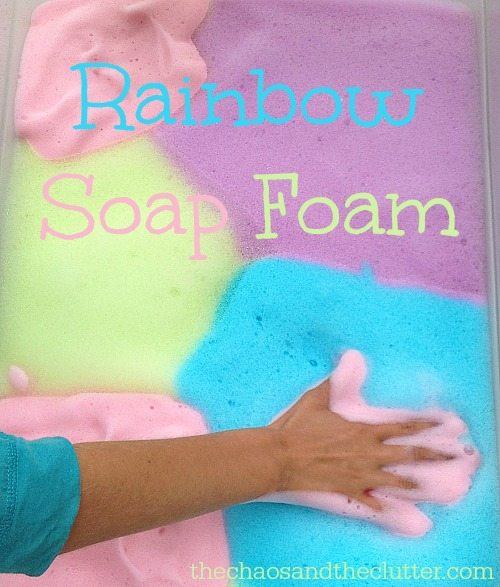
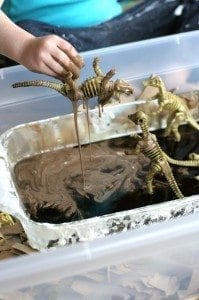
When I had made four colours of soap foam, I brought the bin outside and let the kids play and explore with it. They enjoyed mixing the colours and playing with the foam. They tried to use it to paint on the concrete with their hands, but mostly only the glitter stayed visible.

playing with Rainbow Soap FoamMy girls really enjoyed the textures of the soap foam and seeing the different colours they could create by mixing.

They enjoyed every step of this activity from helping me mix the recipe in the kitchen to playing with the finished product.

Even one of our new kittens came over to see what all the fuss was about!

Be sure to have your kids wash their hands when they are done playing so that they don’t get soap in the eyes accidentally and of course, as with all projects, adult supervision is recommended. 

Find these instructions along with the coolest sensory play recipes around in the Sensory Play Recipes eBook. You’ll find recipes for everything from slimes to oobleck to edible paints and playdoughs and more.

Join our free 5 part email series and get a sample of 5 recipes from our Sensory Play Recipes ebook:

Filed Under: Crafts and Activities, Sensory, Summer Sensory Activities Tagged With: sensory bin, sensory play

Calming Lavender Sensory Bin

Calming Lavender Sensory Bin

By Sharla Kostelyk

I have been wanting to make a lavender sensory bin for the kids for awhile now. Dancing Queen struggles with anxiety and we do as much as we can to help her regulate her anxiety. She loves the lavender playdough I make. It really does seem to have a calming effect on her. I reasoned that since sensory bins already help my kids with their regulation, a lavender one may have even more of a calming effect which would be good for all of them but especially for Dancing Queen.

Calming Lavender Sensory Bin
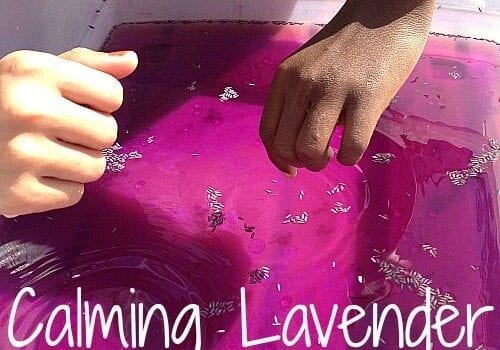
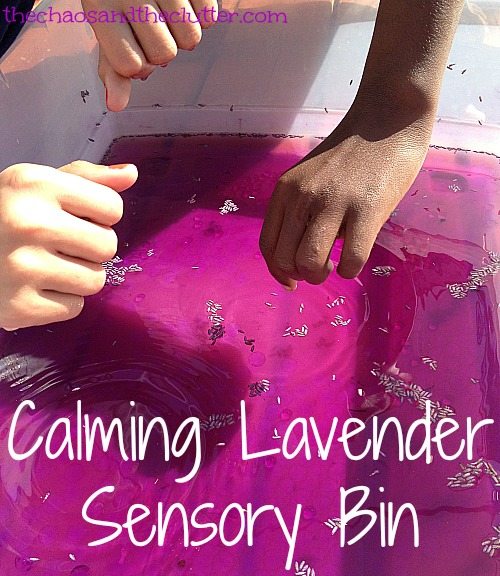
For this sensory bin, I used a large shallow tub so that I could put the bin on the deck. I used purple gems and added
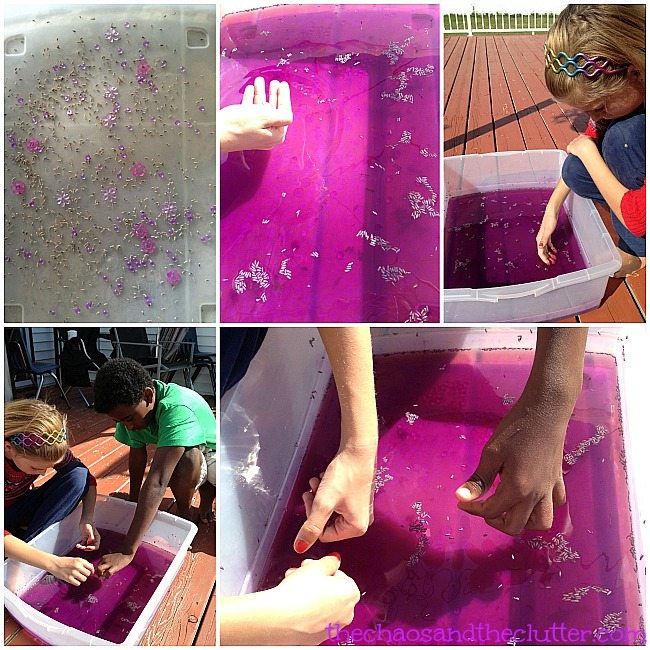
 real lavender and purple water beads. I used a pitcher to add water and it took on a light purple colour because of the water beads.

Lavender Sensory BinThe smell of the lavender was really nice. Once the water was added, the scent was considerably stronger but not overpowering. The plastic gems made a good contrast for the texture of the water beads.

In place of the dry lavender, you can use a few drops of lavender essential oil.

The kids enjoyed playing with this lavender sensory bin outside. It held their attention for long periods of time this week. With the water, various textures and smell of the lavender, it really did seem to have a calming effect on them.

One of the nice things about being back into our regular homeschool routine is having a weekly sensory bin. It forces me to come up with new ideas and even though I keep thinking that I will run out of ideas after so many years of making sensory bins, I haven’t run out yet! The kids like experiencing the new bins and look forward to seeing what each week’s theme is going to be.

Join our free 5 part email series Sensory Solutions and Activities and get our Sensory System Behaviours Easy Reference Cards.

If you are looking for information on making sensory bins,you may be interested in my book. The Ultimate Guide to Sensory Bins

Filed Under: Sensory, Sensory Bins Tagged With: sensory bin, sensory play

How to Host a Sensory Bin Swap

By Sharla Kostelyk

Earlier this week, I had a few friends over for a busy bag and sensory bin swap. I wasn’t as organized as I wanted to be but it still took us no time at all to put together our bins and each of us ended up with four different sensory bins. I would call it a success!

How to Host a Sensory Bin Swap
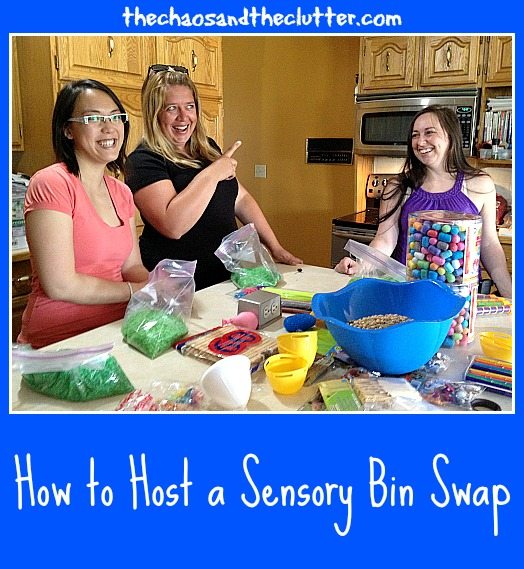
Doing a sensory bin exchange is a great way to get new ideas too and share what works well with your kids and learn what is working well for others.

There are several different ways that a sensory bin swap can work but all are great ways to keep the costs down and get some new ideas.

Here are a few ways a sensory bin swap can work:

1. A group of moms can each make one sensory bin and then once a week or once a month, they can rotate their bin over to the next mom. If you have a group of six moms participating, this will mean that your kids will get to play with six different sensory bins and you’ll only have to make one!

2. A group of moms can each make one theme bin but duplicate it as many times as there are people in the group. The moms then get together and give out their bins. Each mom will go home with as many bins as there are people in the group. It’s fun to add a dinner out or at least tea when getting together as a reward for all your work assembling the bins!

3. A group of moms can work together to create all the bins or bin bases. You will make one of each type for everyone in the group so the amount of sensory bins you go home with at the end will depend on how many you all have planned.

Of course, you can also do an informal swap with just one other mom and rotate your bins out that way. There will be less variety in doing it that way.

How to plan for a sensory bin swap:

  1. Find friends who want to join you and decide which type of swap you want to do. Don’t know any moms in your area who make sensory bins? Ask in your online groups or ask other moms you know to help you spread the word that you are looking to organize a swap. You will likely have a lot of interest.
  2. Decide upon the sensory bins that you want to make so that you are sure there won’t be duplicates.
  3. Buy supplies.
  4. Make your sensory bin(s).
  5. Get together to exchange bins.

Supplies needed:

You will need large resealable bags or stackable bins with lids to store the sensory bins in.


You will also need sensory bin bases. There are so many options for sensory bin bases. I have a list of non-food sensory bin bases that you can read for ideas or you can use one of the common food bases such as rice or dried beans.

Sensory Bins Ideas:

bags for sensory bin swap
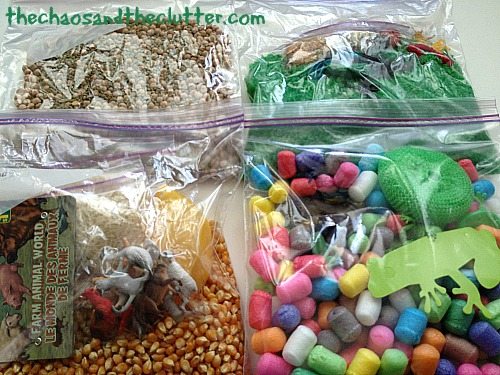
At our sensory bin exchange, we each ended up with the makings of four bins.

For the bug sensory bin, we used rice that I had dyed green. I provided peppermint oil to scent the rice but didn’t do it ahead of time because some kids don’t like certain scents and I wanted to let everyone make a choice for their family. For those who wanted the scent, I added a few drops of the peppermint oil to the bag and once shaken, we had peppermint scented rice.

I had gotten a pack of stretchy spiders and a pack of stretchy caterpillars so we divided those up among the bags. I had also found some bug shaped pasta at Bulk Barn and we put that into small bags to add as well. I also had some plastic spiders and we threw some of those in as well. I had some toy insects that I put into my bag.

bug sensory bin in a bag

For the farm sensory bin, we used popcorn seeds as the base and added a smaller bag of dry soup noodles for the hay. I found silicone yellow egg poachers in sets of two at the dollar store that I thought would work really well in a farm bin.  I also found little sticks called matchsticks and knew they would be great for making fences in this farm bin. I included a little pack of farm animals for everyone.

farm sensory bin in a bag
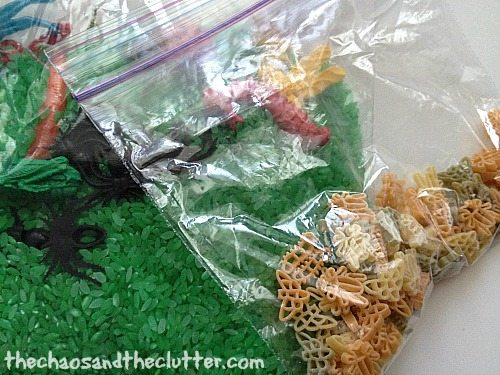
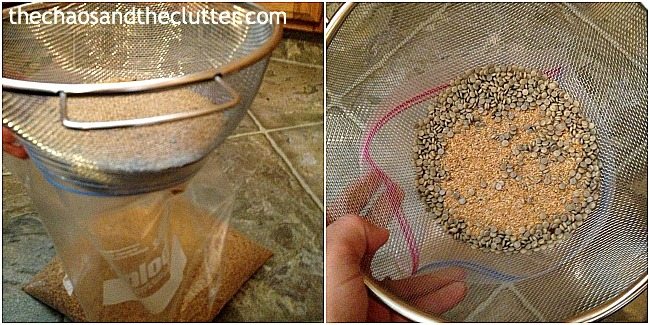
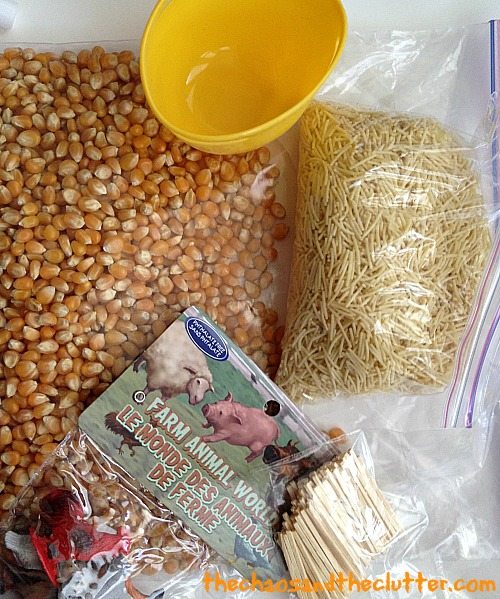
The kids and I made our farm bag into a bin later in the day. I added a few of our toy animals and the bin was ready for play. I also added a funnel and a small container and lid for pouring and scooping. Granola Girl liked scooping the popcorn seeds into the container, putting the lid on and shaking it to hear the sound it made.

farm theme sensory bin
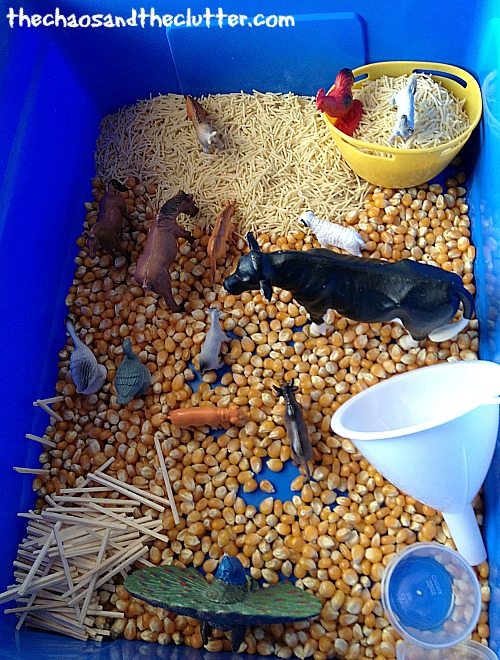
This sensory bin wasn’t originally a frog bin, but I had bought a pack of jump frogs and a pack of kitchen sponges from the dollar store and when I commented that the sponges would make good lily pads, a frog bin was born! We included play puffs (I bought two pails of them at the dollar store and we each took half a pail), a kitchen sponge, a frog stencil, plastic jump frogs, stretchy frogs, and toy frogs that I had in the house already. Once my kids have used this bin, I can re-use the play puffs for crafts.

frog sensory bin in a bag

For hundreds of sensory bin ideas, you can also follow my Sensory Bins board on Pinterest. Follow Sharla Kostelyk’s board Sensory Bins on Pinterest.

How a sensory bin swap saves money:

Hosting a sensory bin swap enables you to buy things in larger packages and share the cost. This can be as simple as splitting a set of funnels that you pick up at the dollar store or can be a larger item such as splitting the cost of a huge bag of kidfetti.

I shopped for our sensory bin items at the dollar store and at Bulk Barn. Not including the cost of the bags or bins, each of the sensory bins averaged $2.50. We each paid $10 and ended up with four sensory bins and a few other odds and ends like a homemade sensory ball. Had I made just one of each bin, some of the costs (like buying a pack of stretchy caterpillars just to use a few) would have stayed the same so the cost of my bins would have been much higher.

This post is part of a 5 day series on Simple Sensory Solutions as part of a Hopscotch with iHomeschool Network. Pop over and see the other great topics from an amazing group of writers!

If you are looking for information on making sensory bins, you may be interested in my book. The Ultimate Guide to Sensory Bins

Filed Under: Sensory, Sensory Bins, Simple Sensory Solutions Tagged With: sensory bin

Seaside Sensory Bin

By Sharla Kostelyk

I find that coming up with sensory bins in the summer is so much easier than in the winter. Not only are themes somehow easier to think of, there are not as many limits because clean up is so much simpler. If it’s a bin that is going to potentially become a huge mess, I can set it up on the deck or in the lawn and the mess is no longer a consideration. This seaside sensory bin wasn’t that messy, but it still floated between outside and inside as the kids took it where they wanted it.

Seaside Sensory BinWhen I was grocery shopping on the weekend, the pool noodles were on clearance, so I picked one up knowing that I could find a use for it. Out of one pool noodle, I was actually able to make this sensory bin, a busy bag, an activity, and still have half leftover that is currently being used by my children as a sword!

To create this sensory bin, use a serrated knife to cut pieces of the pool noodle. In one area of the bin, put sand and seashells to create the shore. In the other, put the pool noodle pieces, glass beads and little blue foam bits. I chose these items both for the variety of texture they created. I also thought that the pool noodle slices gave the illusion of waves and the little foam bits looked like bubbles.

Seaside Sensory Bin square

Seaside Sensory Bin:

Supplies needed:

  • blue or teal pool noodle, sliced
  • sand
  • blue foam bits
  • seashells
  • blue and clear glass beads
  • plastic tub

Directions:

  1. Slice the pool noodle. This step should be done by an adult. A serrated knife works best.
  2. Place sand, foam bits, glass beads, seashells, and pool noodle slices in a plastic tub.
  3. Invite your child to play.

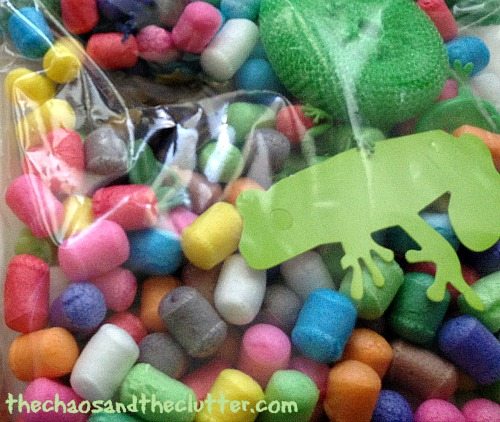
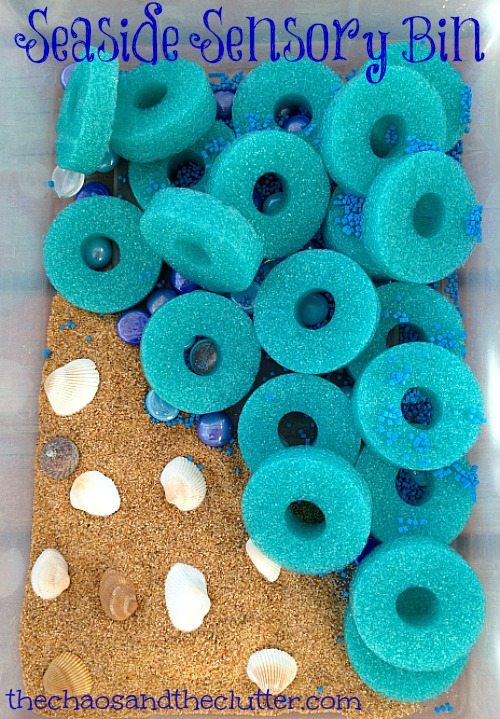
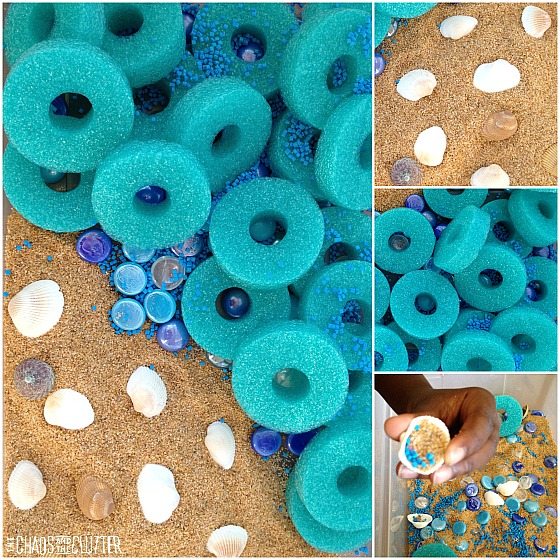
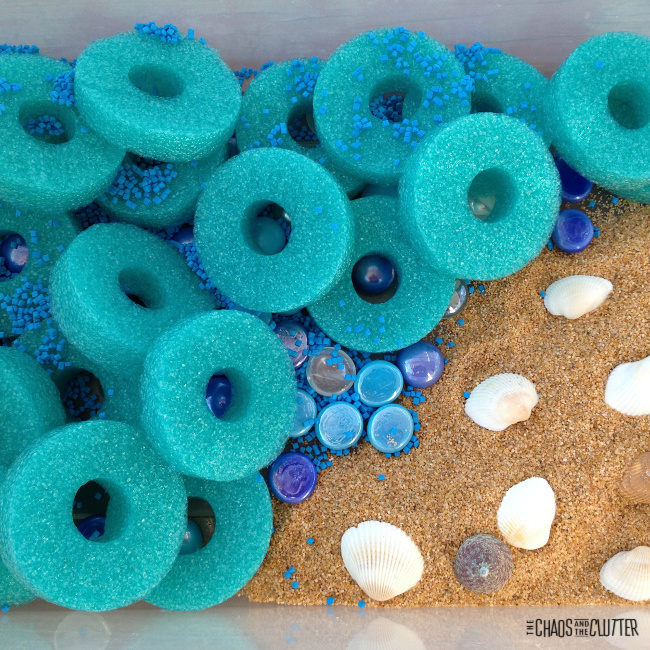
The seashells make great scoops for play. My kids also invented a game of holding one of the pool noodle pieces in their mouth and having others stack the rest of the pieces on top of that piece to see how high of a tower they could create without it falling. It’s not quite what I had in mind when I made the bin, but I like to let them direct their own play!
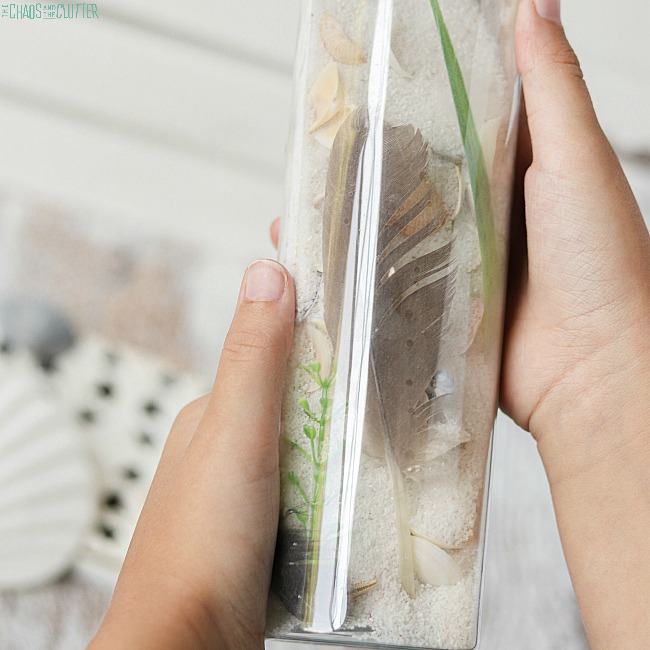
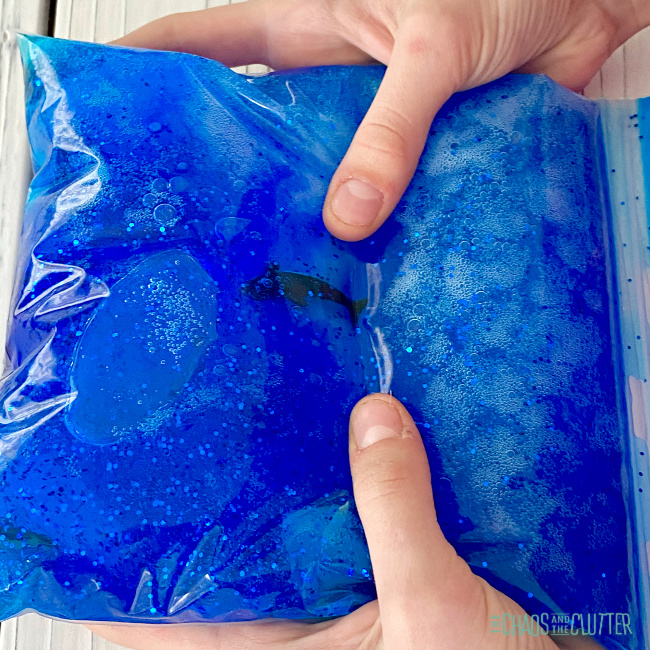
If you are looking for more sensory bin ideas or information, you may be interested in my book.

The Ultimate Guide to Sensory Bins

Join me for a free 5 part email series Sensory Solutions and Activities and get your Sensory System Behaviours Easy Reference Cards.

Check out these other beach themed sensory activities:

At the Beach Sensory Bottle

Ocean Sensory Bag

Filed Under: Sensory, Sensory Bins Tagged With: sensory bin, sensory play

Sensory Bin Cleanup

By Sharla Kostelyk

Since I wrote my book on Sensory Bins, one of the most common questions I get is about the cleanup. Although I do address both how to prevent or cut down on messes and how to clean them up in the book, I have a few additional suggestions and I’d love to hear your suggestions as well.

Hate the messiness of sensory play? Here are some tips.Image credit: MatHayward / 123RF Stock Photo

One of the easiest ways to clean up of course is to avoid the mess in the first place or to control where the mess happens. Sensory sinks are a great way to contain the mess of a sensory bin in an easy to clean area. Here’s an example of a sensory sink from Teaching Mama.

playing-with-penguins-1024x682

The bathtub is another great location for a sensory bin. The deck or backyard are other great areas to house your sensory play when the weather allows it. Controlling where the mess happens will help you with clean up later.

Another tip is to place your sensory bin inside a larger, deeper container such as a Rubbermaid storage tub. This way, any spilling over of the materials will go into the tub instead of all over your floor. This works especially well with little ones as they then have to bend way over to access the sensory bin and don’t quite have the leverage to throw its contents all over the floor!

I suggest that you never have sensory bin play on a carpet as carpet are harder to clean. Many sensory bin bases can easily be swept up after play as long as they are dry bases.

Dry sensory bin bases are easy to clean up as long as they don’t get wet. Try to teach your kids to keep water or other liquids away from those sensory bins. My kids are a bit older and are very good about this but when we have little ones come over, which is fairly often, water does get mixed into a dry bin from time to time. Water and dyed purple rice for example was a bit more unpleasant to clean up. It also meant that I couldn’t re-use that purple rice in a subsequent bin as it had to be thrown out. Water and black beans or dry lentils are also some of the mishaps we’ve had around here.

At the dollar store, you can buy shower curtain liners. They often come in clear but you can get them in pretty much every colour under the sun if you want to create a more cheerful look to accompany the play. These are great for placing underneath a sensory bin, particularly a bin with a messy base such as this one from Fun at Home with Kids.

ooey gooeyYou can use all kinds of things for a drop cloth underneath your sensory bins including old blankets, an actual painter’s canvas drop cloth, or plastic disposable tablecloths (these can also be found at the dollar store). If you are using something such as the shower curtain liner or the plastic tablecloth and things really get out of hand, then you can always bundle up the mess afterwards and throw the whole thing away and only have spent $1.

Of course no matter how well you plan and prepare, sensory bins are probably going to lead to messes. A few months ago, one of the younger kids who was over visiting dumped two of our sensory bins together. One was our desert sensory bin and the other was a construction sensory bin. I had been planning to make other bins using the sand base of the desert bin and sand is not the cheapest base out there, so I decided I was going to have to find a way to salvage it.

I removed all the larger items and then used a colander placed above a large Ziploc bag to sift out the sand from the Kidfetti (also one of the more expensive sensory bin fillers) so that I would be able to re-use both bases. It was a bit of a tedious task but it worked!

separating sensory bin bases

The best rule of thumb really is not to create sensory bins that have a potential mess factor that you aren’t willing to live with!

Now if cleaning up sensory bins just isn’t your thing but you still want your kids to be able to enjoy some sensory play, you can always fill a sink full of water and bubbles and have them clean their toy cars or dishes. You can even have them clean some real dishes while they’re at it!

For instructions on how to create a sensory bin, information about why they are so beneficial for children, relevant recipes, printable idea lists and more, get your copy of my ebook Sensory Bins: the What, the How & the Why.

Sensory Bins Cover 3DWhat tips have you found for cleaning up sensory bins?

Join me for a free 5 part email series Sensory Solutions and Activities and get your Sensory System Behaviours Easy Reference Cards.

Filed Under: Sensory, Sensory Bins Tagged With: sensory bin

Create Your Own Sensory Bin

By Sharla Kostelyk

Sensory bins have always been something that I have created for the kids with very little input from them. Once I create them, the kids play with them, but the process of making them has always been something that is mine. Normally, I choose a theme, plan out what I’m going to include, make a list or take notes, go shopping for supplies if I need to, and then assemble the sensory bin. Sometimes in a pinch, I will go over to my sensory supplies cupboards and throw something together but usually, I have a plan.

Create your own Sensory Bin...a creative challenge for kids

Sarah from Little Bins for Little Hands put out a challenge to set out a bin with white rice and allow our kids to create their own sensory bin without any instruction from us. It sounded like fun and I was really interested to see what my kids would come up with so I took her up on it!

I set out five bins on the table, each filled with a layer of plain white rice. I did give one instruction to the kids which was that they should steer clear of adding anything wet to the bins (we have experienced several times what happens when liquid is added to a sensory bin that has rice as a base and it’s not pretty!).

It was so neat to see not only the kids’ personalities represented in their finished bins, but also to see their sensory preferences. Our older kids who weren’t home at the time the five younger kids made their bins were actually able to later guess whose was whose just based on personality!

The kids know where I keep the sensory supplies and they have been itching to get their hands on the stuff in those drawers! One of the first questions they asked me was if they were allowed to use those items. I say “yes”. The second question they asked was if they were allowed to add food or things they found in the kitchen. I say “yes” to that as well.

They tore off in search of items to add to their bins. It was clear from the beginning that some had a clear plan while others were just adding what felt good to them or what they saw their siblings add to theirs!

creating their own sensory bins
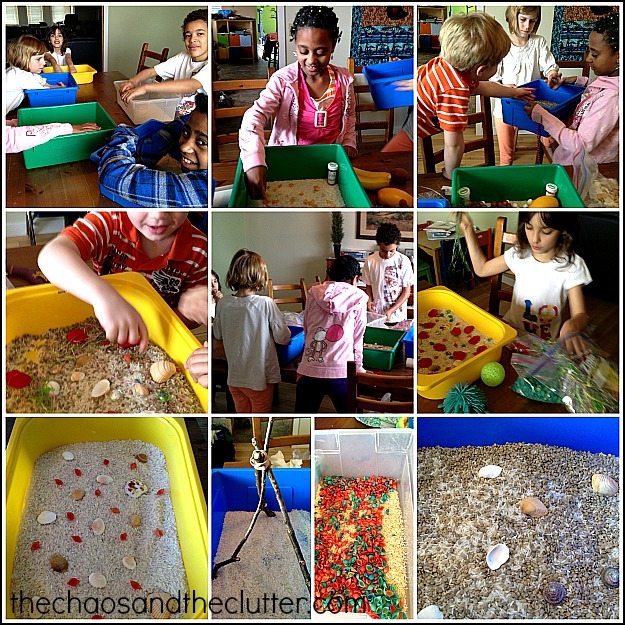
I have to be 100% honest and say that it was painful for me to watch some of this process. It was painful to watch certain things get mixed together when I knew there would be no hope of separating them again and it was painful sometimes not to offer instruction or give suggestions. I was sometimes cringing when I saw what they were adding, so this was as much a learning exercise for me as it is for them.

Here are the kids and their completed sensory bins:

Miss Optimism sensory bin
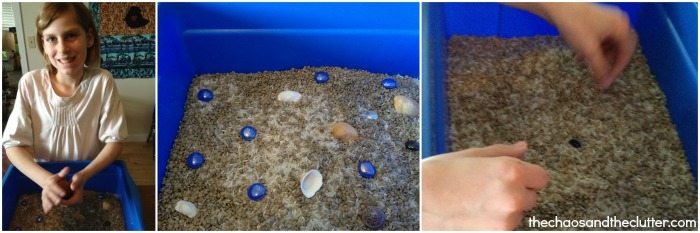
Miss Optimism chose to add Kidfetti to the rice as a base. It’s interesting because the Kidfetti has a very similar feel to the rice. It’s smooth and soft. She initially added some glass stones and sea shells to create a beach scene, but in the end, she ended up taking all of those out because she preferred the feel of her bin without them. Later that day, she hid a coin in the bin and made a game out of having the other kids retrieve it.

Einstein sensory bin
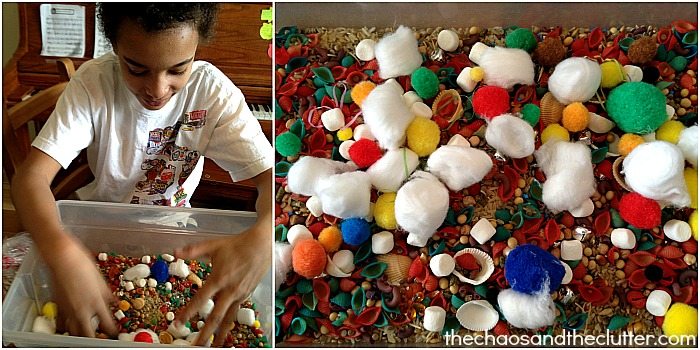
Einstein added anything he could get his hands on and just loved the feel of all the different textures. MORE is MORE apparently for Einstein! He added Kidfetti, dried lentils, dried chickpeas, birdseed, dried beans, mini marshmallows, dyed pasta shells and macaroni, pompoms, jingle bells, cotton balls, shells, Easter grass, and ribbon. He pretty much used every sensory bin filler that I had!

Snuggle Puppy sensory bin
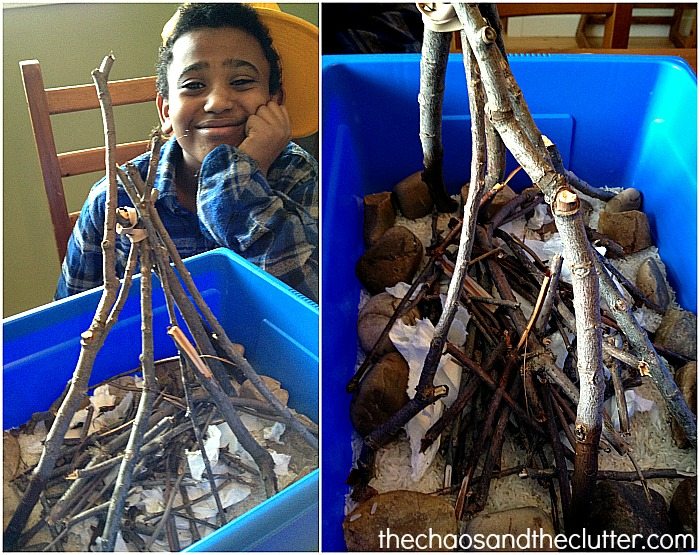
Snuggle Puppy headed straight outside to gather items for his bin. He had a plan from the beginning and his bin was less about sensory and more about story. He told me to tell my “people that read your blog” that the title of this is “Mommy’s first time camping”. He is obviously excited that I am going to be coming camping for the first time in his life this upcoming summer. He used sticks, twigs, shredded paper, and rocks to create a campfire scene.

Granola Girl sensory bin
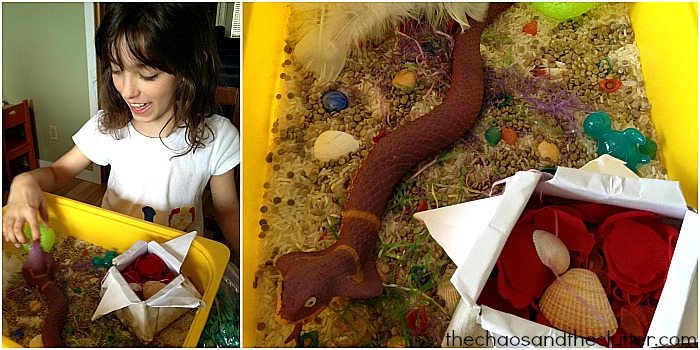
Granola Girl started with a very organized bin that can best be described as minimalist but as the time passed, she began to be influenced by her siblings and add some of the things they were adding. She used Kidfetti, an origami box, silk flower petals, seashells, shaped ice cubes, feathers, Easter grass, dyed pasta shells, a ball, a stretchy frog, and a squishy snake.

Dancing Queen sensory bin
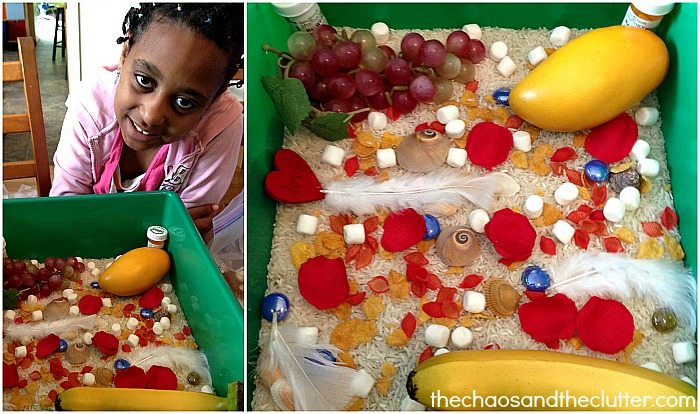
Dancing Queen’s sensory bin had a distinctive theme of food. She used both real and pretend food. She added corn flakes, mini marshmallows, glass beads, feathers, shells, a wooden heart, flower petals, her pill bottles, and a pretend mango (her favourite fruit), bananas and grapes. She also threw in some red dyed pasta.

If you are interested to see how other kids reacted to this sensory bin challenge, there are a number of blogs who are sharing their experiences with this.

rice sensory bin challenge

Little Bins For Little Hands

A Mommy’s Adventures

Craftulate

Creative World of Varya

FSPDT

Gift of Curiosity

Glittering Muffins

Here Come the Girls

Kids Play Space

Lalymom

Life Over C’s

Life with Moore Babies

Minne-Mama

P is for Preschooler

Preschool Inspirations

School Time Snippets

Squiggles and Bubbles

Still Playing School

Suzy Homeschooler

Teach Beside Me

Teach me Mommy

 If you are looking for other sensory play activities, you may be interested in following my Sensory Bins Board on Pinterest.

Check out my book on Sensory Bins! It is fantastic!

Filed Under: Sensory, Sensory Bins Tagged With: sensory bin, sensory play

  • « Go to Previous Page
  • Page 1
  • Interim pages omitted …
  • Page 4
  • Page 5
  • Page 6
  • Page 7
  • Page 8
  • Page 9
  • Go to Next Page »

Primary Sidebar

Categories

We are a participant in the Amazon Services LLC Associates Program, an affiliate advertising program designed to provide a means for us to earn fees by linking to Amazon.com and affiliated sites.

Copyright © 2026 • The Chaos and the Clutter • Site Design by Jeni @ The Blog Maven

Return to top of page

Copyright © 2026 · Chaos and the Clutter 2.0 on Genesis Framework · WordPress · Log in