• Skip to primary navigation
  • Skip to main content
  • Skip to primary sidebar
  • Home
  • About
  • Contact
  • Privacy + Terms
  • Affiliates

The Chaos and the Clutter

  • Facebook
  • Twitter
  • Pinterest
  • Google Plus
  • RSS
  • Email
  • School at Home
  • Sensory
    • Sensory Processing Disorder
    • Awesome Sensory Play Activities
      • Sensory Bins
      • Sensory Bottles
      • Sensory Bags
  • Family Games
    • Minute to Win It Games
  • Special Needs Parenting
    • Childhood Anxiety
    • Reactive Attachment Disorder
    • Sensory Processing Disorder
  • Store
  • Course Login

Sharla Kostelyk

New Year’s Sensory Bottle for Kids

This New Year's sensory bottle is especially for the kids but can also add to the decor of any New Year's celebrations.

By Sharla Kostelyk

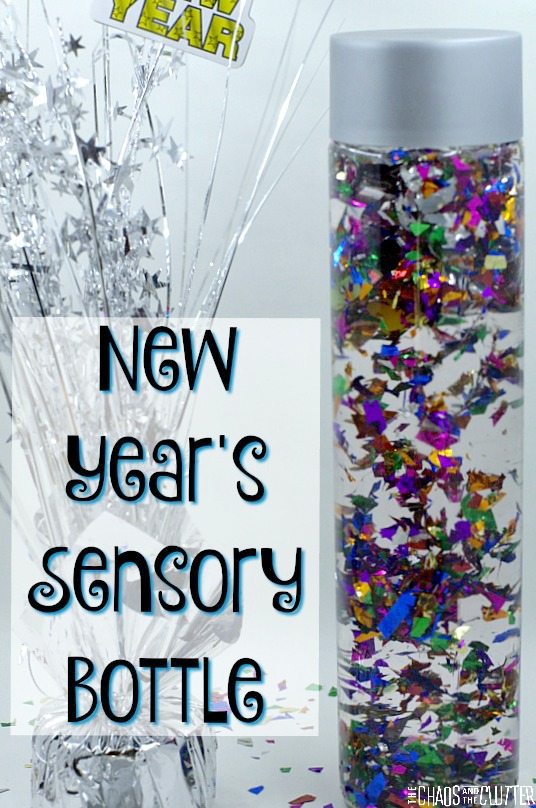
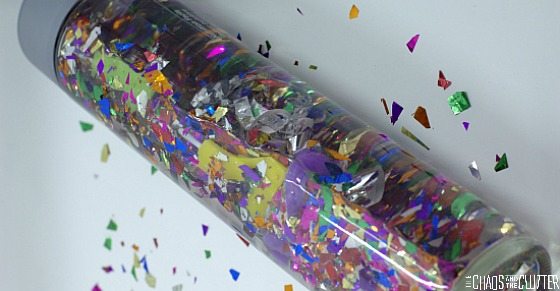
This New Year’s sensory bottle adds a bit of festive flair to any New Year’s Eve or New Year’s Day celebrations. Even though it is especially for the kids, it can also fit in with the festivities and be set out as part of the decor.

This New Year's sensory bottle is especially for the kids but can also add to the decor of any New Year's celebrations.Materials needed:

  • empty water bottle (I used a Voss water bottle because I like the look of the lid)
  • confetti
  • silver or other festive curled ribbon
  • numbers of the new year (we used small number shaped candles and cut the wicks off)

DIY New Year's Eve Sensory Bottle
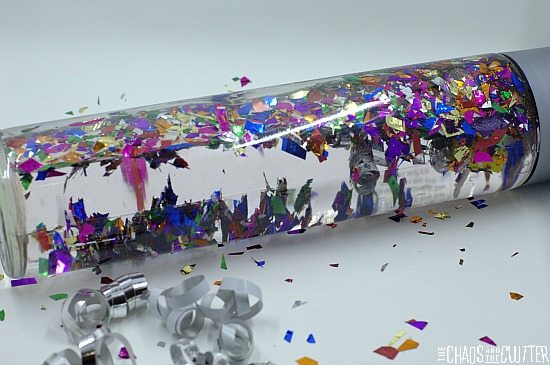
Fill the empty water bottle with water, almost to the very top. Add the numbers, the ribbon curls and the confetti and put the lid back on the bottle. If you are going to be using this snowflake sensory bottle with younger kids, you may want to secure the lid in place using a hot glue gun.

If you can’t find the wax candle numbers, you can use plastic numbers (like the magnetic kind) or foam ones. The trick is to make sure that they are small enough to fit in the bottle top but large enough to be seen in the midst of all that confetti!

DIY New Year's Sensory BottleIf you are looking for other sensory ideas, sign up for the free 5 part email series Sensory Solutions and Activities and get our Sensory System Behaviours Easy Reference Cards.

Filed Under: Crafts and Activities, Sensory Tagged With: sensory bottles, sensory play

Snow Playdough

Snow Playdough and invitation to play

By Sharla Kostelyk

Last month, Granola Girl chose a snow theme for her birthday party. I had planned to make snow playdough for all the party guests and send it home with them along with a snowflake cookie cutter for the party favour. Unfortunately, her party fell the week of Snuggle Puppy’s emergency appendix surgery so the playdough didn’t get made in time. I still really wanted to make it for my kids to play with so just this week, I set out the playdough with some other items and invited the kids to come and play.

Snow playdough and invitation to play
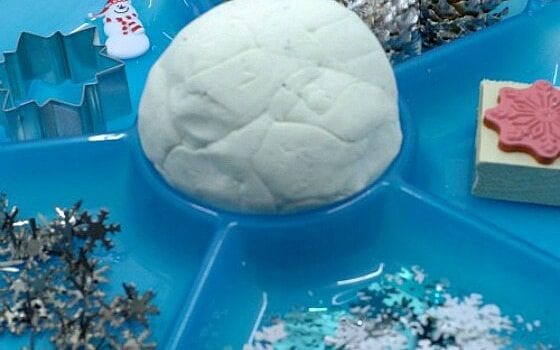
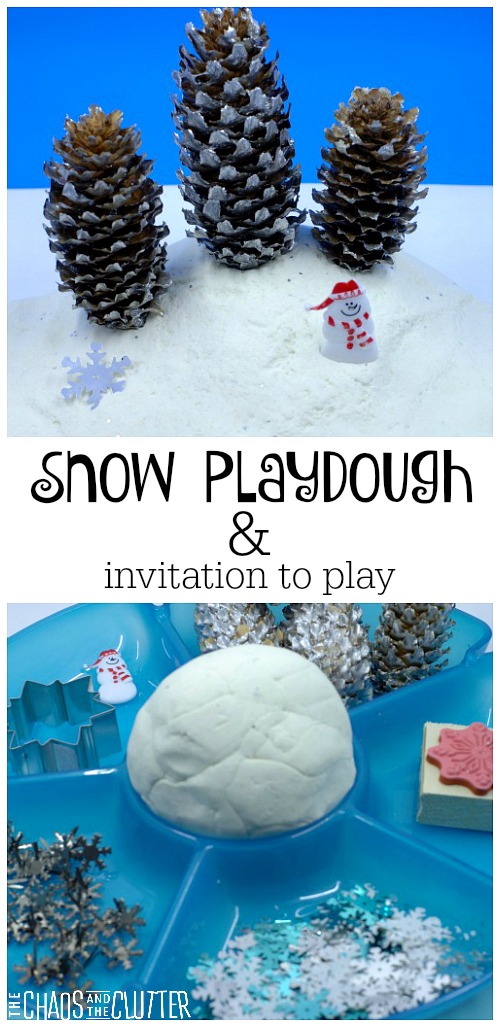
Snow Playdough Recipe:

  1. 1 cup flour
  2. 1/2 cup salt
  3. 2 Tbsp. cream of tartar
  4. 1 Tbsp. oil
  5. 1 tsp. or more white liquid colour
  6. 1 cup water (boiling if using the KitchenAid method)
  7. silver glitter

KitchenAid method instructions:

  1. Put dry ingredients in KitchenAid mixer.
  2. Add oil and the white liquid colour and begin mixing with the flat beater.
  3. As it is mixing on the lowest setting, add the boiling water.
  4. Add in the silver glitter. Mix until the playdough texture you want is achieved.
  5. Take the dough out of the mixer and knead it for half a minute or so.
  6. Once it has cooled, store it in an airtight container or in a resealable bag.

Stovetop method instructions:

  1. Mix the dry ingredients together in a pot.
  2. Stir in the oil, water, and liquid colour.
  3. Cook over medium heat, stirring constantly, making sure to scrape the sides and bottom.
  4. Cook until the dough forms a ball.
  5. Remove from heat.
  6. Place playdough on a piece of wax paper.
  7. Knead.
  8. Add in the glitter at this point. Knead.
  9. Let cool. Store in an airtight container or in a resealable bag.

Snow Playdough and invitation to play
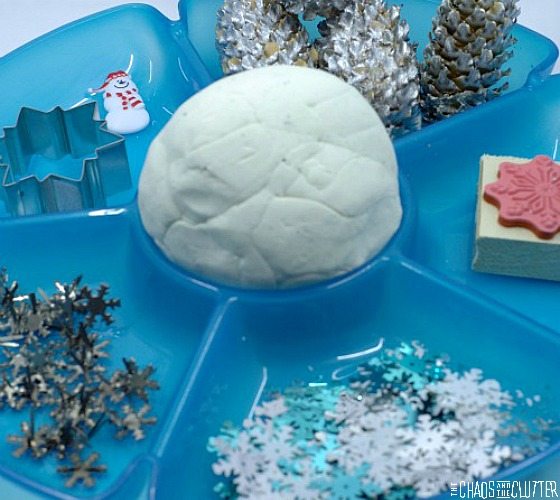
Snow Playdough Invitation to Play:

I set out a snowflake cookie cutter, a snowflake stamp, snowflake confetti, snowflake brads, pine cones painted silver with silver spray paint (this should be done by an adult), and a little plastic snowman with the playdough. As always, the kids were much more creative than I ever could be and came up with ideas I wouldn’t have thought of.

snow playdough and invitation to play
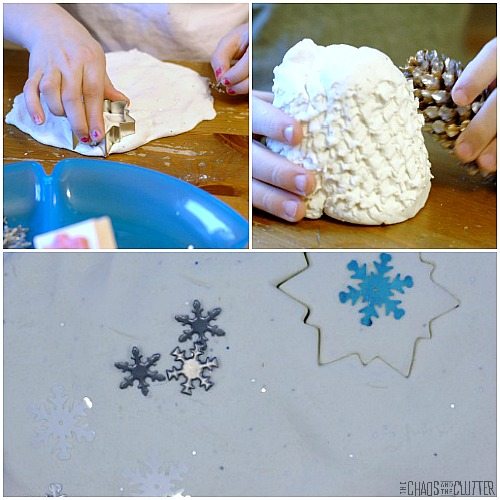
Our neighbours were over playing and Mr. V. thought of using a pine cone as a stamp to create a pattern in the playdough. Such a cool idea! Little Miss J. used the cookie cutter and on the inside of the cutout created, she used the snowflake stamp. The result was so pretty.

Dancing Queen made a five tiered snow cake topped with two plastic snowmen and decorated with the metallic confetti. I got a picture of it but it was so blurry that even editing couldn’t salvage it (I’m still trying to figure out my camera!) so you will just have to use your imagination when it comes to the snow playdough cake.

Join our free 5 part email series Sensory Solutions and Activities and get our Sensory System Behaviours Easy Reference Cards.

Check out some of our other playdough invitations to play:

Calming Lavender Scented Playdough

Peppermint Scented Christmas Playdough

Filed Under: Crafts and Activities, Sensory Tagged With: playdough stations, sensory play

Gluten Free Cake Mix Cookies 3 Ways

Easy Cake Box Cookies made 3 ways

By Sharla Kostelyk

Our son Einstein is on a gluten free diet. I am determined that he won’t have to miss out on things, especially during the holidays and on special occasions. Last Christmas, among other gluten free treats, I made him these Chocolate Toffee cookies using a gluten free cake mix. This year, I decided to play around with the recipe a bit and make some other cake mix cookie variations.

Make life easier. Make 3 types of gluten free cookies using one cake box. Gluten free baking doesn't have to be complicated!
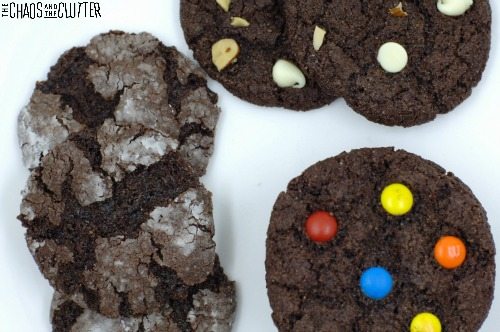
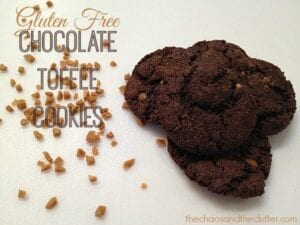
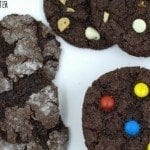
A cookie recipe like this is especially handy for someone who isn’t gluten free and therefore doesn’t have gluten free flours in their kitchen. All you need is to buy a gluten free cake mix box. After that, all you’ll need is eggs, vegetable oil, and your choice of mix-ins and you’re set.

If you are attending or hosting an event where you know there will be those who can’t have gluten, you can still make these easily. Plus, they are delicious!

Gluten Free Cake Mix Cookies Recipe:

1 gluten free chocolate cake mix
2-3 eggs*
1/3 cup vegetable oil

Begin by making this basic recipe. Mix together all three ingredients. (see note below)

*Note: The gluten free cake mixes seem to vary in terms of how dry they are, so sometimes 2 eggs is not enough to make these stay together. Start by adding two eggs and the oil to the cake mix. If you find that the dough isn’t holding together well enough and is very dry, add another egg.

Make life easier. Make 3 types of gluten free cookies using one cake box. Gluten free baking doesn't have to be complicated!

To make Gluten Free Chocolate Crinkles:

Put icing sugar (also called powdered sugar) in a small bowl. Mix together the basic dough and shape into balls. Roll the balls in the icing sugar and place on a cookie sheet. Leave space in between the cookies as they will get flatter as they cook. Bake in a 350° oven for 8-10 minutes. When you take them out of the oven, slap the cookie sheet down on the counter. This will help flatten the cookies a bit more.

To make Gluten Free Chocolate M+M Cookies:

Mix M+Ms or mini M+Ms into the basic cookie batter. Form balls and place on a cookie sheet, leaving room in between the cookies as they will expand as they flatten. Bake in a 350° oven for 8-10 minutes. When you take them out of the oven, slap the cookie sheet down on the counter.

Make life easier. Make 3 types of gluten free cookies using one cake box. Gluten free baking doesn't have to be complicated!

To make Gluten Free Double Chocolate and Almond Cookies:

Stir white chocolate chips and coarsely chopped almonds into the basic chocolate cookie dough. Form balls and place them on a cookie sheet, leaving plenty of space in between them. Bake in a 350° oven for 8-10 minutes. When you take them out of the oven, slap the cookie sheet down on the counter. This will further flatten the cookies.

This recipe yields at least 4 dozen cookies.

I made all three variations using just one cake box, so I didn’t give exact amounts for the white chocolate chips, icing sugar, M+Ms, and almonds because the amounts will vary depending on if you are making the entire box into one type or making two or three types with the one basic batter.

And of course, if you want a fourth variation, you can always make gluten free chocolate toffee cookies.  These are also made with the same basic cookie dough. You’ll love these cookies!

Gluten Free Chocolate Toffee Cookies

Easy Cake Box Cookies made 3 ways
Print
Gluten Free Cake Mix Cookies Recipe
If you are attending or hosting an event where you know there will be those who can't have gluten, you can still make these easily. Plus, they are delicious!
Ingredients
  • 1 gluten free chocolate cake mix
  • 2-3 eggs*
  • 1/3 cup vegetable oil
Instructions
  1. Begin by making this basic recipe. Mix together all three ingredients. (see note below)
To make Gluten Free Chocolate Crinkles:
  1. Put icing sugar (also called powdered sugar) in a small bowl. Mix together the basic dough and shape into balls. Roll the balls in the icing sugar and place on a cookie sheet. Leave space in between the cookies as they will get flatter as they cook. Bake in a 350° oven for 8-10 minutes. When you take them out of the oven, slap the cookie sheet down on the counter. This will help flatten the cookies a bit more.
To make Gluten Free Chocolate M+M Cookies:
  1. Mix M+Ms or mini M+Ms into the basic cookie batter. Form balls and place on a cookie sheet, leaving room in between the cookies as they will expand as they flatten. Bake in a 350° oven for 8-10 minutes. When you take them out of the oven, slap the cookie sheet down on the counter.
To make Gluten Free Double Chocolate and Almond Cookies:
  1. Stir white chocolate chips and coarsely chopped almonds into the basic chocolate cookie dough. Form balls and place them on a cookie sheet, leaving plenty of space in between them. Bake in a 350° oven for 8-10 minutes. When you take them out of the oven, slap the cookie sheet down on the counter. This will further flatten the cookies.
Recipe Notes

I made all three variations using just one cake box, so I didn't give exact amounts for the white chocolate chips, icing sugar, M+Ms, and almonds because the amounts will vary depending on if you are making the entire box into one type or making two or three types with the one basic batter. And of course, if you want a fourth variation, you can always make gluten free chocolate toffee cookies.  These are also made with the same basic cookie dough. You'll love these cookies!

Filed Under: Cooking in the Chaos

Spy Secrets Gift Basket

By Sharla Kostelyk

Every Christmas, my brother is the hardest for me to buy for. The Husband is pretty challenging too, but he usually just buys his own gift and says it’s from me! I feel like men in general are hard to buy gifts for, partly because I’m not one so it’s harder to know what they would like. Last Christmas, my brother and his wife gave us the most amazing Road Trip Gift Basket. This year, I decided to put together a Spy Secrets gift basket for my brother. I think it’s a gift that he’s actually going to like!

This Spy Secrets gift box is perfect to make for the hard to buy for man (or woman) in your life!For my birthday this year, my friend Christie gave me the book Spy Secrets That Can Save Your Life. It is so cool. It’s written by a former CIA Officer and it is full of tips to keep you safe, but it’s also just plain interesting. In the book, there are many suggested items that can help you and can even save your life if you have them with you. Using some of the suggestions from the book, I put together a gift box for my brother.

This Spy Secrets gift box is perfect for the hard-to-buy-for on your list.

Spy Secrets Gift Basket:

  • Spy Secrets That Can Save Your Life book by Jason Hanson
  • tactical pen
  • paracord bracelet or keychain
  • magnesium fire starter
  • pocket poncho
  • 5-in-1 survival tool
  • duct tape
  • band-aids or small first aid kit
  • flashlight
  • Leatherman multi-tool
  • QuikClot
  • bobby pins
  • credit card knife or credit card multi tool
  • emergency sleeping bag
  • 30-hour survival candle

The book offers even more suggestions for essential tools so there are many other items you could add in to create a Spy Secrets kit.

This gift basket is perfect for the outdoorsman, the spy movie aficionado, the hard to buy for, the book lover, the wannabe survivorman, the overly paranoid, or pretty much anyone for any occasion! It is a unique present that will get people talking and be interesting for others to receive.

Spy Secrets Essentials Gift Basket
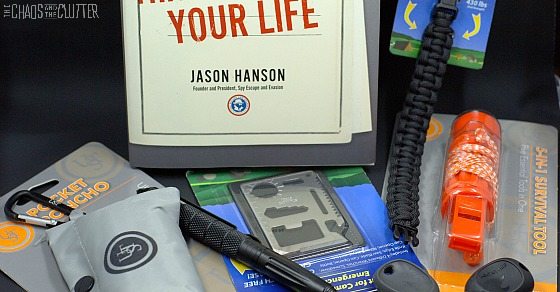
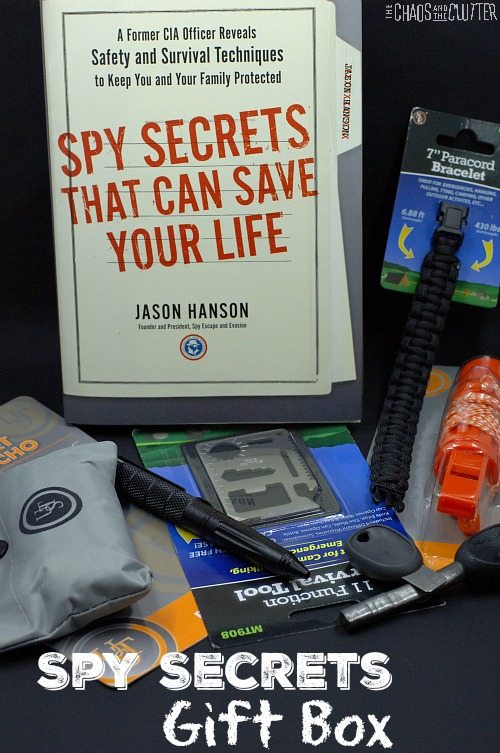
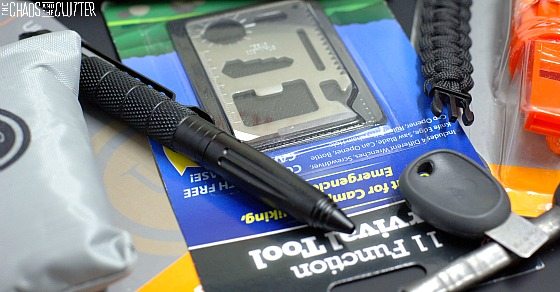
I actually bought doubles of some of the items in the Spy Secrets kit I made my brother because after reading the book, I knew the importance and value of having something like a tactical pen and wanted to create a bit of a kit of my own.

Gift baskets are great to give and to receive! Check out the awesome road trip gift basket we were gifted last year.

Family Road Trip Gift Basket

Filed Under: Christmas

Snowflake Sensory Bottle and Science Lesson

Snowflake Sensory Bottle and simple science lesson

By Sharla Kostelyk

Making this snowflake sensory bottle also offers the opportunity for a simple science lesson. The results are so pretty.

Snowflake Sensory Bottle and simple science lesson

Materials needed:

  • empty water bottle (I used a Voss water bottle because I like the look of the lid)
  • blue food colouring
  • silver glitter
  • snowflake confetti

Fill the empty water bottle with water, almost to the very top. Add glitter and snowflake confetti.

This is where the science lesson comes in: Water is a polar liquid so it dissolves other liquids which are also polar or somewhat polar. Once you explain this to the kids, ask them if they think that food colouring is polar or non-polar, or in simpler terms, ask them if they think that food colouring will dissolve in water.

Then have one of the kids squeeze some drops of blue food colouring into the sensory bottle and observe what happens.

sensory bottle science
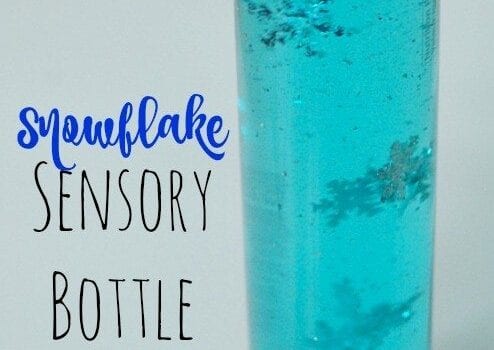
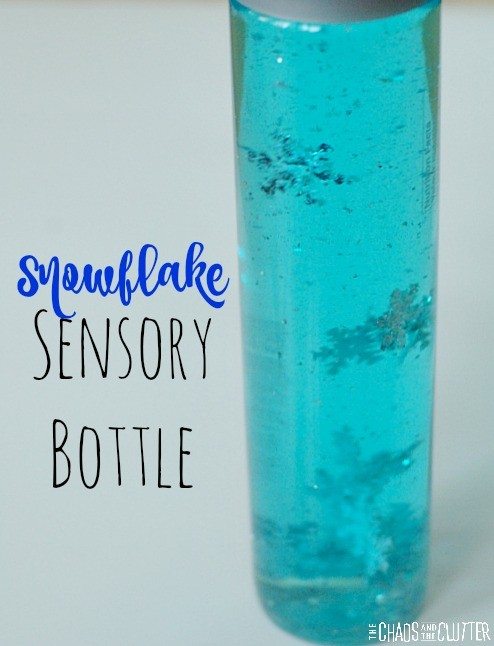
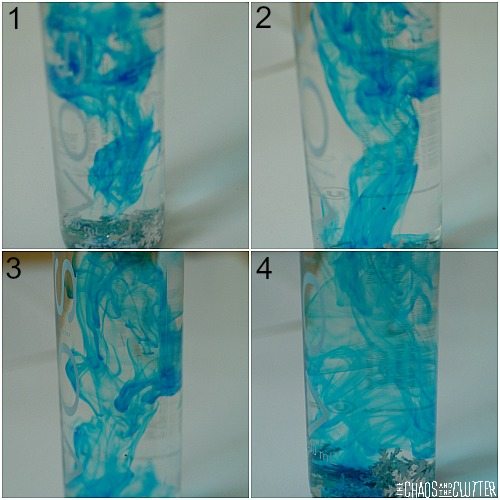
The kids will observe that the food colouring does dissolve in the water which means that it is also a polar liquid.

Snowflake Discovery Bottle
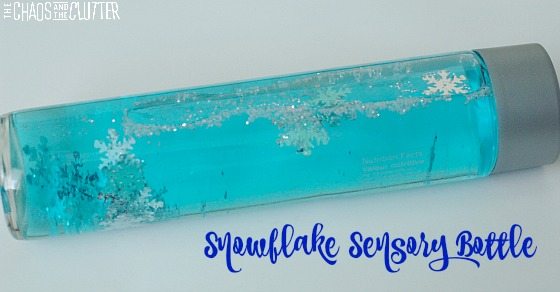
Put the lid on the bottle. If you are going to be using this snowflake sensory bottle with younger kids, you may want to secure the lid in place using a hot glue gun.

Of the sensory bottle we’ve made, for some reason, our daughter Dancing Queen found this one the most fascinating.

snowflake sensory bottle and simple science lesson

She was mesmerized by the movement and spent a lot of time playing with it. Our other kids enjoyed it too but she was the most thrilled by it.

snowflake discovery bottle and simple science lesson

If you are looking for other sensory ideas, sign up for the 5 part email series Sensory Solutions and Activities and get our free Sensory System Behaviours Easy Reference Cards.

Filed Under: Christmas, Sensory, Simple Science Tagged With: sensory bottles, sensory play

Paper Plate Christmas Crafts

Paper Plate Christmas Crafts

By Sharla Kostelyk

Paper plates are such an easy item to craft with and we often have many of them in the house. Paper plates can easily be turned into crafts for any occasion. Christmas is certainly no exception. These paper plate Christmas crafts for kids are so much fun.

Paper Plate Christmas Crafts for kids
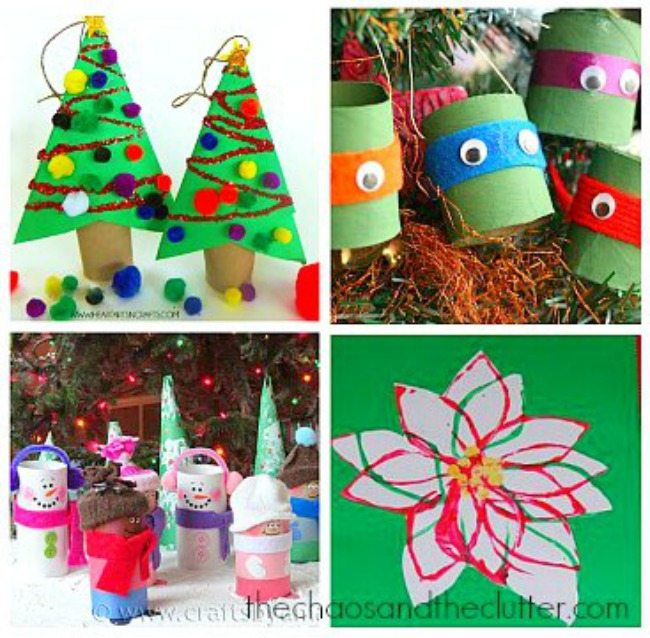
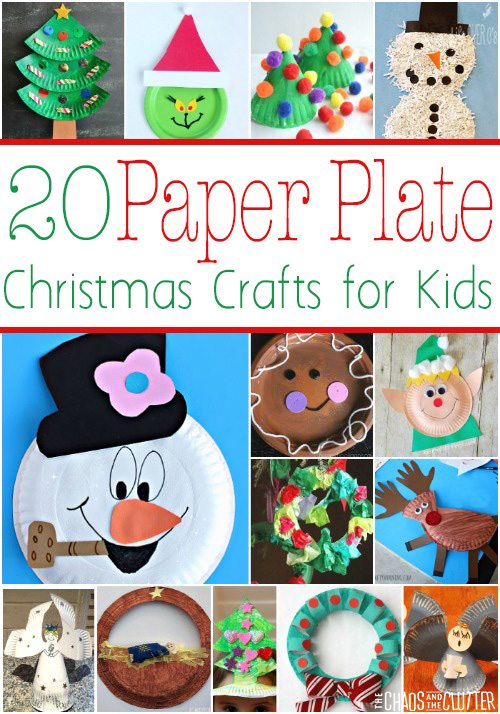
These paper plate crafts are perfect for doing with your kids or classroom students to prepare for the holidays or when stuck inside on a snow day. These crafts show that paper plates can be transformed into just about anything.

Paper Plate Christmas Crafts:

For our Manger Craft, you can use real straw in place of the tissue paper. Either way, it’s a nice activity for Sunday school classes or home.

What I really liked about our Paper Plate Snow Globe is how each of them look so different in the end. Kids can really use their imaginations and paint whatever scene they want to.

This Paper Plate Gingerbread Man from Happy Hooligans is adorable!

The Paper Plate Snowman Wreath from over on Kids Craft Room is super cute with great bright colours.

If you’re looking for something a bit more unique, this Christmas Camper Craft is really cute. It’s not your usual Santa or Snowman!

If you’re going to be making the Paper Plate Grinch craft with younger kids, you can cut out the shapes ahead of time.

The Shredded Paper Snowman is an excellent fine motor activity as well as being a cute craft.

How cute is this Frosty the Snowman?!

These Paper Plate Christmas Masks (Santa and Reindeer) would be such a good activity to put out at a craft table for kids at a holiday party.

Kids can practise their scissor and fine motor skills with this Trim Santa’s Beard Activity.

Another really good Christmas fine motor activity is this Paper Plate Laced Christmas Tree.

More Paper Plate Holiday Activities:

Reindeer Craft from Crafty Morning

Paper Plate Ornament from Glued to my Crafts

Paper Plate Santa from Love Play Learn

Paper Plate Christmas Crafts

Easy Paper Plate Wreaths from The Pleasantest Thing

Cardboard Tube and Paper Plate Wreath from Reading Confetti

Tissue Paper Christmas Wreath for Toddlers and Preschoolers from Happy Hooligans

Paper Plate Christmas Tree from Creative Family Fun

Gingerbread Man from Glued to my Crafts

Christmas Elf Craft from I Heart Crafty Things

Paper Plate Christmas Tree Hat from The Imagination Tree

Singing Angels from Meaningful Mama

Paper Plate Christmas Angel from Nurture Store

If you’re looking for Christmas crafts and activities for kids, you may also be interested in:

Ornaments Made with Old Christmas Cards

Christmas Toilet Paper Roll CraftsHoliday Jingle Bell SlimeHoliday Jingle Bell Slime

Filed Under: Christmas, Crafts and Activities

  • « Go to Previous Page
  • Page 1
  • Interim pages omitted …
  • Page 74
  • Page 75
  • Page 76
  • Page 77
  • Page 78
  • Interim pages omitted …
  • Page 128
  • Go to Next Page »

Primary Sidebar

Categories

We are a participant in the Amazon Services LLC Associates Program, an affiliate advertising program designed to provide a means for us to earn fees by linking to Amazon.com and affiliated sites.

Copyright © 2026 • The Chaos and the Clutter • Site Design by Jeni @ The Blog Maven

Return to top of page

Copyright © 2026 · Chaos and the Clutter 2.0 on Genesis Framework · WordPress · Log in