• Skip to primary navigation
  • Skip to main content
  • Skip to primary sidebar
  • Home
  • About
  • Contact
  • Privacy + Terms
  • Affiliates

The Chaos and the Clutter

  • Facebook
  • Twitter
  • Pinterest
  • Google Plus
  • RSS
  • Email
  • School at Home
  • Sensory
    • Sensory Processing Disorder
    • Awesome Sensory Play Activities
      • Sensory Bins
      • Sensory Bottles
      • Sensory Bags
  • Family Games
    • Minute to Win It Games
  • Special Needs Parenting
    • Childhood Anxiety
    • Reactive Attachment Disorder
    • Sensory Processing Disorder
  • Store
  • Course Login

Sharla Kostelyk

Flower Petal Fingerpaint

By Sharla Kostelyk

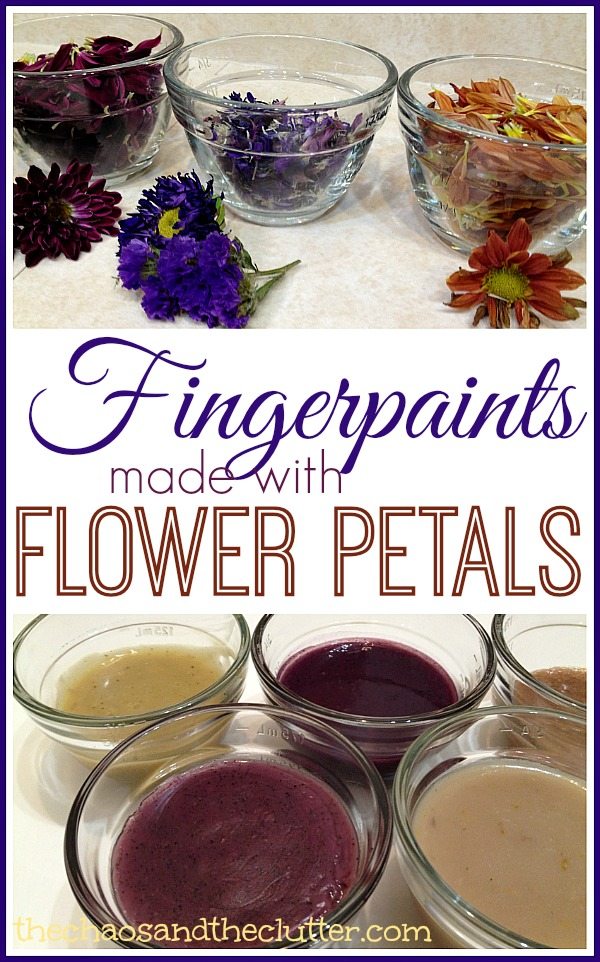
Making flower petal fingerpaint turned out to be an interesting science and art activity. We were surprised by what colours were made with the flowers and even by how the smells changed throughout the process.

Fingerpaints made with Flower PetalsMy neighbour had given me a beautiful fall bouquet of flowers and after a week or so, it had begun to look a bit on the sad side. The flowers were drooping and had started to wither but there were such gorgeous colours in the bouquet that it really seemed a shame to throw it away.

fall flower bouquet
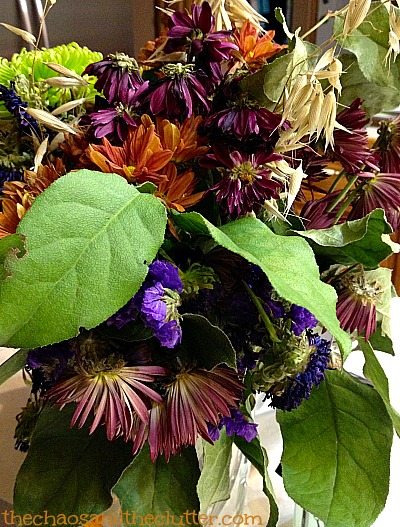
I was trying to think of a way to use the flowers and decided to make them into a hands-on history lesson to demonstrate to the kids how clothing and linens used to be dyed using flowers and other items found in nature.

Once the colours were created though, I realized that I could turn them into paints and extend the activity to cover science, art and sensory elements.

The kids and I started by pulling off the petals and grouping like colours together. We used small clear bowls that have measuring lines on the sides so that it was easy to measure how much of each colour we had collected.

Homemade Fingerpaints made with Flower Petals
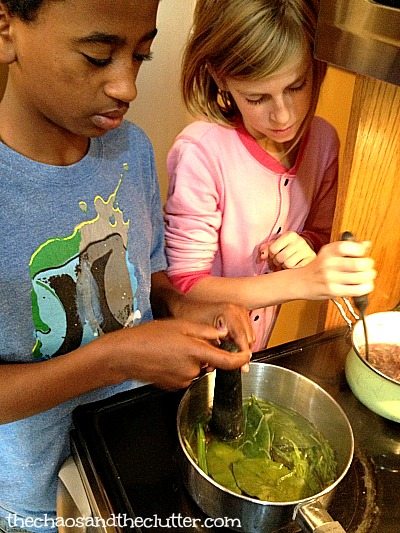
We added water and the petals to a pot and brought the mixture to a boil. Once it was at a rolling boil, we turned it down to simmer and let it simmer for half an hour. We stirred it from time to time and also used a pestle to press the petals to get more colour from them. The reason we let the mixture simmer for so long was so that some of the liquid could boil off and the colour could become more concentrated.

Snuggle Puppy came up with the idea to try to create green paint using the stems and leaves from the bouquet so he filled a pot with those and used the same process. The colour of that one created more of a yellowy colour than green and had a very earthy smell.

making paint from leaves and stemsOnce we had achieved a strong enough colour, we drained the liquid into a bowl placed beneath a strainer and pressed the petals with the pestle.

The liquid then went back into the pot and I whisked in a bit of flour and brought that to a boil, stirring the whole time. Once it was boiling, it only took a few minutes at most for the paint to reach the consistency I was looking for. I then took it off the heat, poured it into the small bowls we had used for the petals earlier and it was ready to paint with.

Flower Petal Fingerpaint Recipe:

3/4 – 1 cup of flower petals
1 1/2 – 2 cups of water
1 Tbsp. flour

Bring water and flower petals to a boil over medium-high heat in a pot. Turn heat to low. Simmer for half an hour.

Place a strainer over a bowl and drain the coloured water through the strainer. Press the petals to get maximum colour.

Put the water back into the pot and whisk in the flour. Bring it to a boil, stirring the whole time. Remove from heat.

steps to making fingerprint using flower petals
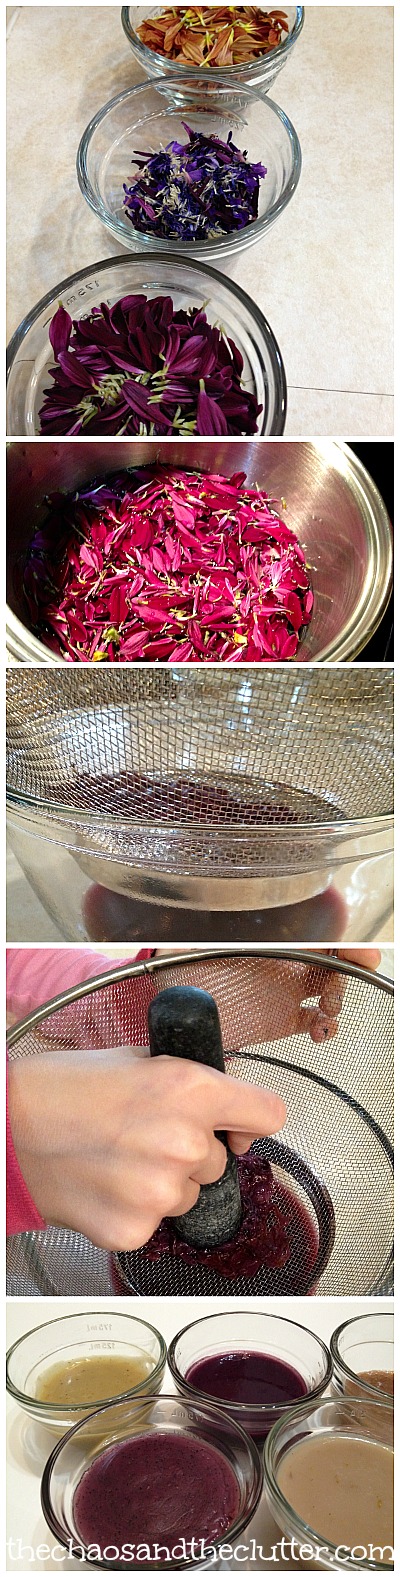
The paints had different smells depending on the type of flowers used. The colours did not turn out the way we expected them to. The purple petals created an unattractive greenish-brown colour. The red flowers created a burgundy-purplish colour. The leaves and stems made a yellowish colour. The orange petals created a light brown.

Before we made each colour, I had the kids hypothesize about what colour they thought would result. When other colours were the result, we discussed what factors may have contributed to that. It became a very interesting science lesson.  Honestly, one of the colours looked pretty gross so we had a bit of a laugh over that!

Miss Optimism wanted to know what would happen if she mixed several colours of flower petals together. The result was a purple with specks of a darker shade.

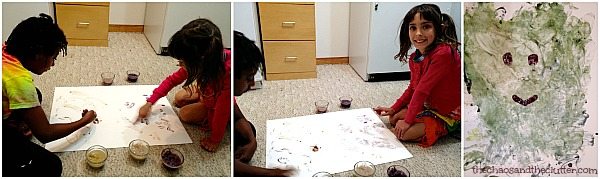
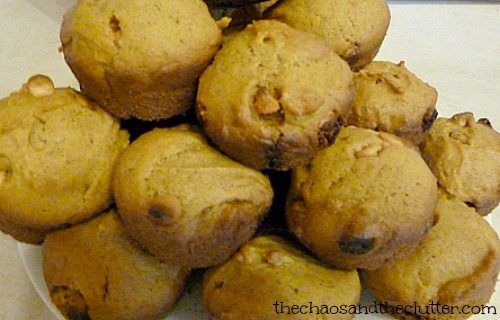
After we had made five colours of flower petal fingerpaint, I let the kids start painting. Granola Girl and Dancing Queen painted a cute looking monster on a large poster paper. This had both sensory (touch, sight and smell) and art elements. I love it when one activity can encompass so many different things!

fingerpainting with flower petal paint

Shaving Cream Painting

Condensed Milk Painting

Pumpkin Puffy Paint

If you are looking for other fun activities to do with your kids, you may want to join our free 5 part email series Sensory Solutions and Activities and get our Sensory System Behaviours Easy Reference Cards.

Filed Under: Crafts and Activities, Homeschooling, Sensory, Simple Science Tagged With: sensory play

Frog Sensory Bin with Play Puffs

Frog Sensory Bin

By Sharla Kostelyk

Back when we first started using sensory bins, we made a frog sensory bin. It was well, ugly. It was one of my first efforts at dying pasta and thankfully, I have gotten better at certain aspects of making sensory bins since then!

I decided that it was time to try a frog themed sensory bin again and this time, I opted out of using orangey, red mini pasta shells and used a bright coloured base instead.

Frog Sensory Bin
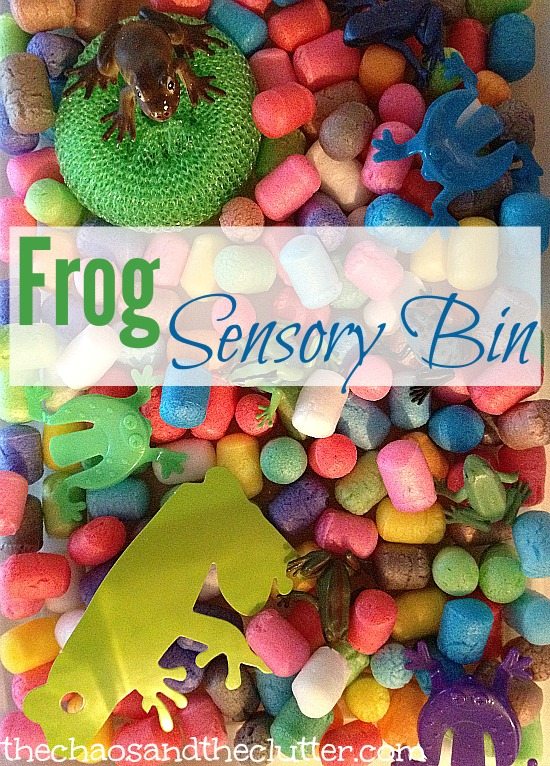
This actually was one of the bins that we put together at our sensory bin swap a few months ago. We had thrown most of the items into a resealable bag so all I had to do was dump it into a bin and it was ready for the kids to play with.

I added a few extra frogs but other than that, the bin was ready to go from the swap. The base for this bin was play puffs. They are a great multi-purpose item as they can be used for sensory play or for craft creation. Once they are wet, play puffs stick together to form whatever shape they can imagine.

Also in this bin, a kitchen sponge “lily pad”, plastic jump frogs, stretchy frogs, toy frogs, and a glossy paper die cut frog.

Frog Sensory Bin Play
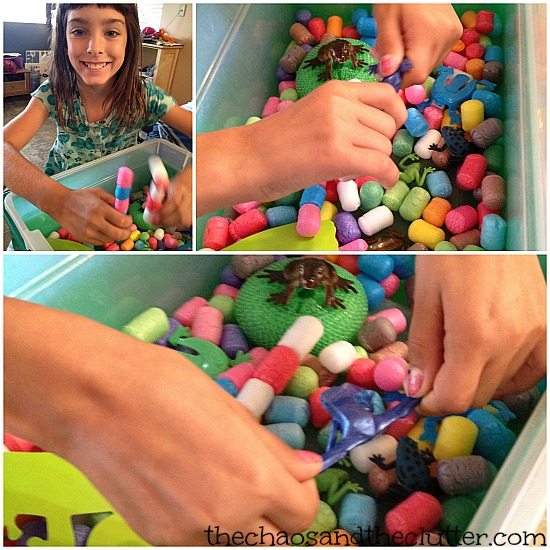
My plan for the kids to use the play puffs for a craft project after I retired this sensory bin didn’t pan out the way I’d planned it. As soon as the kids discovered the ability to stick the play puffs together, they added that as part of their sensory bin play. It made this a popular activity!

For hundreds of sensory bin ideas, you can also follow my Sensory Bins board on Pinterest.

Follow Sharla Kostelyk’s board Sensory Bins on Pinterest.

If you are looking for information on making sensory bins, you may be interested in my book. The Ultimate Guide to Sensory Bins

Join our free 5 part email series Sensory Solutions and Activities and get our Sensory System Behaviours Easy Reference Cards.

Filed Under: Sensory, Sensory Bins Tagged With: sensory bin, sensory play

How to Care for Newly Pierced Ears

How to Care for Newly Pierced Ears

By Sharla Kostelyk

I still remember the day I first got my ears pierced and I also remember the day when I got them pierced again years later because they had grown in the first time after battling infection after infection. When it came to my three girls getting their ears pierced, I wanted to be sure to teach them how to care for newly pierced ears so that they could avoid infection and having to have them re-pierced.

Unfortunately, two of my girls turned out to be allergic to all but gold earrings so they did get infections and eventually we had to let their earring holes grow in until they were older and then we tried again. This time, we have stuck to gold earrings with one of them and plastic posts with the other and have not had trouble. Our youngest daughter is able to wear any earrings and still has her original holes.

How to Care for Newly Pierced Ears

How To Care For Pierced Ears

Before Having Their Ears Pierced:

If your child is old enough, when getting ears pierced for the first time, discuss with them beforehand the aftercare that will be required. Be sure that they understand that they will not be able to change their new earrings for quite some time and that playing with their earrings when their hands aren’t clean can lead to infection.

Where To Get Ears Pierced:

Have ears pierced at a reputable place with qualified staff. You do not want to risk unsanitary equipment or inexperienced staff who get the placement wrong or make things more painful than they need to be for your child.

Best Earrings For Newly Pierced Ears:

Be sure that the earrings have a gold post which is less likely to cause swelling or infection. If your child has a nickel allergy, you can instead choose plastic post earrings.

New Ear Piercing Care:

  1. Wash hands thoroughly before touching the ears or the earrings.
  2. Use a cotton swab (Q-tip) with salt water to clean the area around the hole twice a day. Some recommend using hydrogen peroxide, rubbing alcohol, or antibiotic ointment but salt water disinfects and is less damaging to the skin tissue. The place where you have the piercing done will likely recommend an ear piercing cleaning solution, but salt water is what I would recommend (not only is it better for the skin, it’s less expensive too!).
  3. With clean hands, gently rotate the earrings in the ear at least twice a day.
  4. Watch for signs of infection which include redness, itching, swelling, heat, pus, and pain. Infection can be caused by bacteria or by allergic reaction.

This video has some great tips for piercing after care as far as what to avoid and the best after care products.

<iframe width=”560″ height=”315″ src=”https://www.youtube.com/embed/pP0oRDqitm0″ title=”YouTube video player” frameborder=”0″ allow=”accelerometer; autoplay; clipboard-write; encrypted-media; gyroscope; picture-in-picture” allowfullscreen></iframe>

Can You Go Swimming After Getting Your Ears Pierced?

It is good to wait 2-3 weeks before going swimming as the bacteria and chlorine can cause irritation and possible infection.

How Long For Pierced Ears To Heal?

  1. Leave the original earrings in for about 6 weeks, until the holes have healed completely.
  2. If your child is active or involved in sports, I would recommend they wear small studs instead of hoops or dangly earrings which can get caught or tangled and in some cases, even rip through their ear lobe.

Deciding whether or not to pierce your child’s ears as well as deciding what age to do that is a decision best left up to each individual parent. Some parents have their daughters’ ears pierced when they are babies while others wait until their kids are old enough to be part of the decision or are old enough to help with the care and maintenance of them. Whatever the case is in your household, proper aftercare is important.

Filed Under: Parenting in the Chaos

7 Ways to Take Care of Your Body

By Sharla Kostelyk

I’ve never been particularly good at taking care of myself. I am very good at making sure that my kids eat healthy foods and don’t have a lot of sugar, but my own diet is atrocious. I consume large amounts of sugar daily in the form of Slurpees or pop, chocolate and candy. I still eat like a teenager and it’s catching up to me. I used to get very little exercise, but this is something that has already begun to improve. I take my kids to appointments weekly, but have not been to a dentist for myself in 7 years or a doctor in over a year.

I may think that in doing this, I am being a good mom, but in fact, the example I’m setting for my kids of how to take care of themselves is not a healthy one.

7 Ways to Take Care of Your Body

It’s common especially among women to put others first, but not taking care of your body will get in the way of you having the life you want. If you are not healthy, you cannot achieve the goals you set for yourself. You also cannot fully enjoy what life has to offer if you can’t participate. Imagine that one of your dreams is to travel to Mexico. Once you get there, you find that you cannot climb the stairs of the Mayan ruins or go snorkelling because you are too out of shape.

Even something as simple as playing outside with your kids or your future grandkids can be something impossible if your health doesn’t allow for it.

While there are many aspects of your health that are out of your control, what I’m advocating for here is taking care of the things that you can control so that even if you suffer from a chronic illness, you can get the best out of life that you can.

Here are 7 ways that you can take care of your body to the best of your ability:

Sleep

Doctors recommend that an adult get an average of 7-8 hours of sleep each night. Although sleep needs are individual and some people do need more rest than others, the effects of chronic sleep deprivation are far-reaching.

Even adults can have trouble sleeping because of sensory issues. Read these tips to drastically improve your sleep.

Sleep deprivation affects our mood, our concentration, our attention, our memory, our ability to fight off infection, our libido, and our judgment. Inadequate sleep can also lead to weight gain, depression, car accidents, potentially fatal errors, and cause serious health problems such as stroke, heart attack or diabetes.

This video demonstrates the importance of sleep and what can happen if we don’t get enough of it. 

Schedule time in your life for sleep. This week, try moving your bedtime back by half an hour.

Hydration

Are you dehydrated? Even mild dehydration can affect your energy level and your mood. Many doctors still recommend that adults drink eight 8oz. glasses of water per day, but that amount may need to be higher or lower depending on other factors such as your level of physical activity and your size. New research suggests taking your weight, dividing it in two and drinking that number in ounces per day.

Start by adding just one extra glass of water a day to what you are already drinking. You may soon see an increase in your energy.

Nutrition

Nutrition is a complicated thing nowadays with food allergies and food intolerances in abundance. What is healthy for your body may not be healthy for someone else’s but there are certain commonalities that I think most people could agree on. Cut down on sugar. Eat plenty of fruits and vegetables. Eat a variety of foods. Maintain good portion control standards for your body in terms of your height and energy level.

Nutrition is not about weight. It’s about health. It’s about fuelling your body with good energy sources so that it can work at its optimum capacity. Having healthy food on hand is half the battle. I find that by making freezer meals ahead so that I don’t have to meal plan and can easily pull out supper every day, I eat less junk.

Cut out one thing that you know is not healthy for your body even if it is a small thing like adding one scoop of sugar into your tea instead of two.

Exercise

Many people think of exercise as just being for weight loss but it does far more than that. It helps combat disease such as high blood pressure, depression, certain types of cancer, stroke, heart disease, and type 2 diabetes. It boost certain brain chemicals which leaves you feeling happier and more relaxed than before (this is a very good thing!). Exercise boosts your energy, improves your sex life and helps you get a better sleep.

We make all kinds of excuses as to why we can’t exercise (time, kids, health, etc.), but all of us can do this one simple thing: move more. Park further away. Take the stairs. Dance in your kitchen. Use soup cans to do curls. Play tag with your kids at the park.

I have started exercising by changing three things in my life and it has made all the difference. I have more energy, my clothes fit better, I’ve lost weight, and my strength is noticeably improved. I now go on walks with my neighbour three times a week for 6 km. I do the app Seven which is a 7 minute workout. I take the stairs.

Just choose one small way to move more.

Dental Health

When was the last time you got your teeth cleaned or went for a dental check-up? It’s been over 7 years for me even though I take my kids regularly for dental appointments. Did you know that poor dental health and gum disease have actually been linked to heart disease and lower life expectancy? That is a pretty good reason to take it seriously. You are probably (hopefully) already brushing your teeth a few times a day which is a start.

Start flossing if you don’t already and book a dental appointment for yourself.

Mental Health

Our mental health is just as important as our physical one. No matter how stressful your life is, there are steps that you can take to decrease your body’s stress response and to be doing good self-care. Take a walk, have a visit with a friend, take a candlelit bubble bath with Epsom salts, read a good book, go for a massage, pray, write in a journal, and/or see a counsellor.

If you are the parent of a high needs child and find that the stress from that is affecting you, find other parents in similar circumstances who can understand and support you.

Breathe: Take a few minutes three times a day to sit with your eyes closed and breathe in and out five times slowly.

Appointments

I touched on this point already in the dental care section, but I’d like you now to think about other appointments that you may have put off making for yourself. Do you need to see a doctor for a check-up or a specialist for something that is worrying you? Do you need to see a nutritionalist, physiotherapist, naturopath, chiropractor, or massage therapist?

Make an appointment today that you have been procrastinating about.

Plan of action:

  • go to bed half an hour earlier
  • drink one extra glass of water each day
  • cut one unhealthy thing out of you diet
  • move more
  • start flossing if you aren’t and book a dental appointment for yourself
  • breathe slowly in and out five times with your eyes closed three times a day
  • book an appointment with a medical professional

Part of getting the life you want is taking care of your body. It’s the only one you’ve got!

Move towards the life you want to live.

Join me for a free 5 part email series, Little Hearts, Big Worries offering resources and hope for parents.

Filed Under: Home

Gluten Free Pumpkin Muffins

Gluten Free Pumpkin Muffins

By Sharla Kostelyk

Last week, I shared with you my grandma’s famous pumpkin muffin recipe. There is really no substitute in my books for the memory that I have associated with her recipe, but unfortunately for my son Einstein, he can’t eat them since he is on a gluten free diet.

My friend Molly came to the rescue with this super easy gluten free pumpkin muffin recipe so that now he can enjoy his pumpkin muffins too!

Gluten Free Pumpkin Muffins

The thing that makes this recipe so simple is that it uses gluten free cake mix. It’s so easy in fact that it could easily be made by older kids.

We used the cake mix from a bin at Bulk Barn which also makes this recipe more affordable. You can half this recipe and use a small can of pumpkin if you’d like. The small cans aren’t available where we live, plus with a family our size, we never half recipes!

Pumpkin Muffins Recipe:

Ingredients:

  • 2 boxes of gluten free vanilla cake mix or 6 cups of gluten free vanilla cake mix
  • 2 tsp. pumpkin pie spice or cinnamon
  • 1 796 ml can of pumpkin (the large can)
  • 2 eggs
  • 1 cup of raisins or butterscotch chips
  • optional: 1/2 cup pecans

Directions:

  1. Stir the pumpkin pie spice or cinnamon into the cake mix.
  2. Add the pumpkin and eggs and mix together.
  3. Stir in the raisins or butterscotch chips and if wanted, the pecans. Our daughter is allergic to nuts, so we of course didn’t add those.
  4. Pour the batter into well greased muffin tins or use cupcake liners.
  5. Bake at 350° for 20-25 minutes.

My kids voted for butterscotch chips over raisins, so I wouldn’t recommend giving your kids a vote!

These got eaten so quickly at our house that I didn’t get the chance to see if they freeze as well as my usual pumpkin muffins, but I assume that they would.

Of course, if you are looking for a non-gluten free pumpkin muffin recipe, check out my grandma’s famous (and delicious) one:

My Grandma's Famous Pumpkin Muffins

Filed Under: Cooking in the Chaos

My Grandma’s Famous Pumpkin Muffins

Pumpkin Muffins

By Sharla Kostelyk

My grandma was the best baker I have ever known. She won ribbons at the county fair for everything from her buns to her cakes to her pies and of course, for these delicious muffins. I can still remember the smell in her kitchen.

My Grandma's Famous Pumpkin Muffins

I spent about a week with her one summer learning how to bake. I don’t know how well I retained what she taught me that year as I was still quite young, but I have fond memories of our time together in that kitchen.

My grandma was kind and patient and she sure would have had to be to try to teach me how to bake! We entered my offerings in the fair that summer and I won some ribbons and prize money. She was so proud.

When I was 14, my grandma lost her battle with breast cancer. Years later, I received this small recipe card, my inheritance from her:

pumpkin muffin recipe
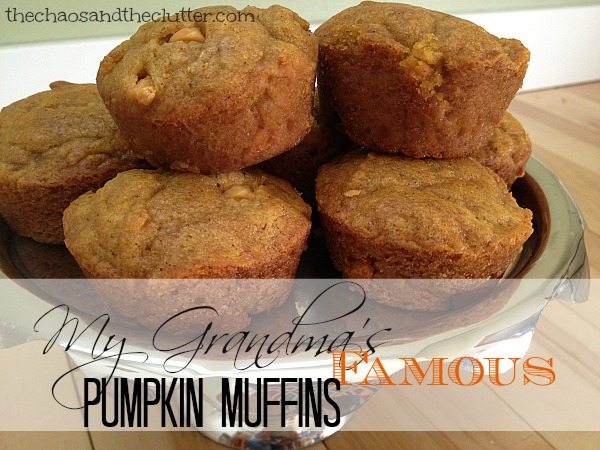
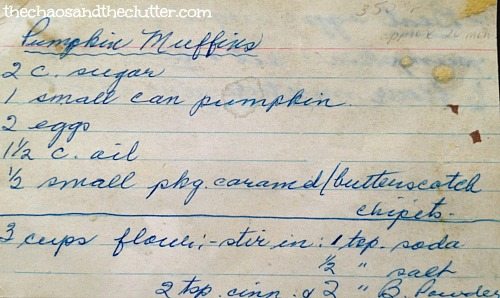
I treasure it. It is worn and has oil spills on it, but it is in her familiar handwriting and each time I bake these muffins and then again while I smell them baking in my own kitchen, I am taken back to a time when my grandma and I shared a connection in her kitchen, where she taught me about more than just measuring ingredients. She taught me about life.

These pumpkin muffins are not the healthiest, nor are they fat or sugar free! They are however, delicious! They are my go-to for giving someone when they have a new baby or are going through a hard time and when I’ve shared the muffins, the requests for the recipe always follows. This is by far my most requested recipe.

These freeze really well and I like to have at least a dozen in the freezer so that if I’m running out the door on my way to an appointment, I can grab one as a quick breakfast.

The butterscotch chips ensure that they are a favourite among kids as well. One of my daughters, Miss Optimism, does not eat fruit or vegetables so these muffins and zucchini cake or loaf are about the only way she gets those nutrients so I reason that the pumpkin cancels out the butterscotch chips!

I had to adapt the recipe slightly by doubling most of the ingredients to accommodate for the larger cans of pumpkin because our local grocery stores stopped selling the smaller ones a number of years ago. Depending on the size you make the muffins, this makes about four dozen.

My Grandma’s Famous Pumpkin Muffins

Cream together:

4 cups of sugar
4 eggs

Then add and beat:

2 1/2 cups vegetable oil
1 – 796ml can of pumpkin

Stir together in another bowl:

6 cups of flour
2 tsp. baking soda
dash of salt
4 tsp. baking powder
4 or 5 tsp. pumpkin pie spice or cinnamon

Add the dry ingredients to the wet ingredients and mix. Stir in:

one bag of butterscotch chips

Grease muffin trays (unless using a stoneware muffin tin) and fill 3/4 full. Bake at 350° for 20 minutes.

If I’m freezing them, I let them cool and then put them in a large resealable freezer bag and then freeze.

Pumpkin MuffinsI’ve tried to make these pumpkin muffins healthier by substituting applesauce for half of the oil and by trying other sweeteners in place of the sugar, but they have never tasted as good.

It could also be that for me, the taste is so connected to childhood memories that this is one recipe I just shouldn’t try to change so feel free to experiment.

Print
My Grandma's Famous Pumpkin Muffins
Ingredients
  • 4 cups of sugar
  • 4 eggs
  • 2 1/2 cups vegetable oil
  • 1 - 796 ml can of pumpkin
  • 6 cups of flour
  • 2 tsp. baking soda
  • dash of salt
  • 4 tsp. baking powder
  • 4 or 5 tsp. pumpkin pie spice or cinnamon
  • 1 bag of butterscotch chips
Instructions
  1. Cream together sugar and eggs.
  2. Add vegetable oil and can of pumpkin and beat.
  3. In a separate bowl, mix flour, baking soda, salt, baking powder and pimpin pie spice or cinnamon.
  4. Add the dry ingredients to the wet ingredients and mix.
  5. Stir in butterscotch chips.
  6. Grease muffin trays (unless using a stoneware muffin tiand fill 3/4 full.
  7. Bake at 350° for 20 minutes.
Recipe Notes

If I'm freezing them, I let them cool and then put them in a large resealable freezer bag and then freeze.

You may also be interested in my recipe for Gluten Free Granola Muffins or Gluten Free Pumpkin Muffins.

Filed Under: Cooking in the Chaos

  • « Go to Previous Page
  • Page 1
  • Interim pages omitted …
  • Page 91
  • Page 92
  • Page 93
  • Page 94
  • Page 95
  • Interim pages omitted …
  • Page 128
  • Go to Next Page »

Primary Sidebar

Categories

We are a participant in the Amazon Services LLC Associates Program, an affiliate advertising program designed to provide a means for us to earn fees by linking to Amazon.com and affiliated sites.

Copyright © 2026 • The Chaos and the Clutter • Site Design by Jeni @ The Blog Maven

Return to top of page

Copyright © 2026 · Chaos and the Clutter 2.0 on Genesis Framework · WordPress · Log in