• Skip to primary navigation
  • Skip to main content
  • Skip to primary sidebar
  • Home
  • About
  • Contact
  • Privacy + Terms
  • Affiliates

The Chaos and the Clutter

  • Facebook
  • Twitter
  • Pinterest
  • Google Plus
  • RSS
  • Email
  • School at Home
  • Sensory
    • Sensory Processing Disorder
    • Awesome Sensory Play Activities
      • Sensory Bins
      • Sensory Bottles
      • Sensory Bags
  • Family Games
    • Minute to Win It Games
  • Special Needs Parenting
    • Childhood Anxiety
    • Reactive Attachment Disorder
    • Sensory Processing Disorder
  • Store
  • Course Login

Sharla Kostelyk

Easy Outdoor Sensory Activities at Home

By Sharla Kostelyk

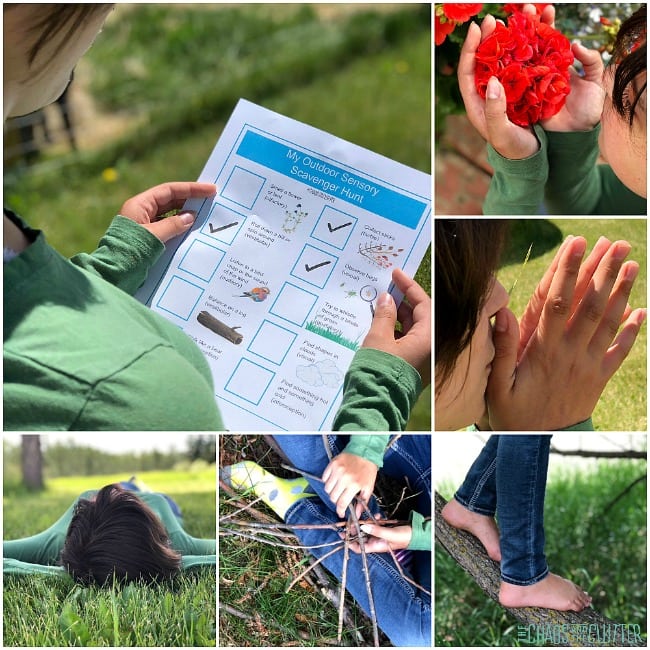
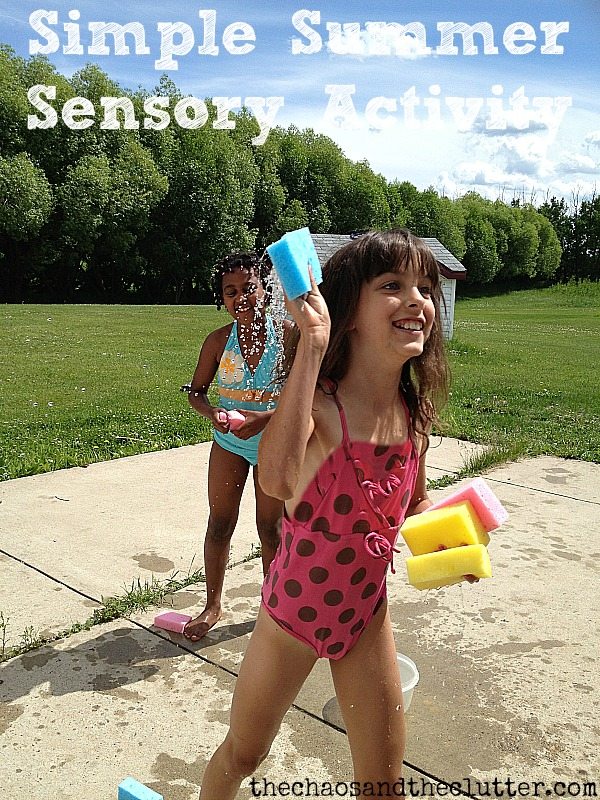
We’ve been stuck inside only able to do indoor sensory activities but now it’s finally warmed up enough to spend some time outside. That means we can finally add these easy outdoor sensory activities to our days. We are so looking forward to getting some fresh air.collage of images of kids playing. Text reads "Outdoor Sensory Activities at home"
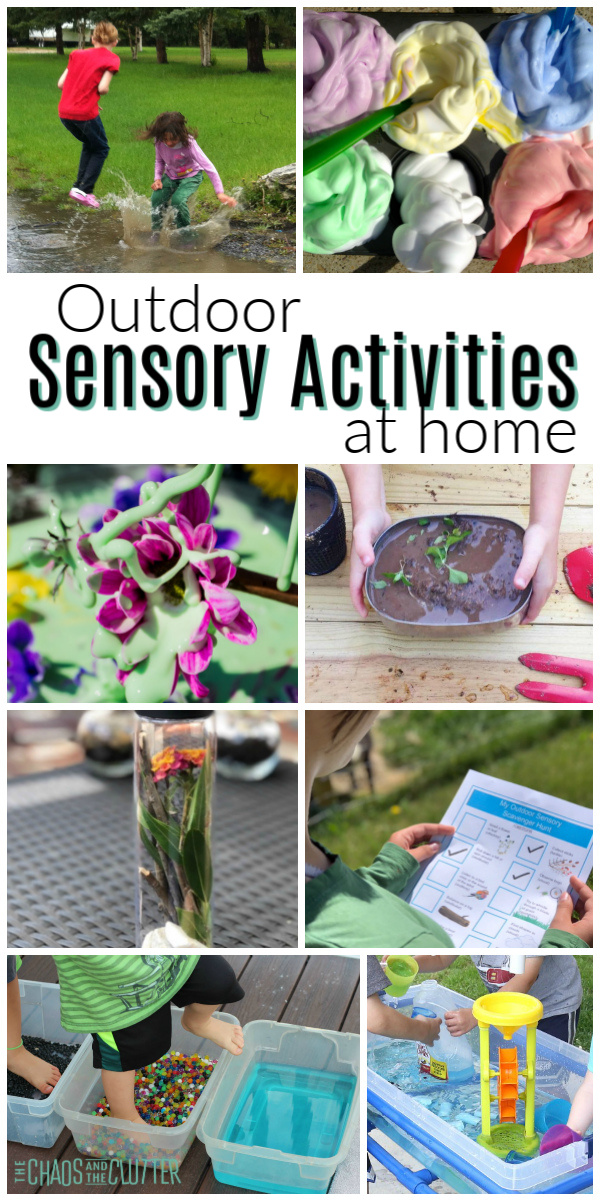
The kids have already begun exploring in the trees and enjoying the sunshine. It has done wonders for their mood now that they aren’t as cooped up anymore.

Easy Outdoor Sensory Activities at Home

Image for Outdoor Sensory Scavenger Hunt for Kids

Outdoor Sensory Scavenger Hunt for Kids

Image for Frozen Treasure Find

Frozen Treasure Find

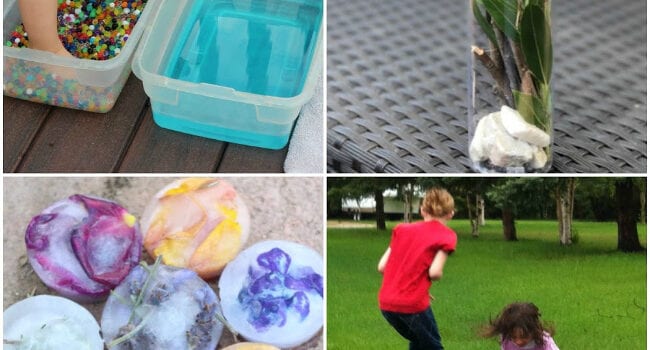
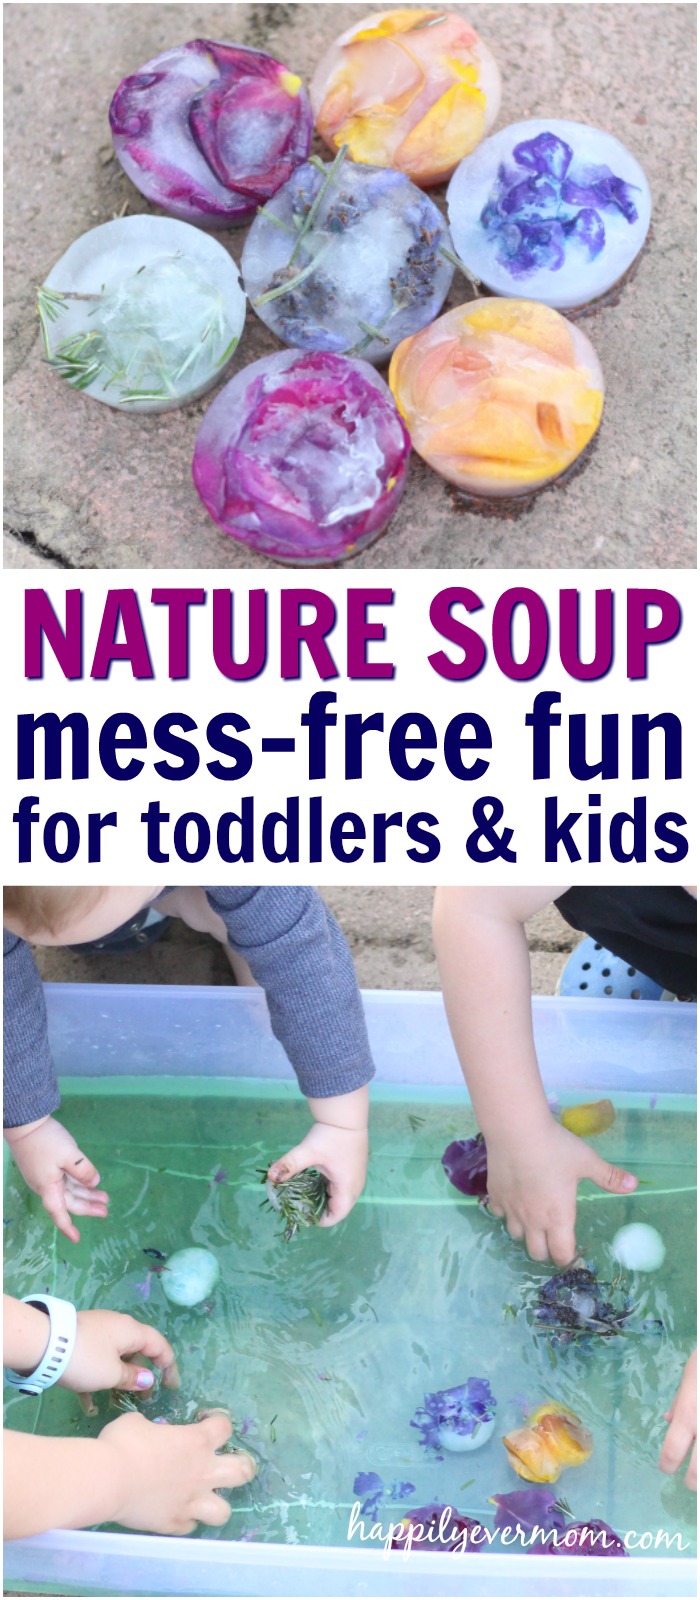
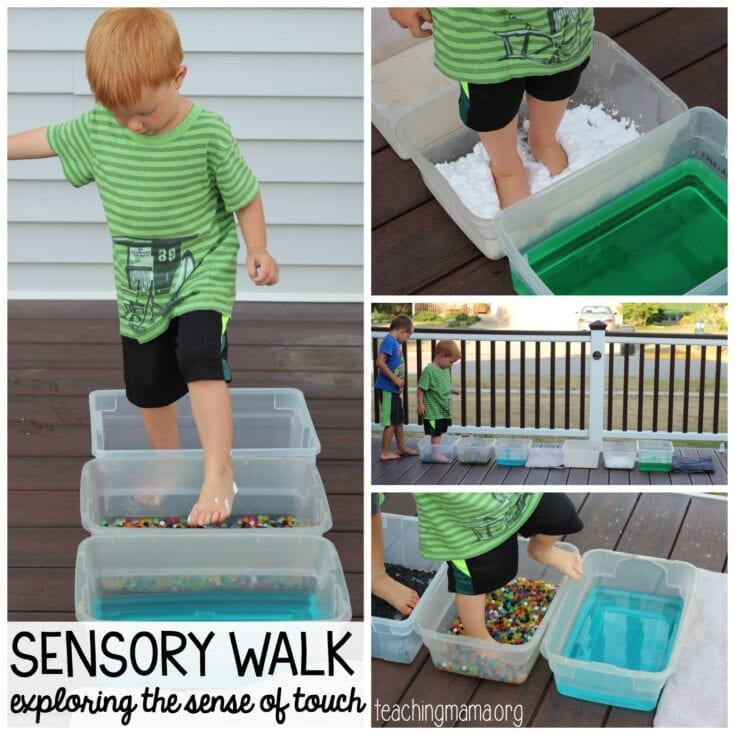
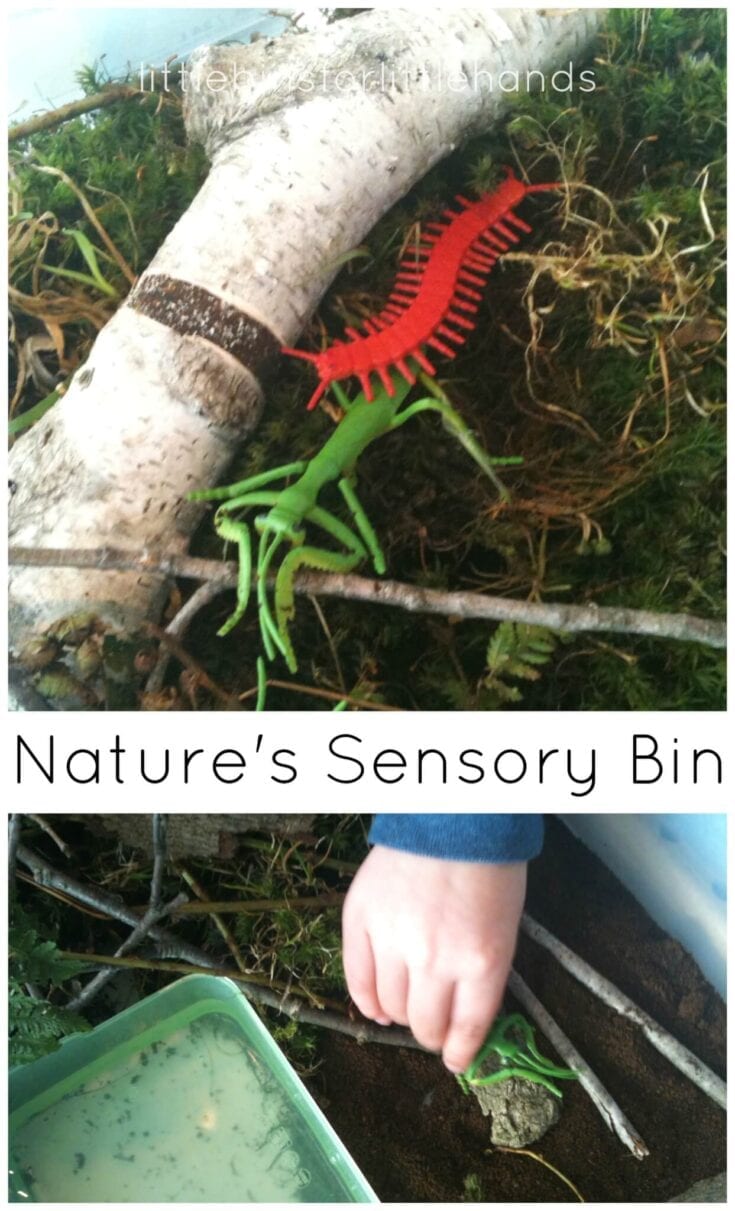
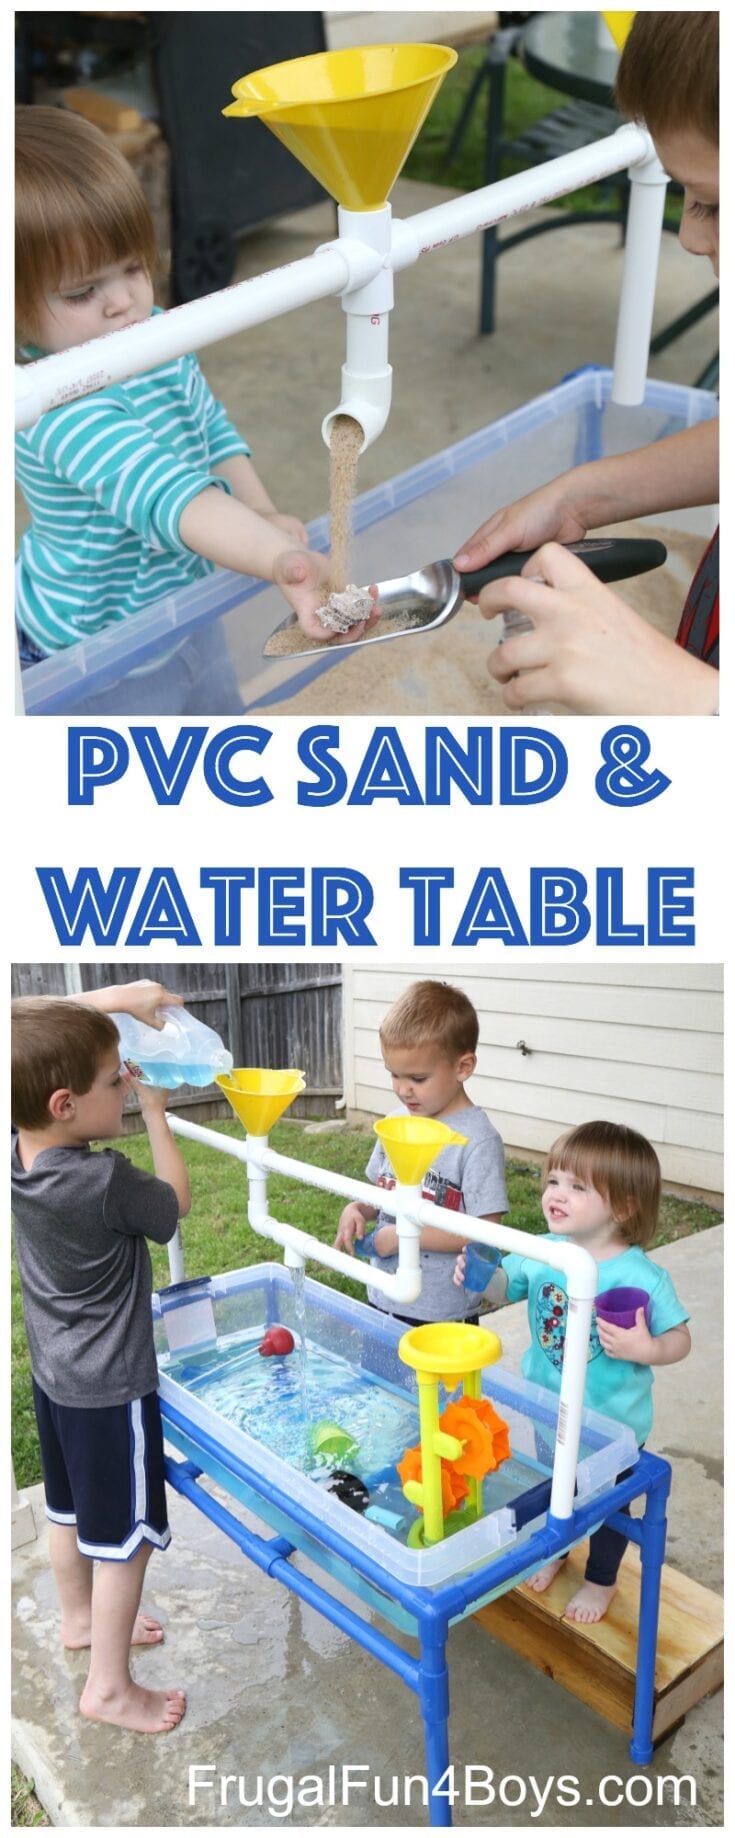
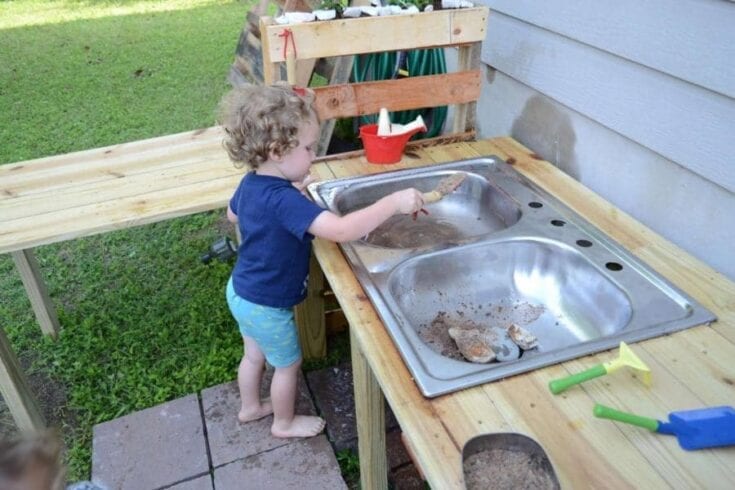
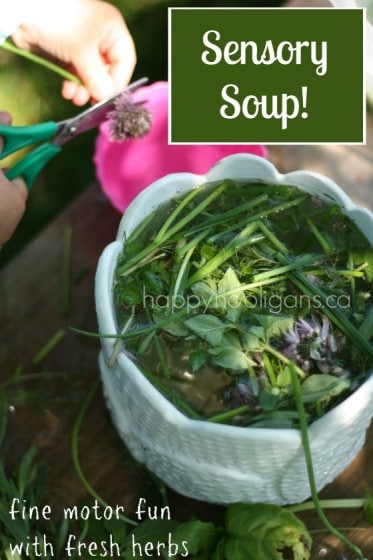
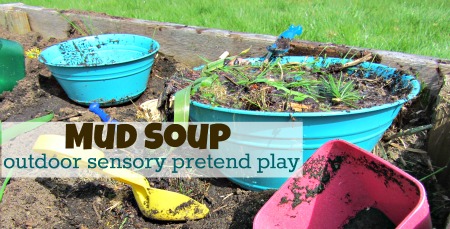
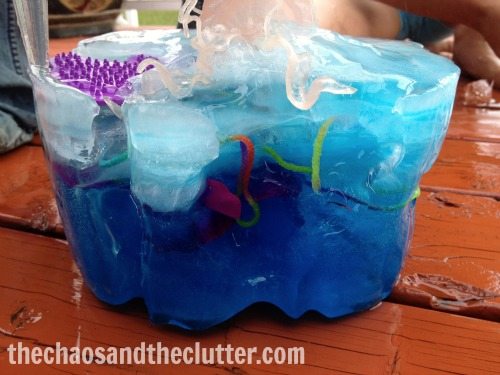
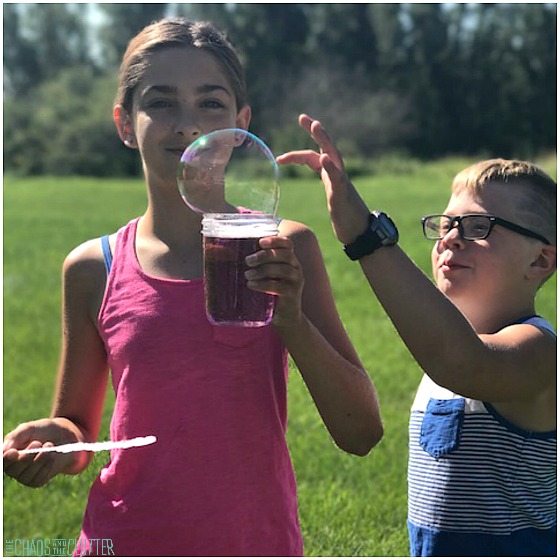
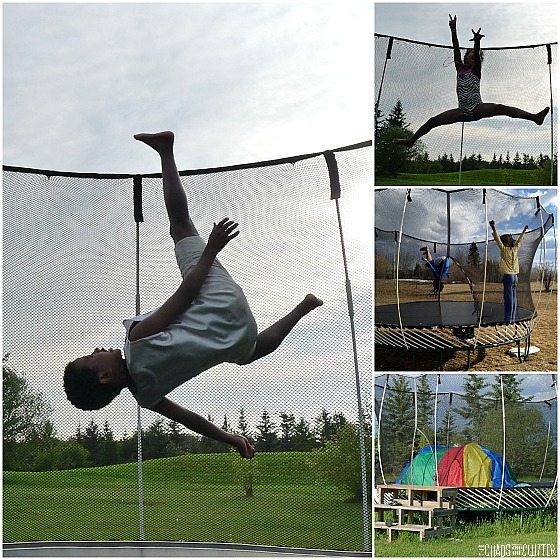
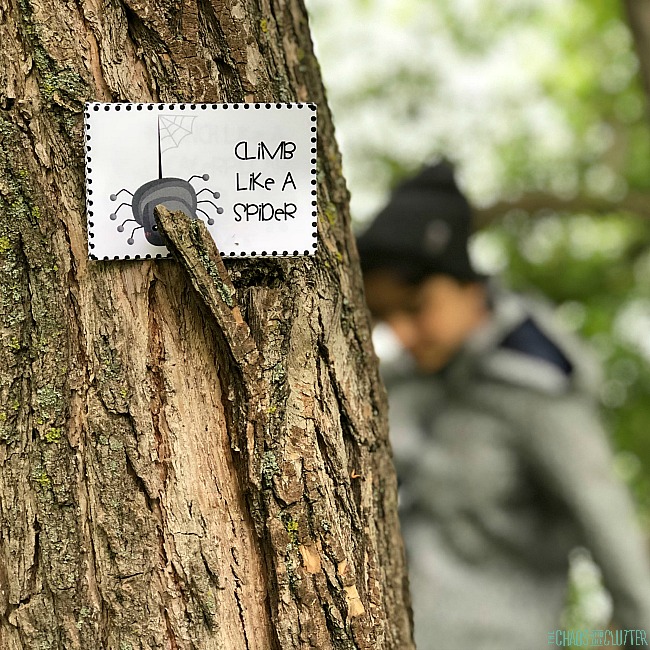
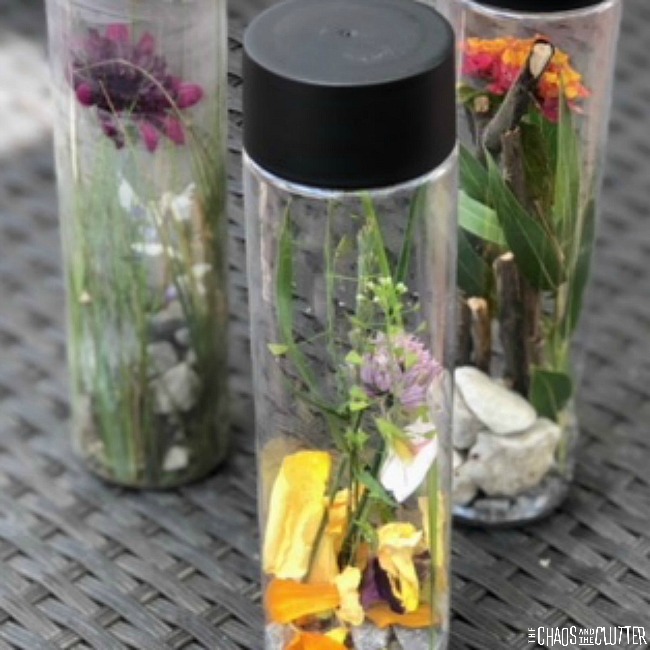
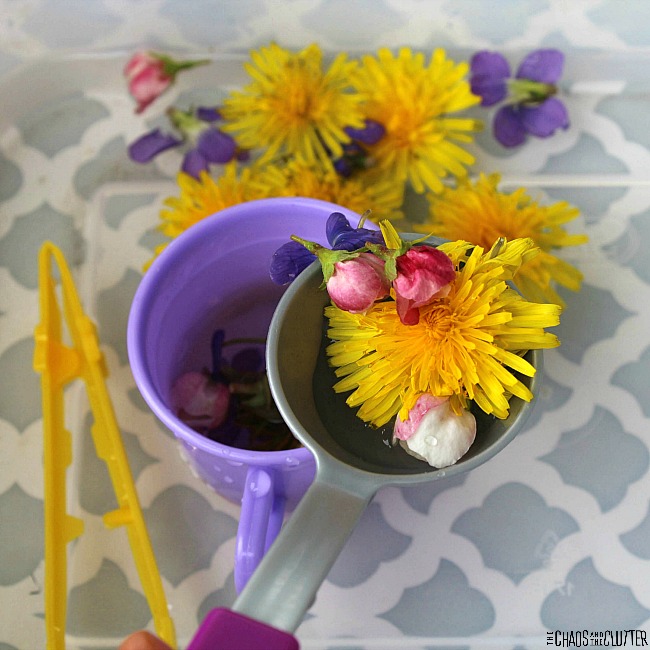
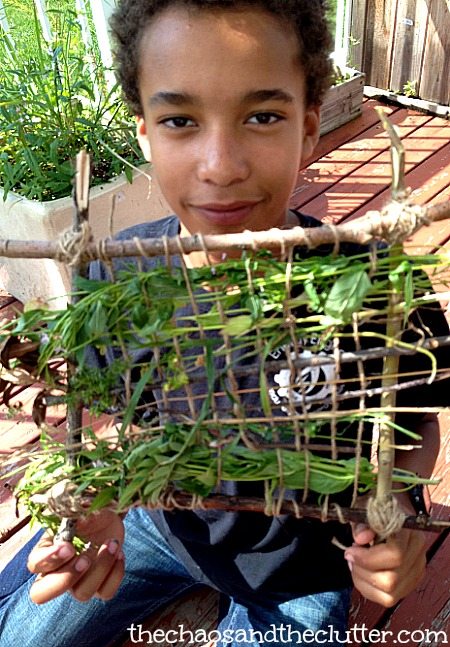
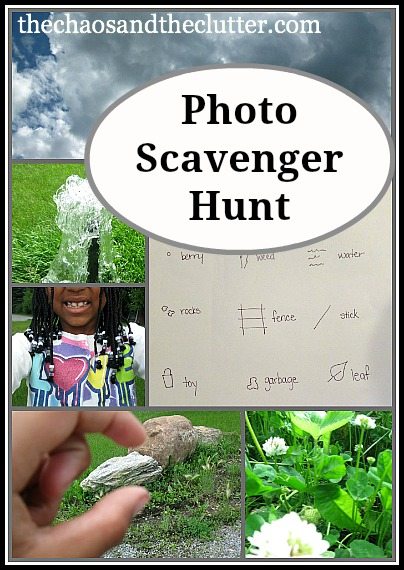
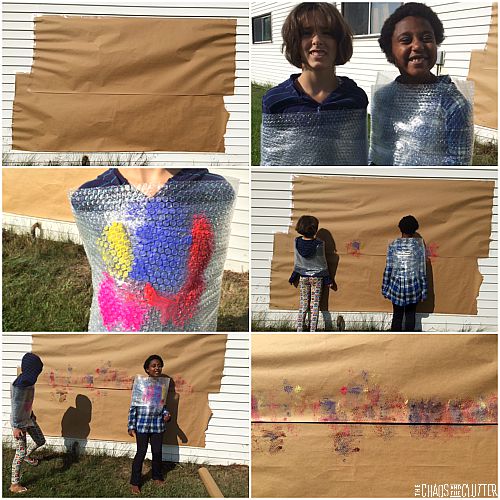
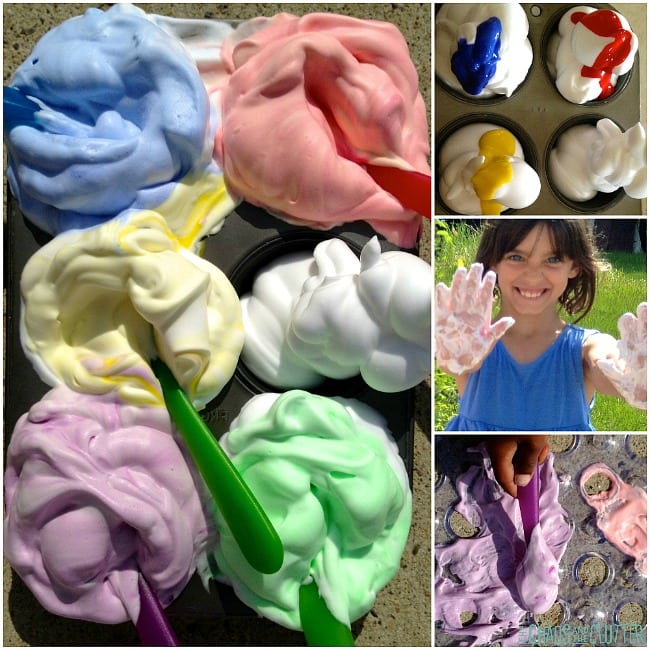
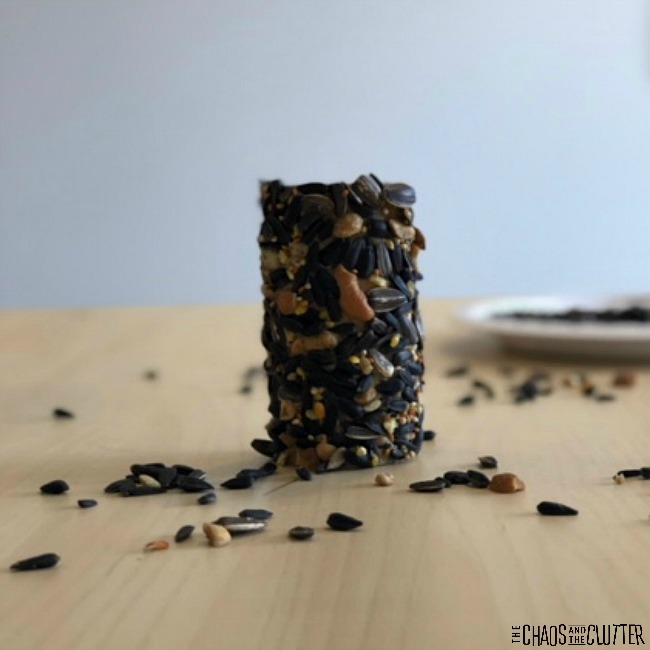
This is one of my favourite activities as it keeps the kids busy for hours.

Image for Scented Bubbles: Calming Lavender Bubble Recipe

Scented Bubbles: Calming Lavender Bubble Recipe

There are so many fun ways to play with bubbles and this is a great homemade recipe to use.

Trampoline Games and Activities

5 Trampoline Games

Playing on a trampoline is good for kids' moods and health. These trampoline games are great fun.

Image for Bug Action Cards for Kids

Bug Action Cards for Kids

These bug action cards give kids ideas for practising their gross motor skills while getting fresh air.

Image for Nature Sensory Bottle

Nature Sensory Bottle

As kids explore outside, they can collect items to create their own unique sensory bottle.

Image for Nature Inspired Spring Sensory Soup

Nature Inspired Spring Sensory Soup

Pour, dump, scoop, and stir with this sensory soup.

nature weaving project

Nature Weaving

Nature meets art in this sensory rich weaving project.

Image for Ghost Hands Campfire Fun

Ghost Hands Campfire Fun

Ewwww! This is so sticky and messy, but kids completely love it!

Image for Edible Freezie Painting

Edible Freezie Painting

Even toddlers can participate in creating art with this taste-safe "paint".

Image for Cotton Ball Painting

Cotton Ball Painting

Big movements and lots of interaction is required for this cool art activity.

Calming Lavender Sensory Bin

Calming Lavender Sensory Bin

There are only a few simple supplies needed to make this calming sensory bin for kids.

Image for Photo Scavenger Hunt

Photo Scavenger Hunt

Older kids will enjoy exploring outdoors in a photo scavenger hunt.

Bubble Paint Body Slam

Bubble Wrap Body Slam Painting

Bubble wrap body slam painting is as hilarious to watch as it is to do. Great proprioceptive sensory input too!

Image for Shaving Cream Polka-Dot Sidewalk Painting

Shaving Cream Polka-Dot Sidewalk Painting

Shaving cream painting is a neat alternative to sidewalk chalk.

an empty toilet paper roll covered in birdseed on a table sprinkled with bird seed. A white plate is visible in the background.

Toilet Paper Roll Bird Feeder

Use your empty toilet paper rolls to create a bird feeder. Then watch as the birds come to eat.

Simple Summer Sensory Activity

Simple Summer Sensory Activity

This is so easy to set up, but the best ideas usually are. My kids always love this game.

Image for Flower Oobleck
Photo Credit: www.steampoweredfamily.com

Flower Oobleck

Summer, sensory, and science combine for this ooey-gooey gorgeous flower oobleck.

Image for Nature Soup
Photo Credit: happilyevermom.com

Nature Soup

A mess free nature sensory bin for toddlers and siblings to do together. Gather materials outside, freeze them, and make a nature soup that will help kids cool down on a hot day as they mix their nature soup together!

Image for Sensory Walk
Photo Credit: teachingmama.org

Sensory Walk

Exploring the sense of touch with the toes in a sensory walk!

Image for Nature Sensory Bin Outdoor Explore and Discover
Photo Credit: littlebinsforlittlehands.com

Nature Sensory Bin Outdoor Explore and Discover

Create a real nature theme sensory bin to explore the senses! Go on a nature hunt and collect materials to build an outdoor sensory bin. Make sure to talk with your kiddo about all the smells, textures, and items found in nature.

Image for How to Make a PVC Pipe Sand and Water Table
Photo Credit: frugalfun4boys.com

How to Make a PVC Pipe Sand and Water Table

Make your own sand or water table using PVC pipes. There are so many play opportunities with this.

Image for DIY Mud Kitchen in One Weekend
Photo Credit: handsonaswegrow.com

DIY Mud Kitchen in One Weekend

Make your own outdoor mud kitchen for messy exploration.

Image for Outdoor Sensory Play - exploring herbs
Photo Credit: happyhooligans.ca

Outdoor Sensory Play - exploring herbs

Make some "homemade" sensory soup using weeds or herbs from the garden.

Image for Mud Soup
Photo Credit: www.notimeforflashcards.com

Mud Soup

Pretend play doesn't have to be complicated. How about some good old fashioned mud soup?

Not all activities have to be planned out. There are other things that can be done more spontaneously in the yard. 

Other easy ideas for outdoor sensory activities you can do at home:

  • make mud pies
  • water balloons or an old fashioned water fight
  • obstacle course – Use anything you have on hand such as hula hoops, slides, wood, pallets, tunnels, pool noodles, chairs, and tires. 
  • jump rope
  • relay races
  • sprinkler, kiddie pool, or Slip ‘n’ Slide
  • tag
  • yard work – Great for proprioception and for teaching good work ethic! Think raking, mowing (for kids who are old enough), picking rocks, and carrying firewood or bricks.
  • dig in the sandbox
  • gardening – digging, planting, pulling weeds, and picking are all great tactile sensory input.
  • bike rides
  • hikes or nature walks
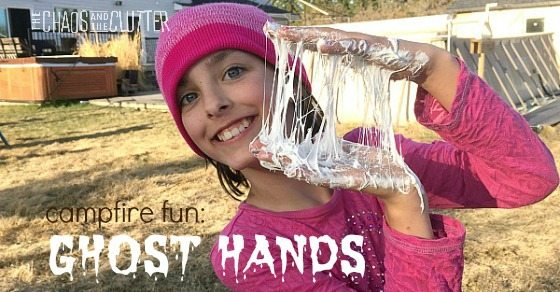
  • family campfire
  • tree climbing
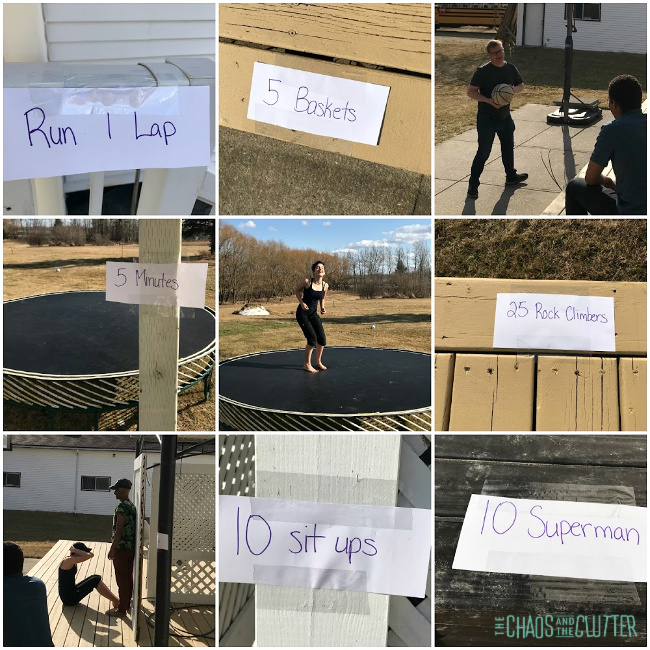
  • interval circuit – set up exercise stations in the yard with signs like “10 Jumping Jacks”, “1 Run Around the Yard”, “10 Supermans” (my kids loved this activity!)

Of course as with all sensory activities, adult supervision should be used. 

In case the weather doesn’t cooperate, you can find a great list of indoor sensory activities for home here.

Filed Under: Crafts and Activities, Sensory, Summer Sensory Activities Tagged With: parenting through pandemic

Praying Mantis Life Cycle Sensory Bin

By Sharla Kostelyk

I find that my kids are always fascinated to learn about different life cycles. One of the ways I like to help them reinforce that learning is through sensory play. This Praying Mantis Life Cycle Sensory Bin allows kids to explore through their senses and imaginations. hands hold green toy insect. Text reads "Praying Mantis Life Cycle Sensory Bin" 
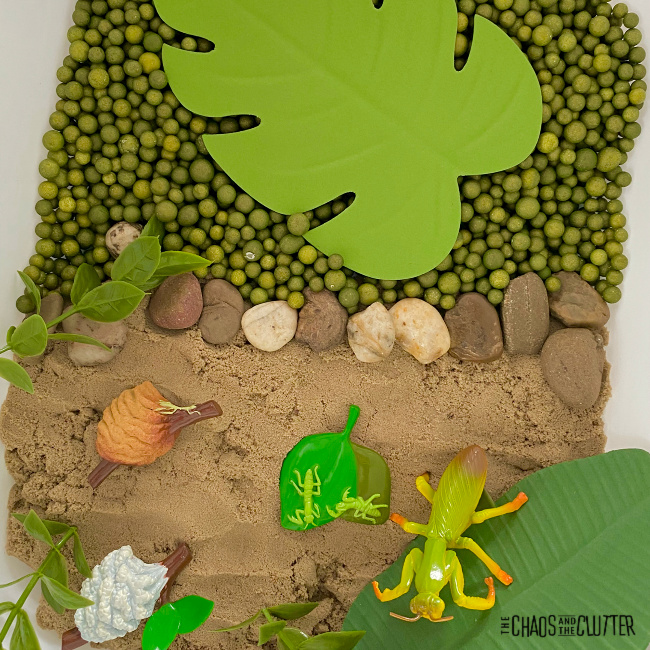
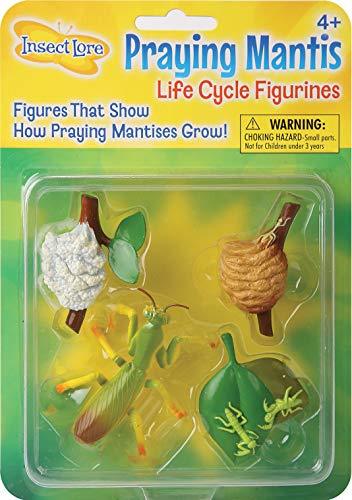
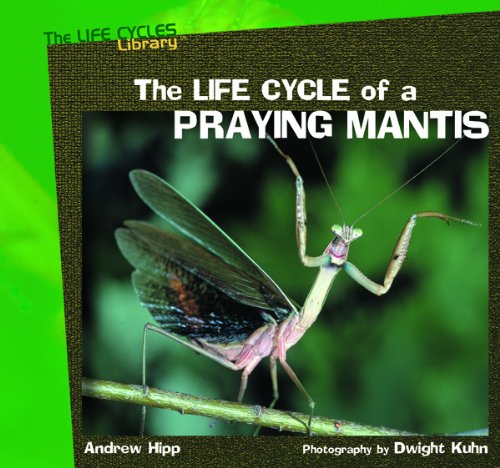
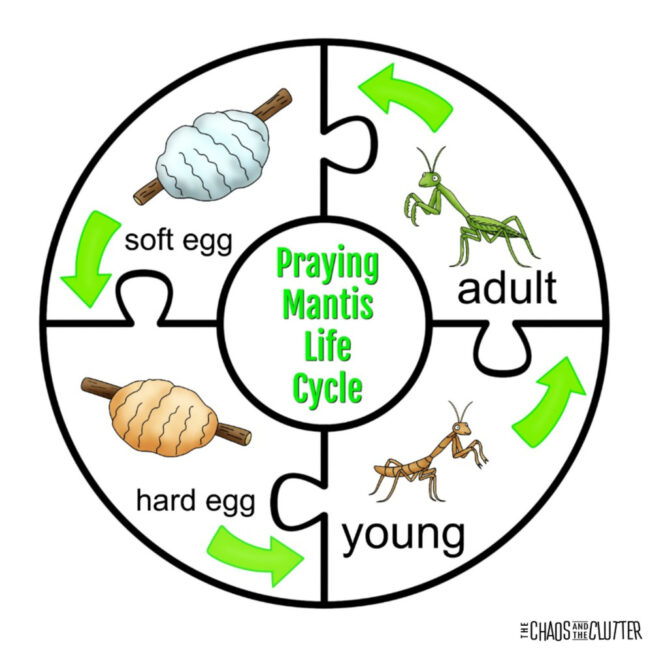
Kids can see how the cycle from soft egg case to hard egg to nymph (young) to adult. The more they learn about this fascinating insect, the more their interest will be piqued. 
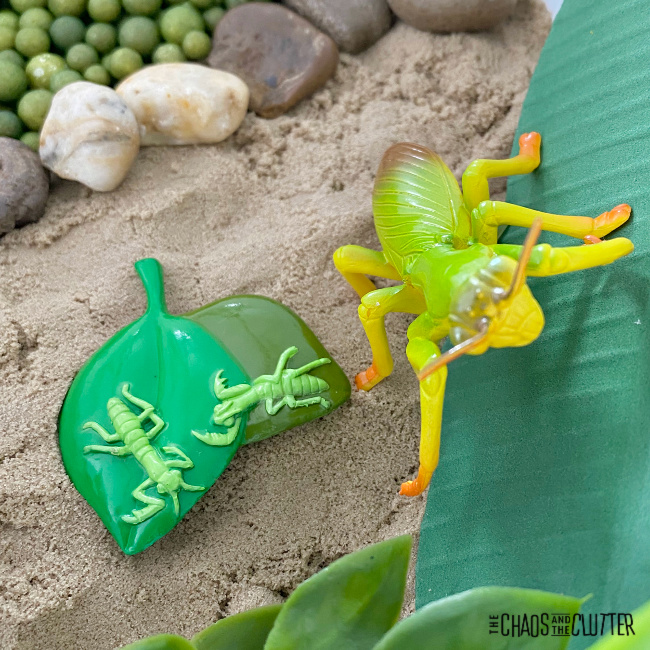
Praying Mantis Life Cycle Sensory Bin:

Supplies needed:

  • kinetic sand (you can use regular sand if you prefer)
  • decorative foam balls in green (I found these at the Dollar Store)
  • Praying Mantis Life Cycle Pack
  • magnifying glass
  • rocks
  • various leaves (real or plastic)
  • plastic bin
  • optional: scoops, spoons, or tongs

Directions:

  1. Place kinetic sand and foam balls in a plastic tub.
  2. Add rocks, leaves, a magnifying glass, and the figures from the Praying Mantis pack.
  3. If you want, you can also add some scoops or tongs.
  4. Invite your child to play.

This hands-on activity is a great way for kids to get up close and personal with this type of insect. The way it is set up mimics the habitat for some types of praying mantis.

This activity can be used for science at home or in a preschool or classroom. In addition to learning, students will also be getting visual, tactile, and proprioceptive sensory input as they play.

You can use this sensory bin as part of a unit study on insects or on the praying mantis. 

Kids can research their questions such as:

  • What does a praying mantis eat?
  • How long does a praying mantis live?
  • Where do praying mantis live?

Ways to expand the learning:

  1. Read books about insects or about the praying mantis in particular.
  2. If you live in an area where there are praying mantis, you could catch one and place it in a bug habitat to observe before releasing it.
  3. Write a report complete with pictures about the praying mantis. 
  4. Print off the Praying Mantis Life Cycle puzzle. Cut out the pieces and assemble. 

Praying Mantis 4 Piece Life Cycle FiguresPraying Mantis 4 Piece Life Cycle FiguresPraying Mantis 4 Piece Life Cycle FiguresThe Life Cycle of a Praying MantisThe Life Cycle of a Praying MantisThe Life Cycle of a Praying MantisMini Praying Mantis Finger PuppetMini Praying Mantis Finger PuppetMini Praying Mantis Finger PuppetEducational Insights GeoSafari Jr. BugWatchEducational Insights GeoSafari Jr. BugWatchEducational Insights GeoSafari Jr. BugWatchHow to Draw InsectsHow to Draw InsectsHow to Draw InsectsManuelo, the Playing MantisManuelo, the Playing MantisManuelo, the Playing MantisPraying Mantises (Animal Cannibals)Praying Mantises (Animal Cannibals)Praying Mantises (Animal Cannibals)

Learn more about the praying mantis:

National Geographic

Interesting Facts about the Praying Mantises (great pictures here!)

Nature’s Perfect Predator (Praying Mantis video)

Download your free printable Praying Mantis Life Cycle puzzle to go along with this science activity. 

You may also be interested in checking out these Life Cycle Sensory Bins:

Bee Life Cycle Sensory Bin

Chicken Life Cycle Sensory Bin

Sea Turtle Life Cycle Sensory Bin


Filed Under: Homeschooling, Printables, Sensory Bins

Simple Science: Earthquake Experiment

By Sharla Kostelyk

In the past few weeks, we’ve been learning about the Earth’s layers (you can see how to make a Layers of the Earth model here), tectonic plates, volcanoes, and earthquakes. For the teaching on earthquakes, I wanted to give the kids a hands-on activity that would help them remember what they learned.lego bricks and wooden blocks on a cookie tray. Text reads "hands-on science Earthquake Experiment"
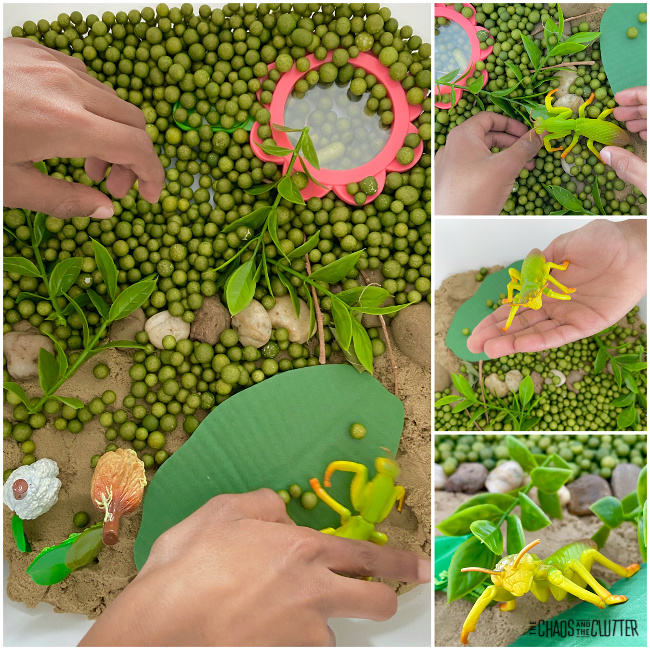
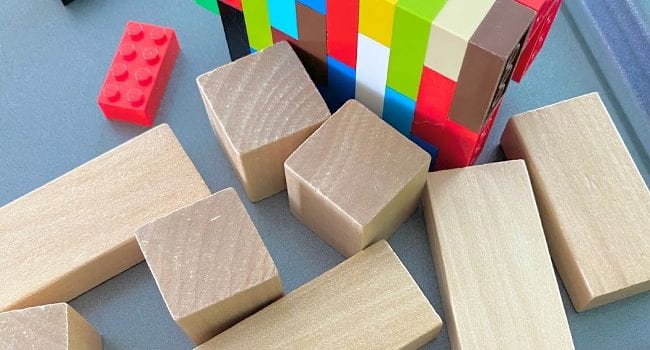
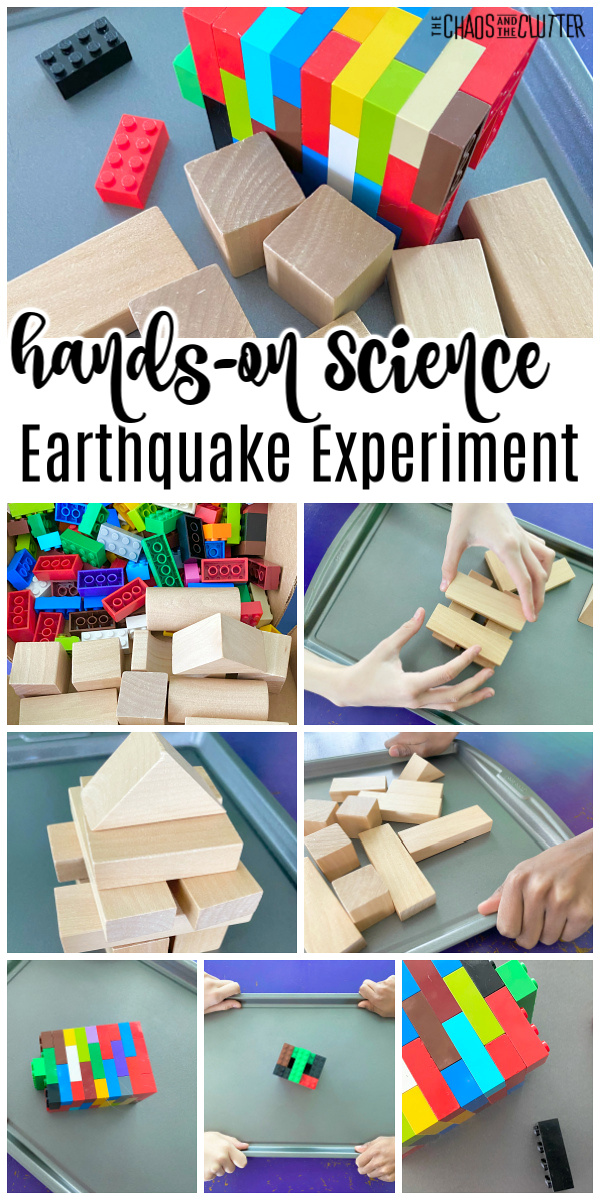
This earthquake experiment is simple and requires very few items to create. This can easily be done at home and chances are, you already have the items you’ll need. 

Earthquake Experiment:

Supplies needed:

  • metal cookie sheet
  • wooden blocks
  • Lego bricks

Directions:

  1. First, have the students construct a tower on the cookie sheet using the wooden blocks.
  2. Have two of the kids sit on either side of the cookie sheet and shake it as if there were an earthquake. Not surprisingly, when we did this, the tower crumbled with very little shaking and the blocks fell.

The metal cookie tray is meant to represent a tectonic plate and the shaking represents the shifting that happens with an earthquake.

Directions Part Two:

  1. Next, work together to construct a tower with interlocking Lego blocks. Our kids, are always excited when Lego and school collide! Made it approximately the same height and shape as the wooden block tower. For us, it took much longer of course to make the Lego brick tower, which led to a discussion about how sometimes doing things the right way takes more time.
  2. Set the new tower on the cookie sheet and have two kids sit on either side (in order for the experiment to be as scientific as possible, we wanted to use the same people so that they could attempt to create the same earthquake force). At first, they recreated the same shaking they had the first time and the tower stayed intact.
  3. Simulate a larger, more powerful earthquake. When we did this, they became more and more forceful with the shaking, eventually lifting the tray up and banging it up and down as well as side to side before they were able to knock the tower over and dislodge a few of the bricks.

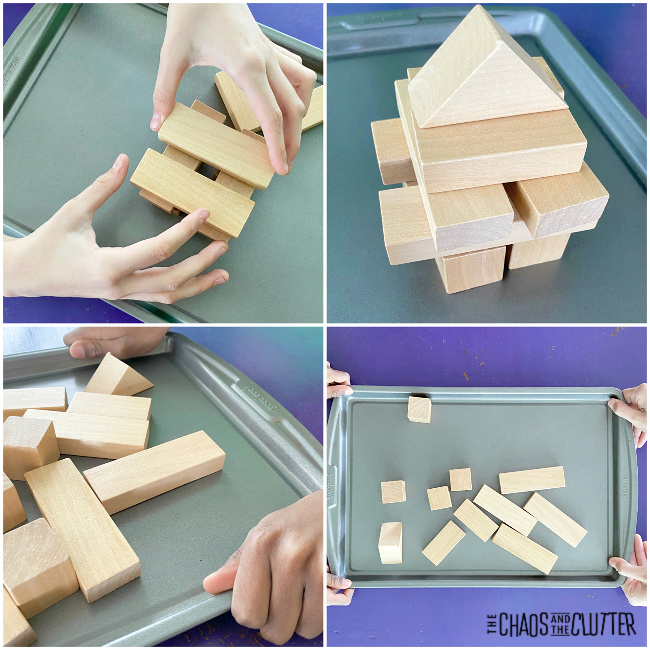
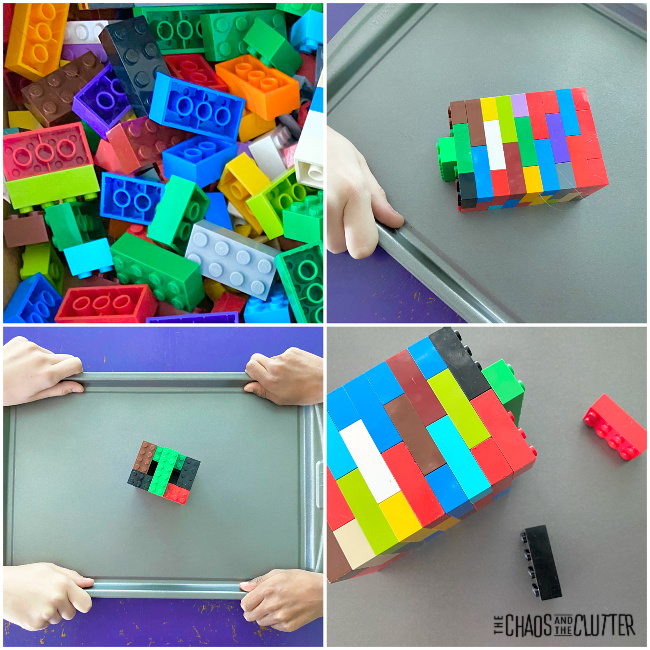
This simple earthquake experiment is an easy way to demonstrate to kids why buildings in earthquake-prone areas need to be built differently to withstand the fallout of the quakes.

Ways to expand your learning about earthquakes:

  • Experiment to show the destruction of earthquakes along fault lines
  • Seismic Waves
  • Tectonic Plates, Earthquakes, and Volcanos
  • What is an Earthquake?

Books for Kids about Earthquakes:

Why Do Tectonic Plates Crash and Slip? Geology Book for KidsWhy Do Tectonic Plates Crash and Slip? Geology Book for KidsWhy Do Tectonic Plates Crash and Slip? Geology Book for KidsEarthquakes and Other Natural DisastersEarthquakes and Other Natural DisastersEarthquakes and Other Natural DisastersTummy Rumble Quake: An Earthquake Safety BookTummy Rumble Quake: An Earthquake Safety BookTummy Rumble Quake: An Earthquake Safety BookEarthquakes! - An Earthshaking Book on the Science of Plate TectonicsEarthquakes! – An Earthshaking Book on the Science of Plate TectonicsEarthquakes! - An Earthshaking Book on the Science of Plate TectonicsJump Into Science: EarthquakesJump Into Science: EarthquakesJump Into Science: Earthquakes


You may also be interested in these other easy science activities for kids about the Earth:

Layers of the Earth Hands-On Science Activity

Making GroundwaterScience Groundwater Experiment

How do Fold Mountains FormThis is a great hands-on science experiment to explain how fold mountains are formed.

Filed Under: Homeschooling, Simple Science

2020 Pandemic Journal for Kids

By Sharla Kostelyk

The 2020 Pandemic Journal for Kids is a powerful tool in helping your child focus on the positive, express their feelings in a healthy way, shift their thinking to gratitude and hopefulness, and create a memorable time capsule keepsake.

As much as we try to shelter our child from the stress of what’s happening in the world right now, we can’t shield them from it all. Their reality has been altered. School closures, not being able to hug grandparents or visit friends, not going out to the playground, movies, or even the store, and maybe hearing the hushed whispers of adults are just a few of the changes your child may be facing. 

Even though we are doing our best as parents to make things as normal as possible for them, chances are, they still carry with them some concern. Worry in a child may look like:​

  • teasing or arguing with siblings more than usual
  • being irritable
  • having trouble falling asleep or having nightmares
  • whining
  • outbursts or meltdowns
  • being rigid/inflexible
  • quick or easy to anger
  • easily frustrated
  • big emotions
  • asking a lot of questions
  • aggression

What can you do to help your child through this?

Offer hope. ​

Talk about the future without making promises you can’t keep. The statement “Someday, you’ll be able to tell your kids that you were 9 years old during the 2020 pandemic.” is very powerful. It conveys to them that this will not end the world. That they have a future to look forward to and it also helps them feel like what they are doing now will hold a place in history. 

Help them focus on the positive.

There is so much surrounding them that is difficult right now that it can be easy for kids (and adults) to slip into negative thought patterns. “It’s never going to get better.” “I can’t do …”

By helping them reframe what they are going through in more positive language, kids can shift their thinking to gratitude and hopefulness.

Give them an outlet for expressing their feelings.

When kids are able to identify their feelings, they can better manage them. By tracking their emotions, they can also learn to communicate about them. This helps parents and teachers be able to help them through even the most difficult emotions and enables them to equip their child or student with appropriate calm down strategies and tools to better manage those.

What the 2020 Pandemic Journal for Kids includes:

  • 19 printable pages
  • prompts to help kids document the journey for a time capsule keepsake
  • pages for them to help identify and process their emotions
  • new habit tracker 
  • gratitude journal 
  • encouraging colouring pages
  • ideas to help them focus on the positives
  • and more

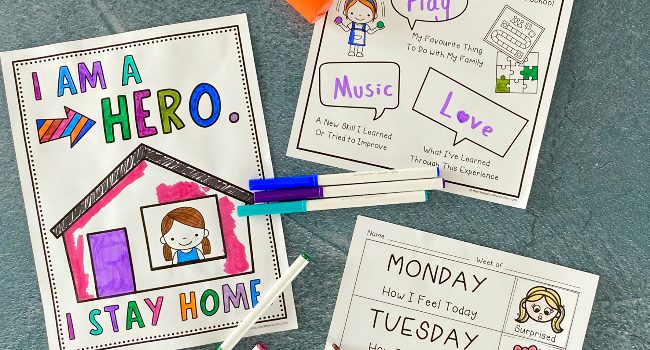
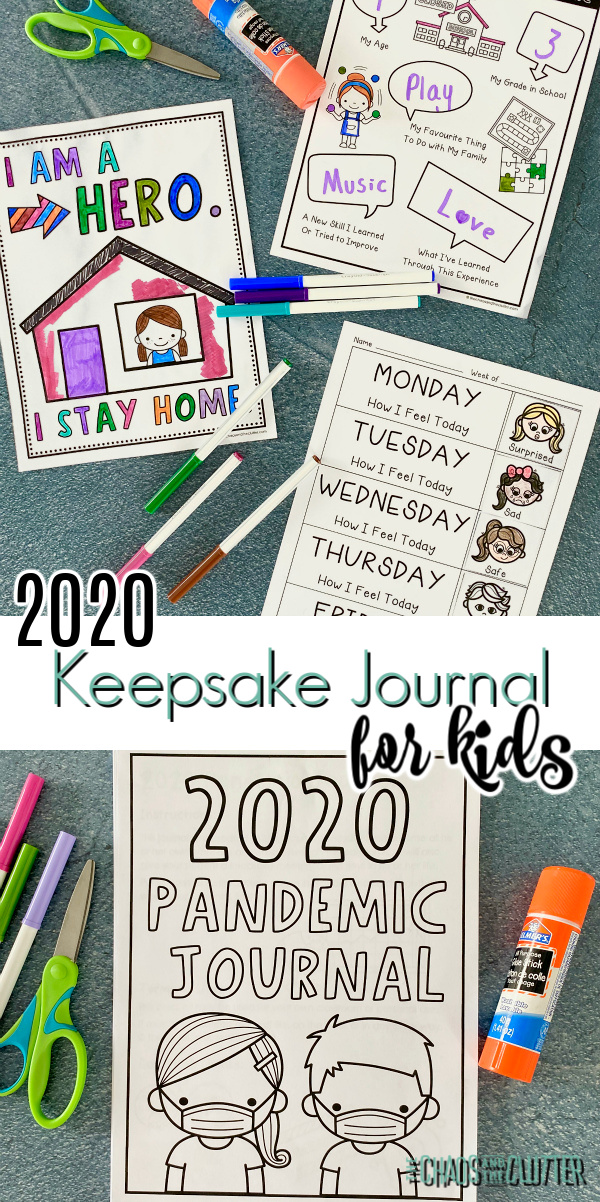
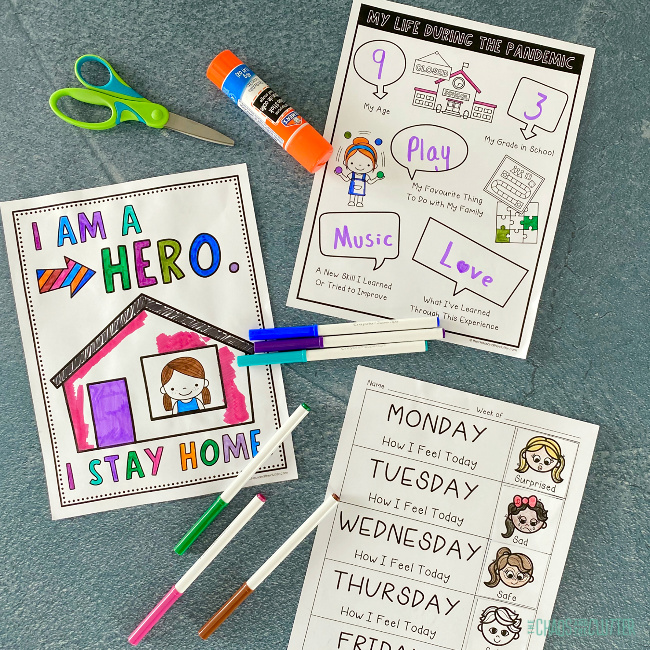
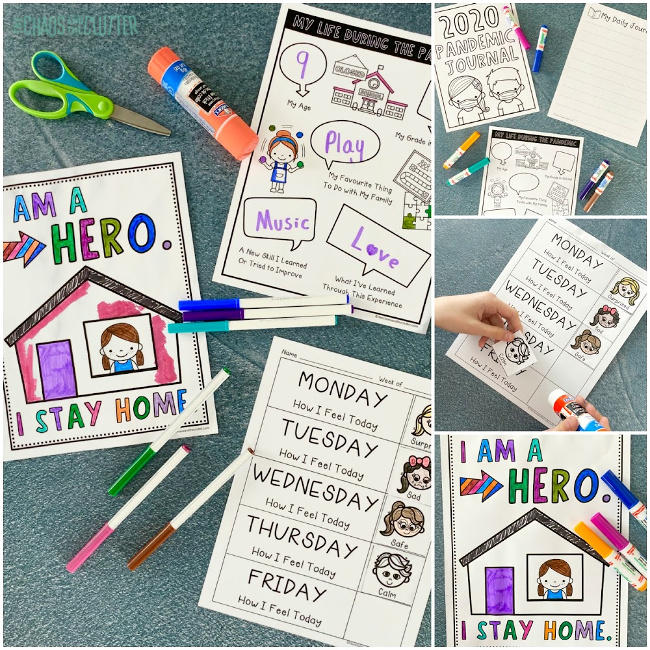
How to Use the Journal:
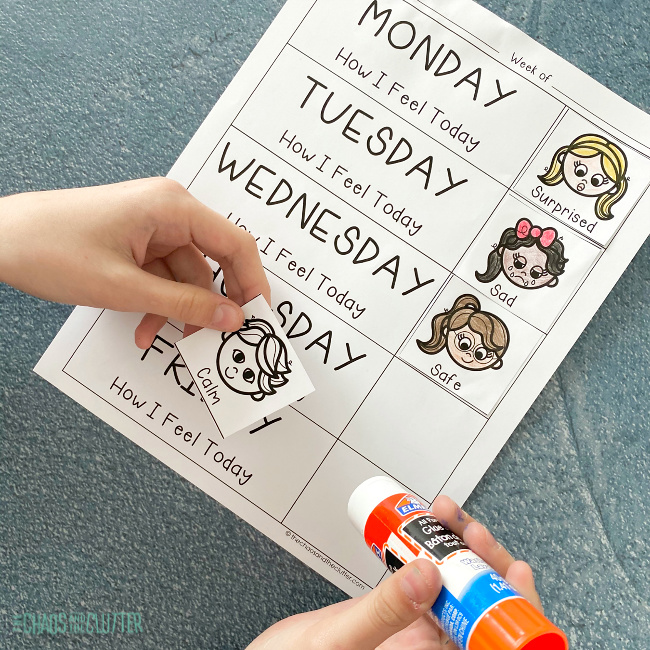
Supplies needed:

  • 2020 Pandemic Journal for Kids (download yours here)
  • pen or pencil
  • markers, crayons, or pencil crayons
  • scissors
  • glue stick or glue

Instructions:

  1. Download the pandemic journal.
  2. Print off the pages. You may want to make multiple copies of some of the pages such as the gratitude page and daily journal. 
  3. Have your child complete the pages of the journal.
  4. If you want to, you can hole punch the papers to keep them in a binder or duo tang. 

How to adapt the Pandemic Journal for Preschoolers:

Even preschoolers can easily use this tool. They can colour the title page and colouring pages, a parent can help them fill in the answers for the “my life during the pandemic page” by interviewing them and recording their answers, the Feelings Log pages can be completed by colouring, cutting, and pasting, and all the other sheets can be completed by drawing rather than writing. 

How to adapt the Pandemic Journal for Older Kids and Teens:

This tool can actually serve as an inspiration for your teen or older child to expand on this idea. Perhaps they will want to create a video journal or scrapbook of news articles to accompany their Pandemic Journal. Maybe they will choose to write a report on what they are learning through this experience or about the ways the world came together. 

They can use the pages in the journal to write their experiences, thoughts, and emotions as well as to document the experience through their eyes. Depending on the age, maturity, and personality of your teen, they also want to follow reputable news sources to create a timeline or even write a book about the pandemic as seen through their eyes.

To download your free copy of the 2020 Pandemic Journal for Kids, enter your email address in the box below.

You may also be interested in reading:

Your Complete Guide to School at Home

How to Talk to Your Child about the Pandemic

Theme Day Ideas for Family Fun at Home

Filed Under: Homeschooling, Parenting in the Chaos, Printables Tagged With: parenting through pandemic

Eggs and Carrots Easter Sensory Bin

By Sharla Kostelyk

I am so in love with the bright and cheery colours in this Eggs and Carrots Easter Sensory Bin! It’s very inviting for kids. This bin also engages them in filling and dumping and pouring and creating which are especially good skills for preschoolers to practise. brightly coloured rice with toy eggs and carrots. Text reads "Easter Sensory Bin"

One of the nicest things about sensory bins is that they don’t have to be exact. While I will share with you what we used for our Easter sensory bin and you can get ideas and inspiration from that, you don’t have to have all the same supplies to make one of your own. You can add items you already have that are Easter themed or Spring colours to create your Easter sensory tub.

Eggs and Carrots Easter Sensory Bin:

Supplies needed:

  • pink, yellow, purple, and green coloured dry rice
  • Easter shaped cookie cutters (we used bunny, carrot, and egg cookie cutters)
  • stretchy bunnies
  • mini glitter foam eggs
  • hollow plastic carrot container
  • foam carrot decorations
  • handy scooper or something to scoop and pour with 
  • plastic bin

Directions:

  1. Dye the rice. You can do this by adding food colouring or paste and 1/2 tsp. vinegar into a bag and shaking. Then lay the coloured rice on a tray to dry overnight. 
  2. Place the coloured rice in a plastic bin.
  3. Add all the other items. Again, if you don’t have exactly these items, you can use any Spring or Easter related toys or kitchen items.
  4. Invite your child to play.

There are so many possibilities with this Easter sensory bin. Kids can use the empty carrot as a scoop or to fill with rice or eggs. They can also fill the cookie cutters with rice. 
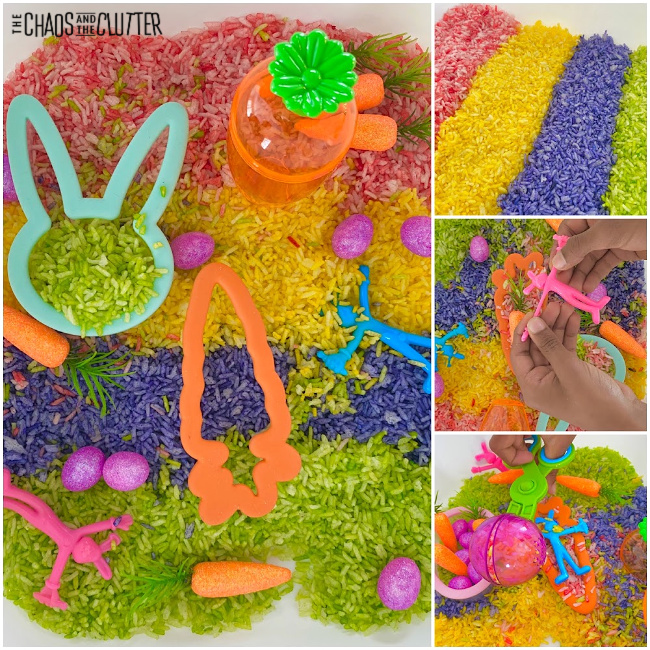
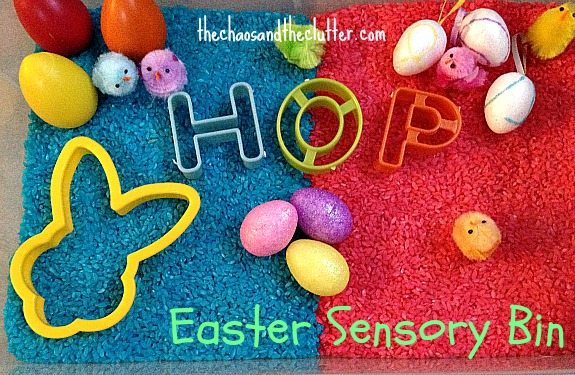
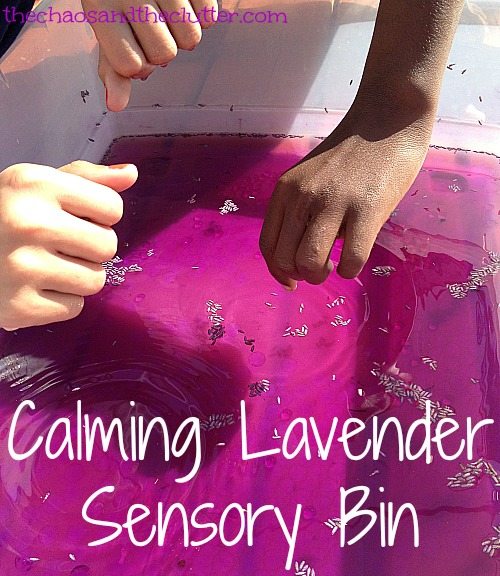
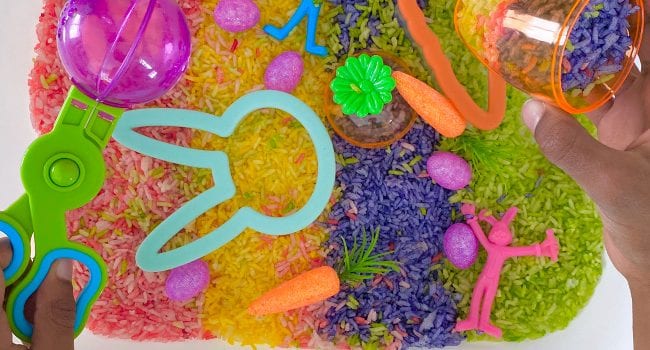
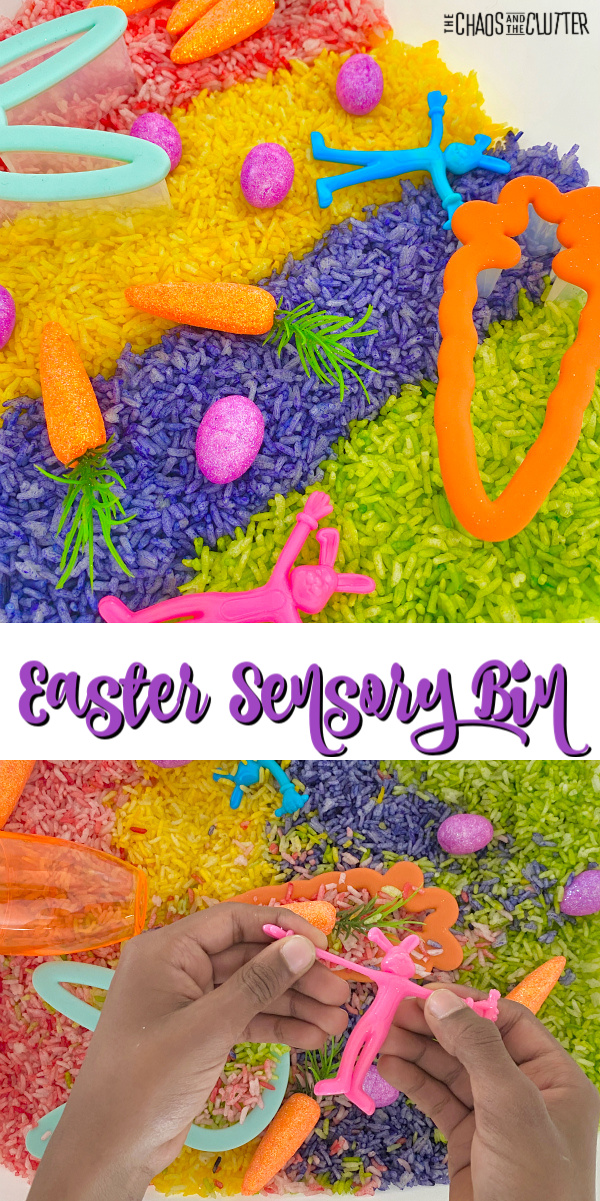
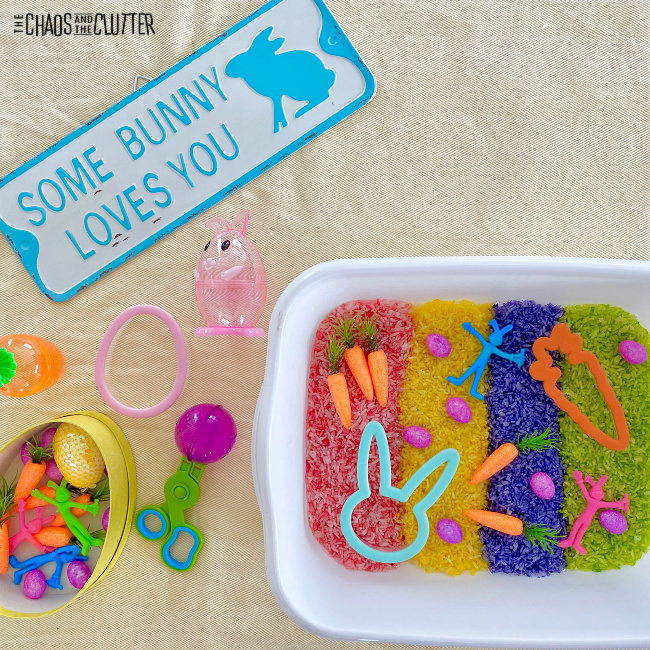
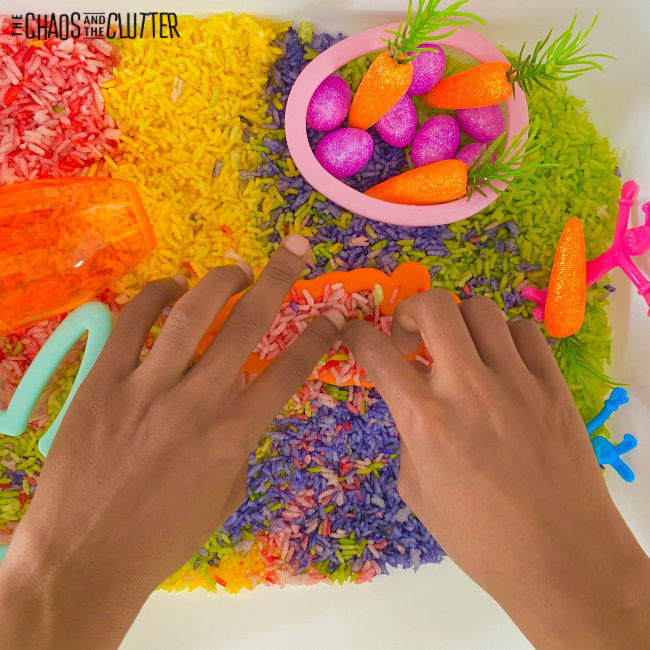
Once they begin playing with the bin, the different colours of rice will inevitably mix and that’s ok. If you have a child who gets upset by things like this, explain ahead of time that the colours will mix and that it’s all part of the fun. Once the colours mix together, it’s also quite pretty.

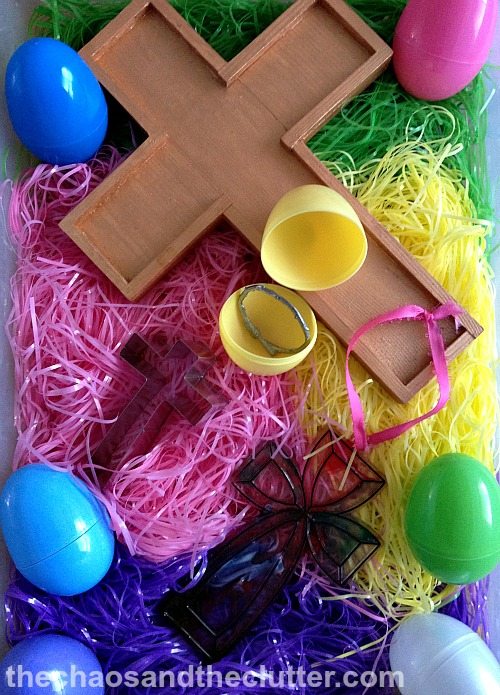
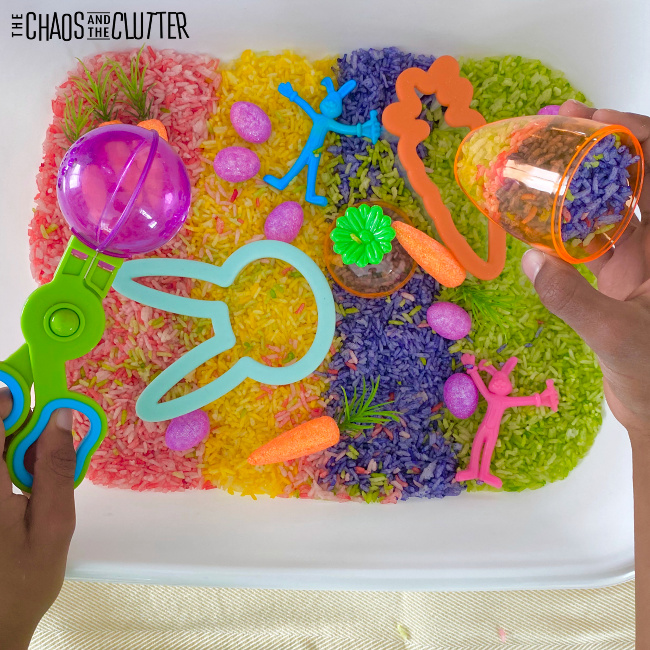
Check out some of these other Easter sensory activities:

Easter Fluffy Slime

Peter Rabbit Playdough

Christ Centered Easter Sensory Bin

Filed Under: Sensory Bins Tagged With: sensory play

Easter Fluffy Slime

By Sharla Kostelyk

Bring on Spring with this feathery Easter fluffy slime. Its texture is so soft, making it perfect for celebrating this Spring holiday. I am wanting anything that makes that feel closer. white puffy goo with small colourful eggs. Text reads "Easter fluffy slime"
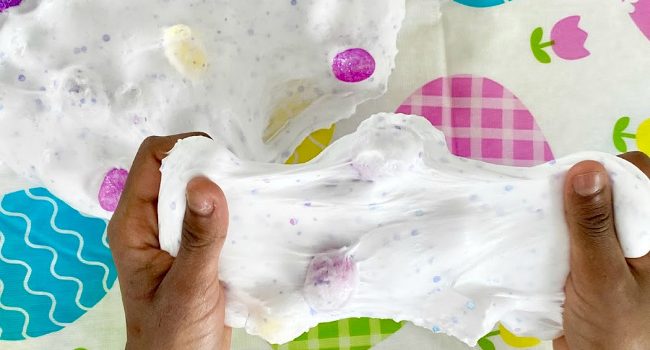
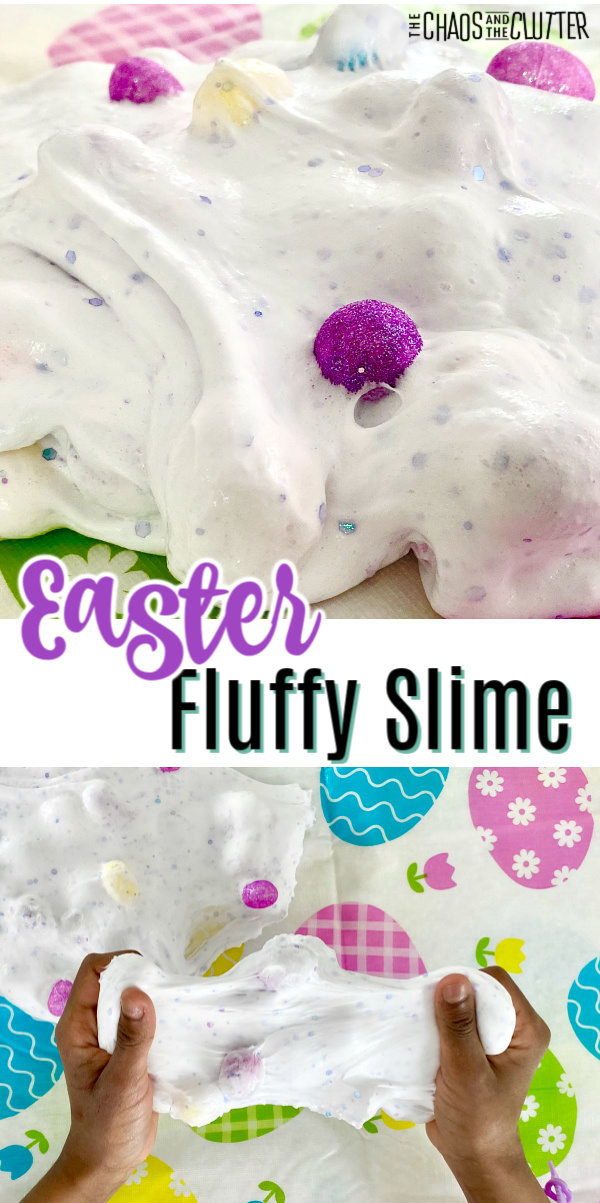
Full disclosure: I’m dreaming of Spring right now because where I live, it is still below freezing and snow blankets the ground a week into April. So I am all about thinking about baby chicks, green grass, and colourful flowers right now! And of course Easter.
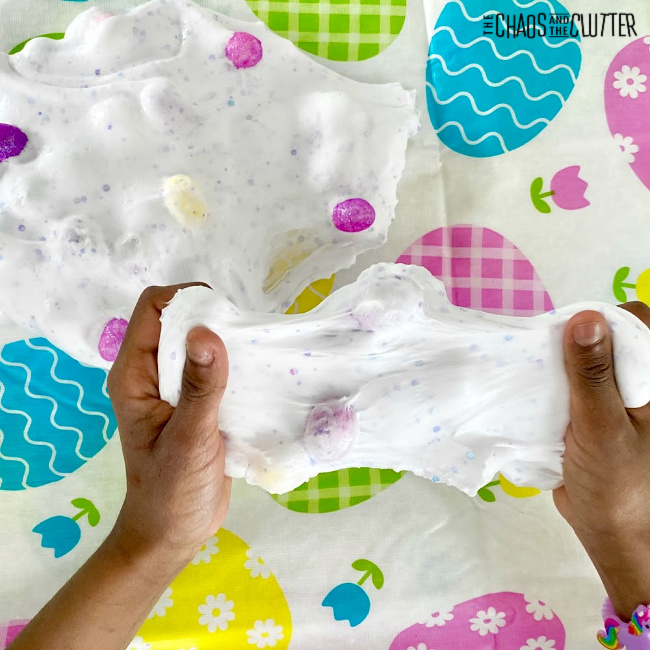
This Easter fluffy slime is soft and downy-like in its texture which reminds me of those Spring things. Watch the video below to see just how easy it is to make your own Easter fluffy slime. 

Easter Fluffy Slime:

Ingredients:

  • 2/3 cup of Elmer’s white School Glue
  • 1/2 teaspoon baking soda
  • 1/4 cup water
  • 2 1/2 cups shaving cream
  • 1 1/2 Tbsp. contact lens solution
  • blue or purple glitter
  • mini glitter foam eggs (I found mine at the Dollar Store)

Directions:

    1. Add glue to a bowl.
    2. Mix in water and baking soda.
    3. Add shaving cream and mix.
    4. Stir in food colour.
    5. Slowly add contact solution. Mix.
    6. Add the glitter.
    7. Knead.
    8. If it’s still too sticky, add a drop more of contact solution and knead some more.
    9. Fold in the mini glitter foam eggs. Continue to knead.
    10. Store in an airtight glass or plastic container.

Fluffy Slime Troubleshooting Tips:

You need an activator in order to create the slime’s texture. In this recipe, we used contact solution as the activator. Without that, the glue and shaving cream would just be a bowl of gunk.

Fold in extra shaving cream if you want your slime to be fluffier. 

If the slime isn’t stretchy after days of play, try to add a bit of hot tap water or a small amount of lotion.

If you find that the slime is too sticky, add a drop or two more of the contact solution or a small amount of baby oil and knead. The real key here is the kneading.

These tips will help you to get the right consistency with your slime.

Looking for more easy sensory play recipes to inspire creativity year-round? Join me for a free five day email series on Sensory Activities and Solutions and get a complimentary sample of our Sensory Play Recipes eBook.

Check out some of our other Easter sensory activities:

Easter Egg and Bunny Sensory BinEaster Egg and Bunny Sensory Bin

Bubble Wrap Easter Egg PaintingBubble Wrap Easter Eggs

Christ Centered Easter Sensory Bin

Filed Under: Crafts and Activities, Sensory Tagged With: sensory play, slime

  • « Go to Previous Page
  • Page 1
  • Interim pages omitted …
  • Page 20
  • Page 21
  • Page 22
  • Page 23
  • Page 24
  • Interim pages omitted …
  • Page 128
  • Go to Next Page »

Primary Sidebar

Categories

We are a participant in the Amazon Services LLC Associates Program, an affiliate advertising program designed to provide a means for us to earn fees by linking to Amazon.com and affiliated sites.

Copyright © 2026 • The Chaos and the Clutter • Site Design by Jeni @ The Blog Maven

Return to top of page

Copyright © 2026 · Chaos and the Clutter 2.0 on Genesis Framework · WordPress · Log in