• Skip to primary navigation
  • Skip to main content
  • Skip to primary sidebar
  • Home
  • About
  • Contact
  • Privacy + Terms
  • Affiliates

The Chaos and the Clutter

  • Facebook
  • Twitter
  • Pinterest
  • Google Plus
  • RSS
  • Email
  • School at Home
  • Sensory
    • Sensory Processing Disorder
    • Awesome Sensory Play Activities
      • Sensory Bins
      • Sensory Bottles
      • Sensory Bags
  • Family Games
    • Minute to Win It Games
  • Special Needs Parenting
    • Childhood Anxiety
    • Reactive Attachment Disorder
    • Sensory Processing Disorder
  • Store
  • Course Login

Sharla Kostelyk

Saran Wrap Ball Party Game

hands unwrapping ball made of plastic wrap filled with prizes

By Sharla Kostelyk

This is such a fun party game! The Saran Wrap game is great for all ages. It can be played at holiday gatherings, office parties, birthday parties, or even in the classroom.hands holding ball made of plastic wrap with items wrapped in it. Text "Saran Wrap Party Game"
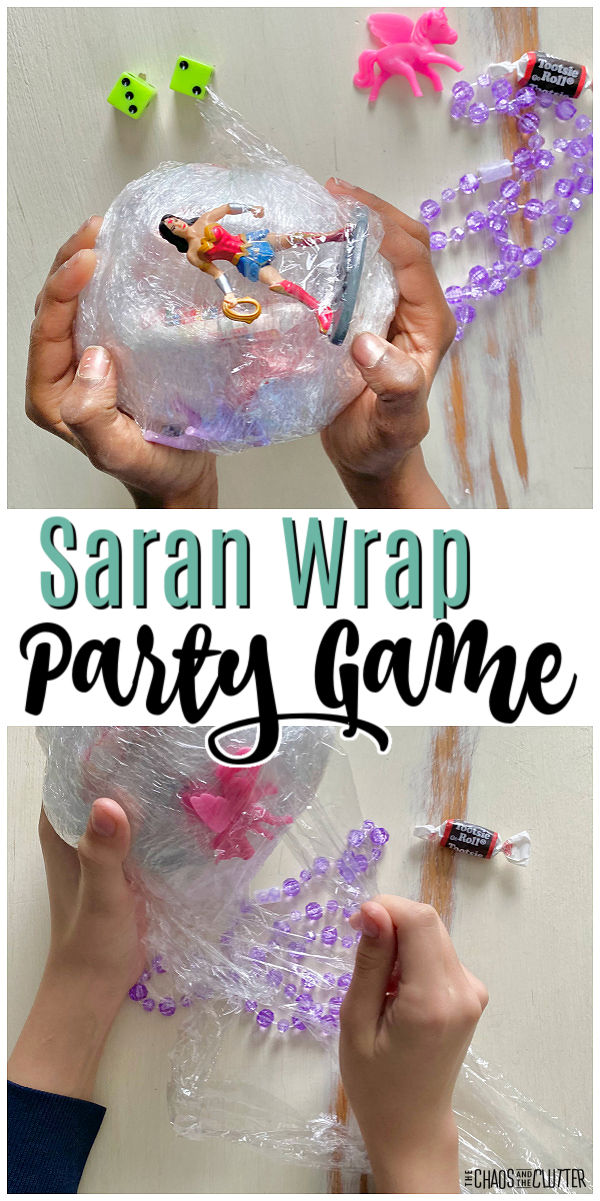
The great thing about this game is that everyone is a winner as each person is able to keep the prizes that they unwrap. There will of course be some people that end up with more treats that others, but that’s all part of the fun!

In case the ball doesn’t make it all the way around the circle, you can keep a few prizes to the side to give to anyone who doesn’t end up with a treat.

Saran Wrap Ball Game:

Supplies needed:

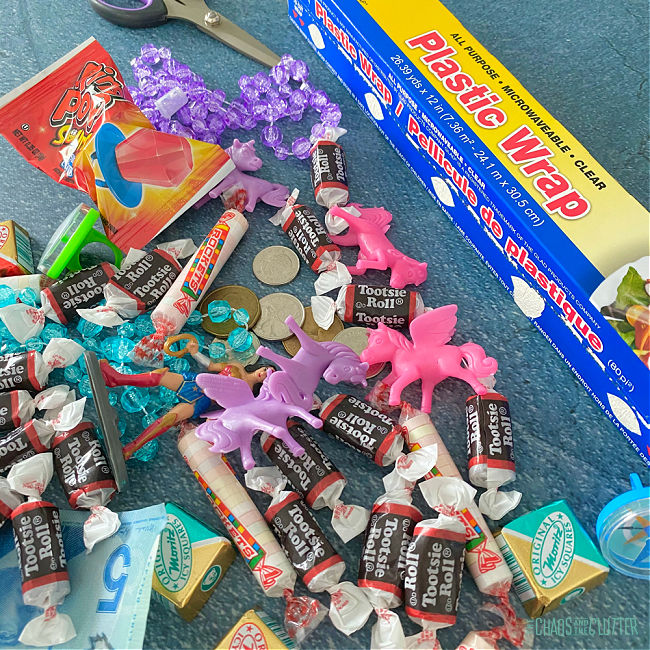
  • 1-5 packages of Saran Wrap or Glad Cling Wrap (you want to use brand name plastic wrap for this to ensure that it sticks to itself)
  • candies and small treats (there’s a list of prize ideas below)
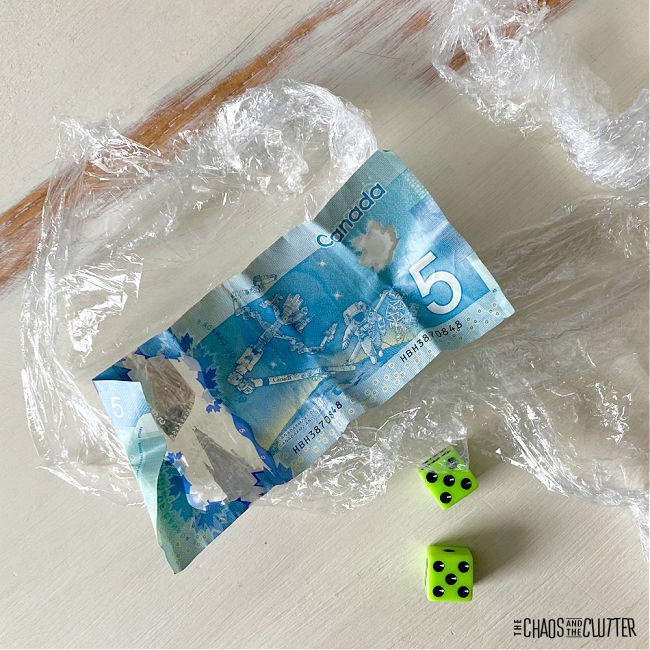
  • optional: a large prize such as cash for the center
  • dice

How to make the Saran Wrap ball:

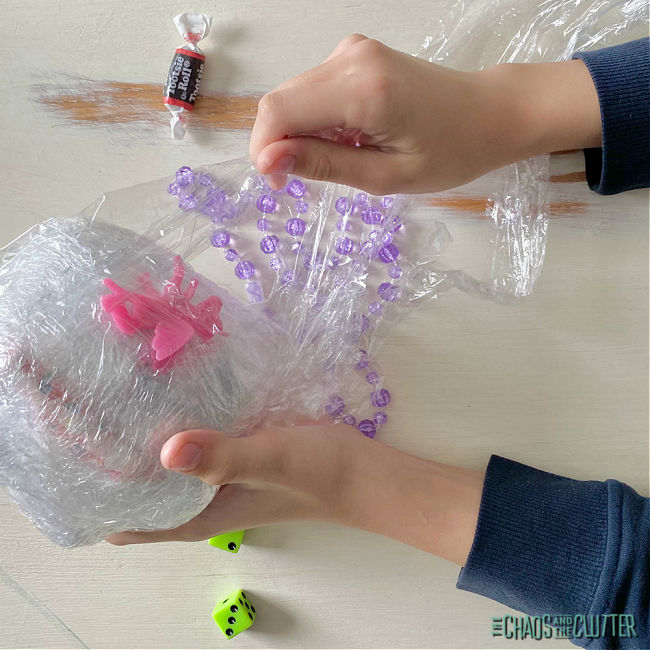
  1. Begin by placing the best prize on some of the plastic wrap. Wrap it around the prize and continue to wrap around.
  2. Continue wrapping the plastic wrap around to create a ball and every few layers, add a candy or treat and continue wrapping.
  3. Continue wrapping until the ball reaches the desired size. You can make a smaller ball for smaller groups using just one roll of Saran Wrap or make a larger ball for a big group or to make the game last longer using two or three rolls. You want to ensure you make the ball large enough that each person will get at least one turn to play.

Hint: If you want to make it more difficult to unwrap, you can periodically cut the plastic wrap and then start wrapping the other way with the next piece. collage of photos of making a ball of plastic wrap filled with prizes

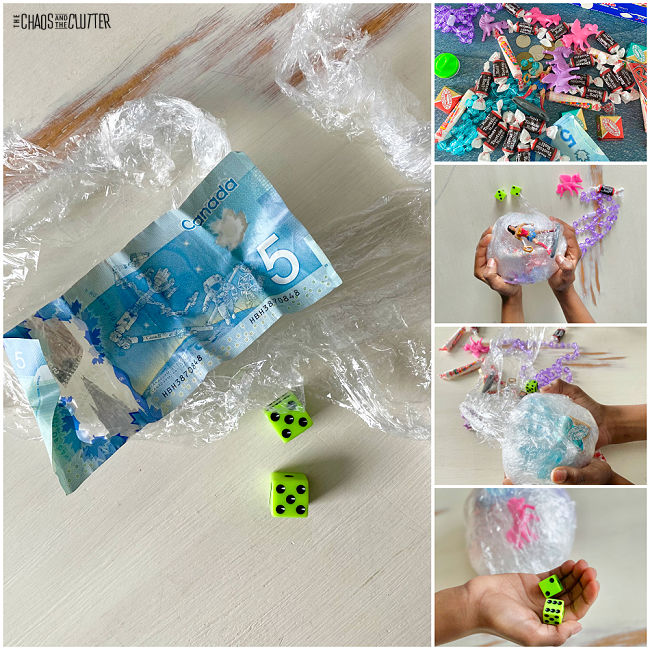
How to play the game:

  1. Have all the players sit in a circle.
  2. Give the ball to the first person. In our house, the house rule is that the youngest player goes first always. 
  3. That person can begin to unwrap the ball, keeping every treat they unwrap as they go. 
  4. In the meantime, the person to their left rolls the dice and continues to roll until they roll doubles. 
  5. Once they roll doubles, the ball passes to them and the dice passes to the person on their left. 
  6. The game continues until the entire ball in unwrapped with the last person being able to keep the prize at the center of the ball. 

hands unwrapping a ball made of plastic wrap that has small prizes in it

Saran Wrap Ball Game Variations:

  • For Christmas, you can use red and green cling wrap to add more of a holiday feel. Choose holiday treats such as Christmas mini erasers, small candy canes, and stickers.
  • Choose prizes according to the theme of your party.
  • Use this game as a way for party goers to fill up their treat bag at a birthday party.
  • Instead of having the person to the left roll repeatedly until they get doubles, you can have them roll only once and then pass the dice if they don’t get doubles and have everyone roll one time each turn. The person who rolls the doubles gets to “steal” the ball and so on.
  • In this variation, if a 7 is rolled, the direction the ball passes in is reversed.
  • Add some gag gifts to the ball. This adds a funny twist.

$5 bill and a pair of green dice

What prizes can I put in the Saran Wrap ball?

Here are some ideas of what you can include in your Saran Wrap ball:

  • candy (mini sizes as well as full size)
  • small toys such as those you would put in a treat bag
  • cash (bills and/or coins)
  • gift cards or gift certificates
  • makeup or lotion samples
  • stickers
  • costume jewelry
  • movie tickets
  • bouncy balls
  • small fidgets
  • face mask packets
  • mini Kleenex packs
  • scrunchies or hair ties
  • craft supplies
  • action figures
  • toy cars
  • items from Toobs like plastic animals

treats and candy strewn on a tableThis activity doesn’t have to cost much to put together. You can look for sales on small candies the day after Valentine’s Day or Hallowe’en or right after Christmas or you can purchase things at the dollar store. 

Sign up for our email series 5 Secrets to Powerful Family Connection for other great ideas. 

You may also be interested in these party game ideas:

Minute to Win It GamesA collage of images of kids and teens playing games at home. The text reads Minute to Win It Games.

The Flour Game

The Put Away Scavenger Huntboy in red shirt is delighted holding two chocolate bars

Filed Under: Crafts and Activities, Family Games

I Spy Forest Animal Babies Sensory Bottle

clear bottle filled with dry rice and forest animal buttons

By Sharla Kostelyk

Create an opportunity for kids to explore through play with this I Spy Forest Babies sensory bottle. It’s easy and inexpensive to make and can be used at home or in the classroom.

clear bottle with white rice and mini animals in it. Text reads "Forest Animal Babies sensory bottle"
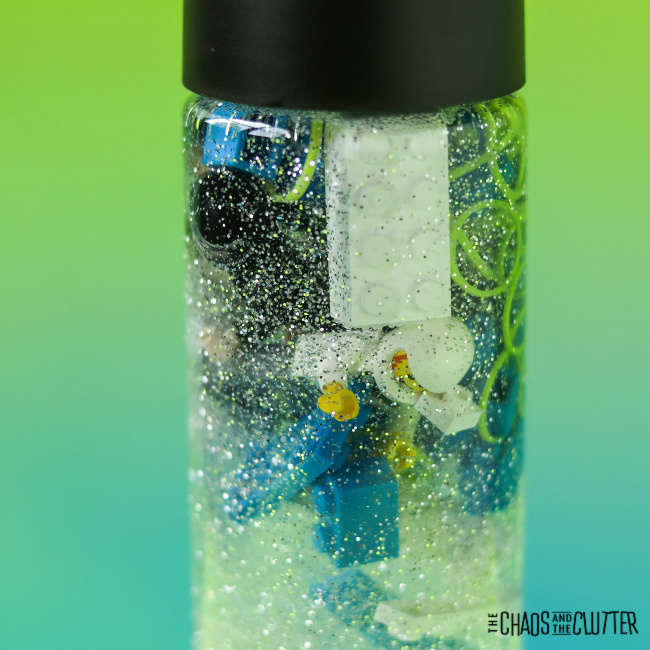
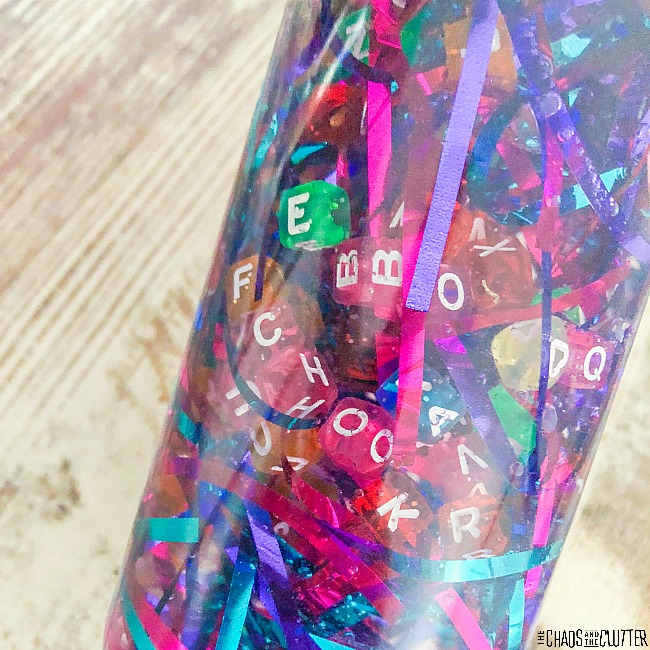
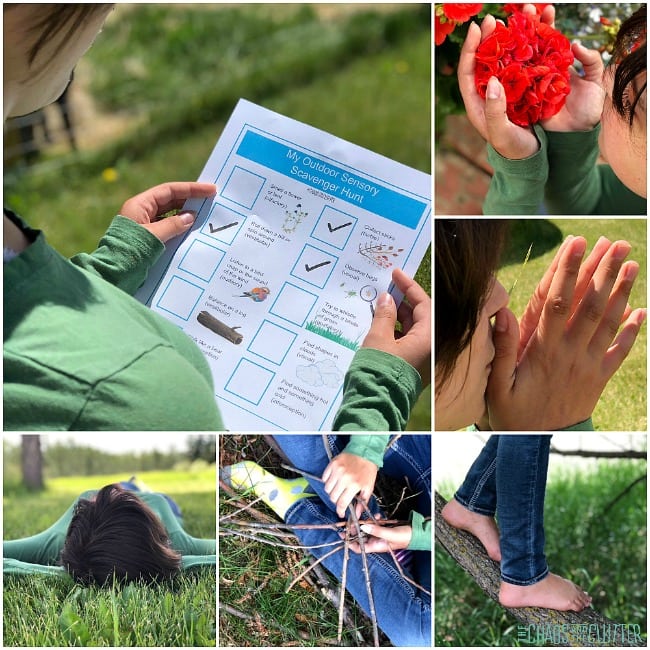
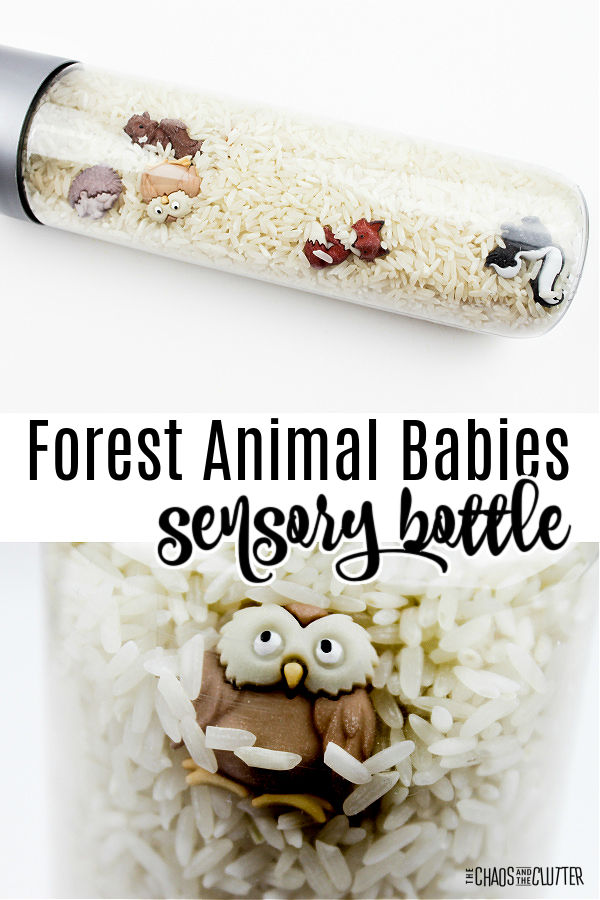
Kids will use their tactile, visual, and proprioceptive sensory systems. They can also practise counting skills, memory, visual recognition skills, and communication. 

I Spy Forest Animals Sensory Bottle:

Supplies needed:

    • 16.9 oz. bottle (you can use a sensory bottle or Voss type water bottle)
    • white rice
    • funnel
    • forest babies buttons 
    • optional: hot glue

Directions:

  1. Using a funnel, add a small amount of rice to the bottom of the bottle.
  2. Place a forest baby animal button inside the bottle.
  3. Repeat the above steps until all the animals are placed inside the bottle. By layering the rice and animals, they won’t all be in the same place. We included two foxes, a porcupine/hedgehog (hard to tell what it is!), squirrel, owl, and skunk.
  4. Fill the remainder of the bottle with rice, but leave some space for the rice to move around. You can empty out rice if you feel the rice doesn’t move enough to allow the animals to be seen.
  5. Replace the lid on the bottle.
  6. If you want to secure the bottle, you can secure the lid with a hot glue gun.
  7. Give the sensory bottle to a child to explore.

four photos of the process of putting rice and small animal buttons in a sensory bottle
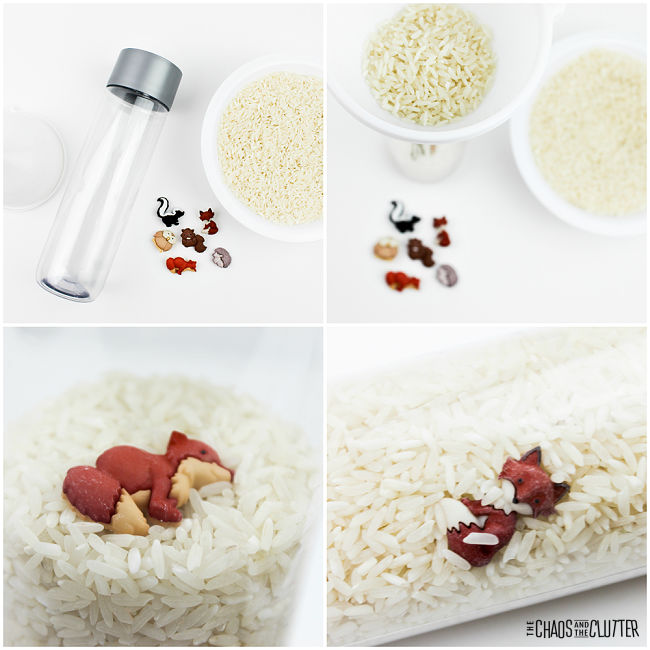
Kids can move and shake the rice around to find all of the forest babies in the bottle. You can also give them a cheat sheet so they know what they are looking for.clear bottle filled with dry rice and forest animal buttons

Ways to expand this activity:

  • Have kids draw the animals as they find them.
  • Set out books on forest animals.
  • Watch a movie like Bambi about animals in the forest. 

As with all sensory play activities, adult supervision should be used at all times. Even if you have secured the lid with glue, it is still possible to get it open and the bottle contains small parts which are choking hazards. 

Are you looking for more easy sensory play ideas to try? Join us for a five day email series on Sensory Activities and Solutions and get a free sample of our Sensory Play Recipes eBook.

Check out some of our other sensory bottles:

Astronaut Sensory BottleColour Mixing Sensory Bottle

Alphabet I Spy Sensory BottleA closeup picture of a sensory bottle filled with bright colours of alphabet beads and bright coloured tinsel.

Filed Under: Crafts and Activities Tagged With: sensory bottles, sensory play

The Put Away Scavenger Hunt

boy in red shirt is delighted holding two chocolate bars

By Sharla Kostelyk

Moms…you are going to love me after reading this! It’s so easy to do and costs nothing. No planning ahead required. The Put Away Scavenger Hunt is my go-to for turning grumpy days around. collage of photos of things being put back where they go. Text "the Put Away Scavenger Hunt"
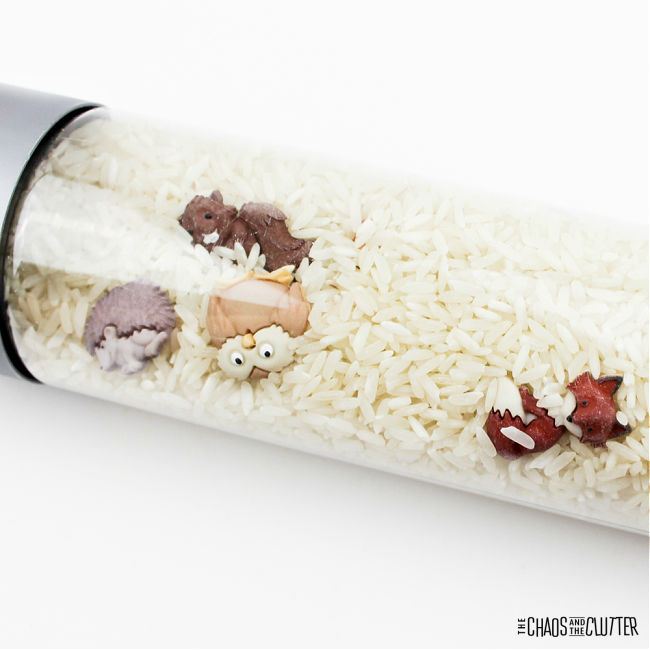
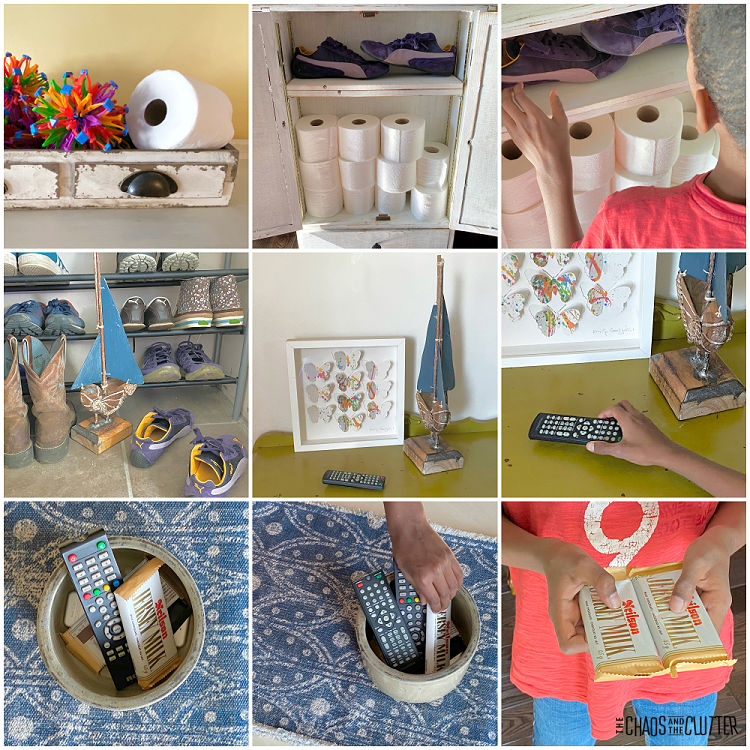
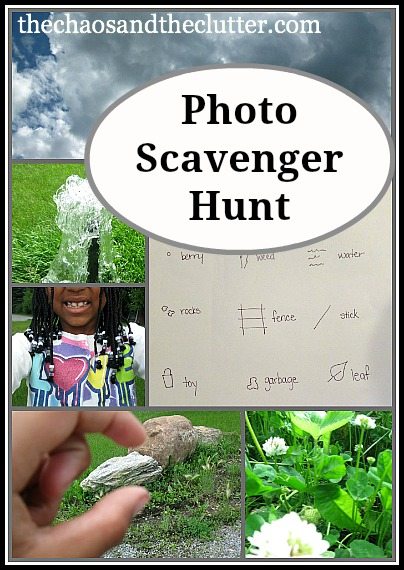
We have been doing put away scavenger hunts for at least a decade now and they never seem to get old. I usually just do them on an ordinary day with my own kids to change the mood, but I’ve also done them in place of an Easter Egg Hunt or as a birthday party game. It’s always a big hit.

Our family really enjoys scavenger hunts such as our photo scavenger hunt, sensory scavenger hunt, or Opposite Day scavenger hunt.

The Put Away Scavenger Hunt:

Supplies needed:

  • random items you already have around the house
  • a prize. This can be candy, a full Easter basket, party treat bags, or something like staying up an extra hour at bedtime or getting a free pass on chores.

How to play:

  1. To set things up, choose one item you will give your child to start with. In this example, it will be the spatulas. Set this item aside.
  2. In the place where this item should go, place another item that doesn’t belong there. (In this example, a fidget toy was in the drawer where the spatulas should be.) 
  3. Continue to do this with items around the house.
  4. In the place where the last item should go, put the prize.
  5. To play, hand your child (or children) the first item to put away. 
  6. When they discover something in that location that isn’t where it should be, have them put that away and so forth.
  7. In the last location, they will discover their prize.

collage of photos where one item in each picture is in the wrong place

To give you an idea of how this works, I’ve taken pictures of a sample Put Away Scavenger Hunt to walk you through.

  • spatulas handed to child
  • spatulas get put away in the kitchen drawer
  • fidget toy where spatulas should be
  • fidget toy put away in its place
  • keys where fidget toy should be
  • key ring put back on its hook
  • dishcloth where keys should be
  • dishcloth put in its drawer
  • decorative “R” shouldn’t be there
  • in the place where the “R” belongs, an expanding ball sits
  • expanding ball put where it goes
  • toilet paper discovered there

collage of photos of things where they don't belong

  • toilet paper put back in its cupboard
  • shoes discovered there
  • shoes replaced near shoe rack
  • decorative sailboat sits on the floor
  • sailboat replaced on dresser
  • remote control shouldn’t be there
  • remote placed back in the living room and some treats are discovered in its bowl!

boy in red shirt is delighted holding two chocolate barsPut Away Scavenger Hunt Tips:

  • For older kids, place items in a way that has them running all over. I put an item upstairs and the next one downstairs and the next outside and the next on the main floor and then next in the garage. That way, it’s more challenging, lasts longer, and gets in some exercise for them.
  • If you’re hiding large prizes like treat bags for a birthday party or Easter baskets, the dryer is a great place. Just put dryer balls in the second-last place and when the kids go put them away, they will find their prize. The garage is another area we’ve used to end the game if it was a larger prize. 
  • Add some humour. My kids think it’s hilarious if I put a pair of underwear in like a kitchen drawer or something. Be sure it’s clean underwear of course, but this always makes them roar with laughter!
  • Toothbrushes, books, kitchen utensils, photo frames, pencils, candles, and oven mitts all work great for this game. 
  • This scavenger hunt is a fantastic teaching tool as it helps kids learn where things belong and how to put things where they go. Think of this as a skills development activity for chores!
  • Kids can also participate in setting this up for siblings which helps with critical thinking as they plan ahead to which item will go where. 
  • Adult supervision should be used of course and your child’s age and abilities should be considered when you choose what to hide where.

Let me know how your family enjoy this. 

If you’re looking for similar activities, you can download our free printable Outdoor Scavenger Hunt. Just enter your email address below.

You may also be interested in:

Outdoor Sensory Scavenger Hunt

Photo Scavenger Hunt

Filed Under: Crafts and Activities, Family Games

Christmas Movie Bingo

green and white holiday bingo card

By Sharla Kostelyk

Watching sappy, predictable holiday movies has long been a part of our Christmas traditions. Last year, we discovered that watching is even more fun if paired with Christmas Movie Bingo!red and white grid text reads "Christmas Movie Bingo FREE Printable Bingo Cards"
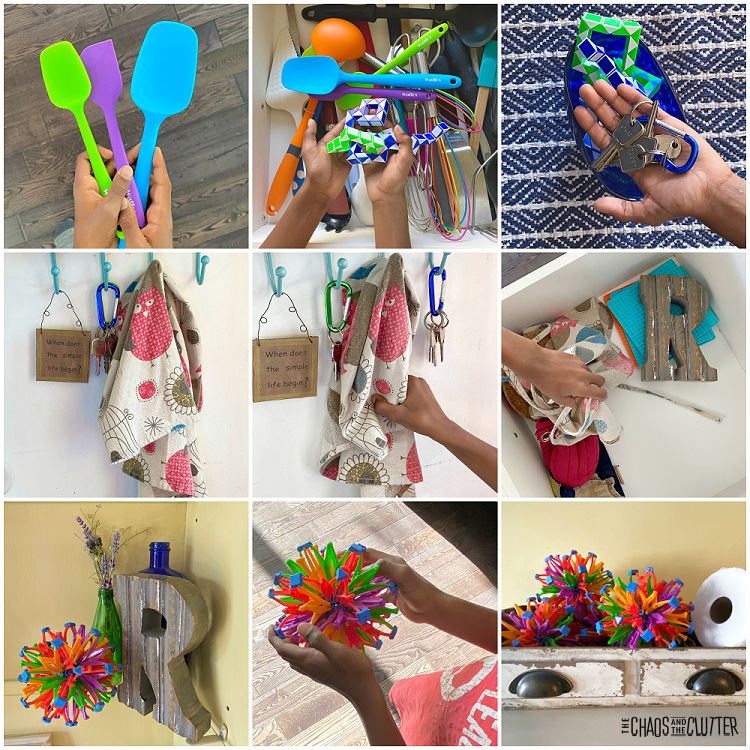
My girls and I like to curl up in our pyjamas or our matching Christmas movie watching shirts in front of the TV. Add in some holiday baking or popcorn and hot chocolate and you have the recipe for a relaxing afternoon.

Those Hallmark Christmas movies can be a wee bit addictive! Often, before we know it, the whole day has slipped by.

The reason it’s so much more fun to watch with your bingo cards in hand is it makes the predictability of the movies even funnier. 

Hallmark Christmas Movie Bingo:

Supplies needed: 

  • Christmas Movie Bingo Cards (download yours here)
  • marker, bingo daubers, or holiday stickers to cover the game squares

Directions:

  1. Download and print out the bingo cards. 
  2. As you watch holiday movies, mark all the squares that apply.
  3. The winner is either the first person to fill five in a row OR you can just keep watching movies until you’re able to fill in every square on the cards.

So print off those bingo cards, pop some popcorn, get a mug of hot cocoa, and get ready to binge watch this season’s best!green and white holiday bingo card

Last year, my girls and I filled out all the squares on our cards.

That’s an awful lot of TV watching (!), but we sometimes made ornaments or iced cookies while we watched. One year, we rolled croquettes during the shows and the cheesy romance films were a great distraction for a tedious task. 

If you want to give prizes to the winner, you can choose holiday themed treats like candy canes or holiday baking. And instead of yelling out “Bingo”, you can choose a word more fitting to the theme like “Mistletoe”!

Sign up to receive your free Christmas Movie Bingo and you’ll also receive our email series 5 Secrets to Powerful Family Connection.

If you’re looking for other family holiday fun, you’ll want to check these out:

Christmas Minute to Win It Games

Christmas Printable Activities

Christmas Games for Kids

Filed Under: Christmas, Family Games

Stretchy Superhero Slime

hand presses into blue slime with coloured confetti in it

By Sharla Kostelyk

This stretchy superhero slime is great for inspiring imagination. It can be used for sensory play or made as a party favour for a superhero themed birthday. child's hand presses down on blue slime. Text reads "Stretchy Superhero Slime"
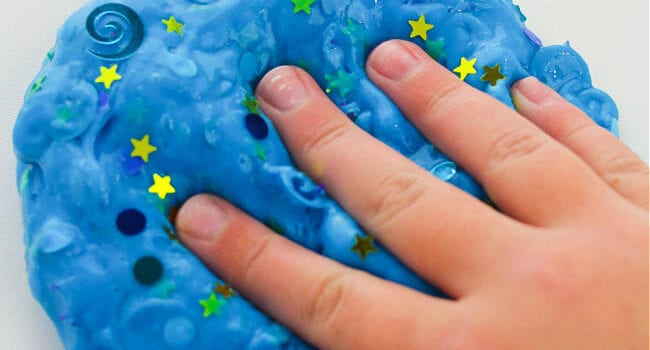
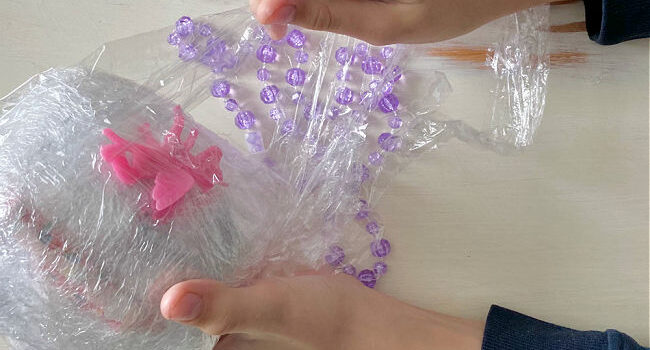
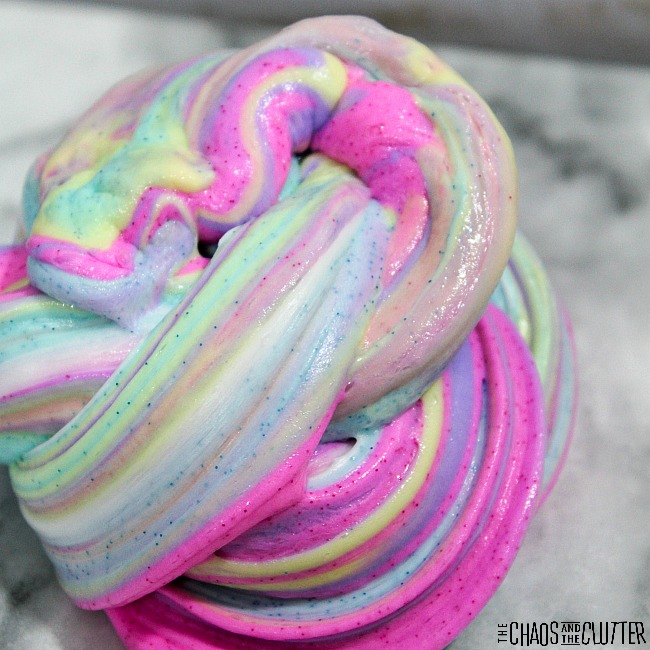
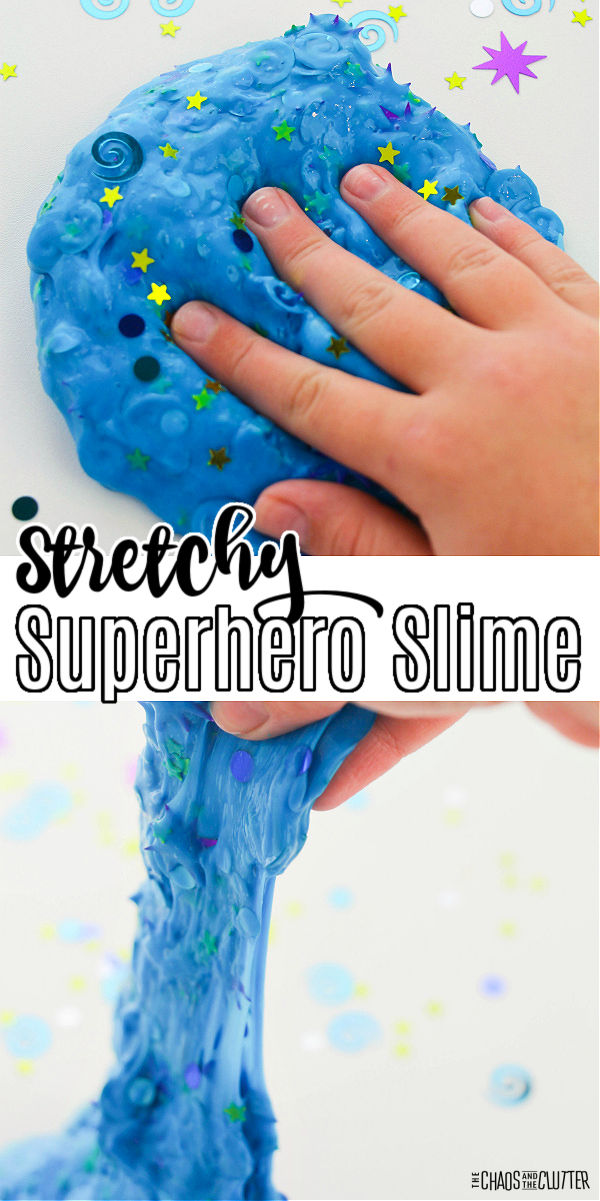
One of our daughters is a huge fan of all things superhero. She loves the Marvel and DC movies and comics. She is inspired by the thought of superpowers. We even had a DC themed birthday party for her last year.

hand pulling up blue slime
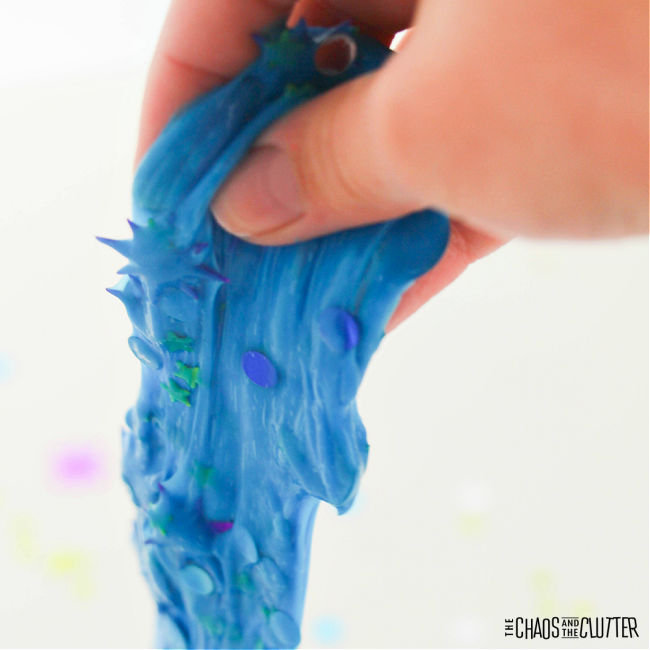
So I guess it comes as no surprise that I’m talking about how to make superhero slime.

Superhero Slime Recipe:

Supplies needed:

  • 6 oz. bottle Elmer’s Blue coloured Glue
  • 1/4 to 1/2 cup warm water, as needed
  • 1/4 to 1/2 cup liquid starch, as needed
  • Superhero confetti 

Directions:

  1. Pour the blue glue into a medium-sized bowl.
  2. Use a fork to stir in 1/4 cup of warm water.
  3. Add 3 Tablespoons of liquid starch and stir well for 2 minutes.
  4. Test the slime. Add more water if too stiff, more liquid starch if it’s too sticky.
  5. Continue stirring until the slime forms into a ball, then knead for 2 minutes, adding more water or liquid starch as needed.
  6. Once the slime is stretchy and no longer sticky, knead in the superhero themed confetti.

collage of photos showing the process of making blue slime with added confetti
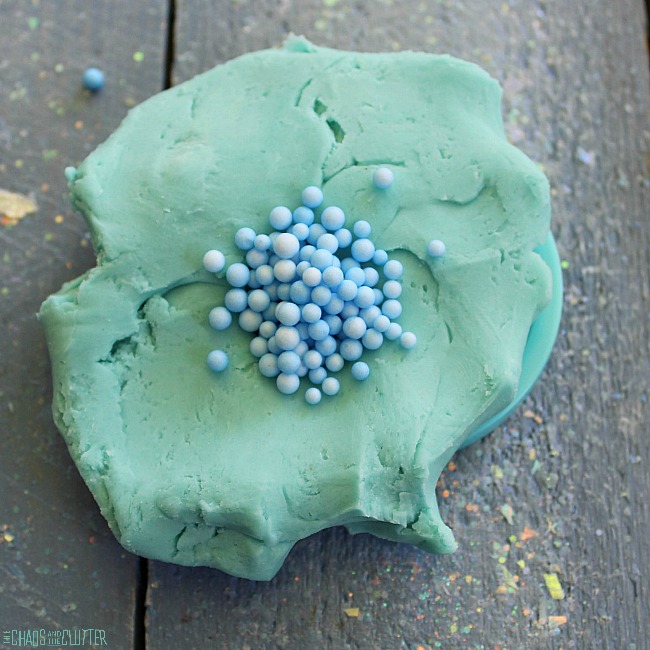
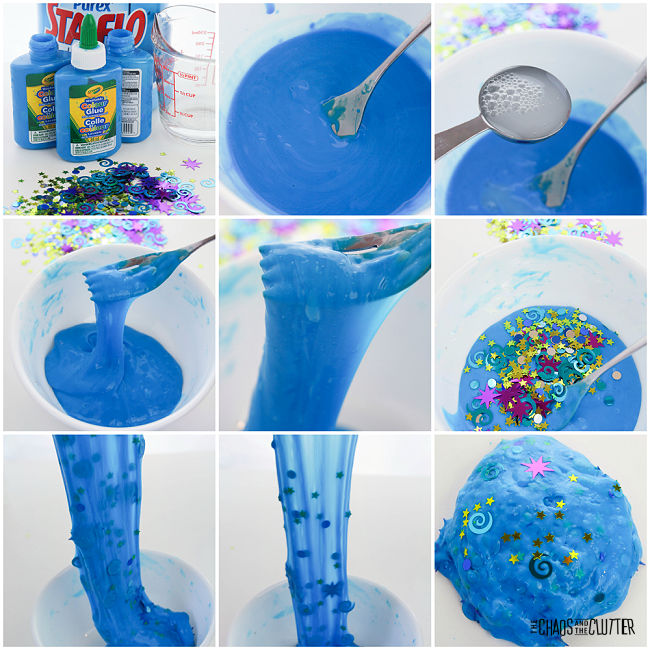
As kids play with their slime, they engage their visual, tactile, and proprioceptive sensory systems. Getting enough sensory input is important not only for brain development, but for emotional regulation. 

collage of photos of blue slime with confetti in it
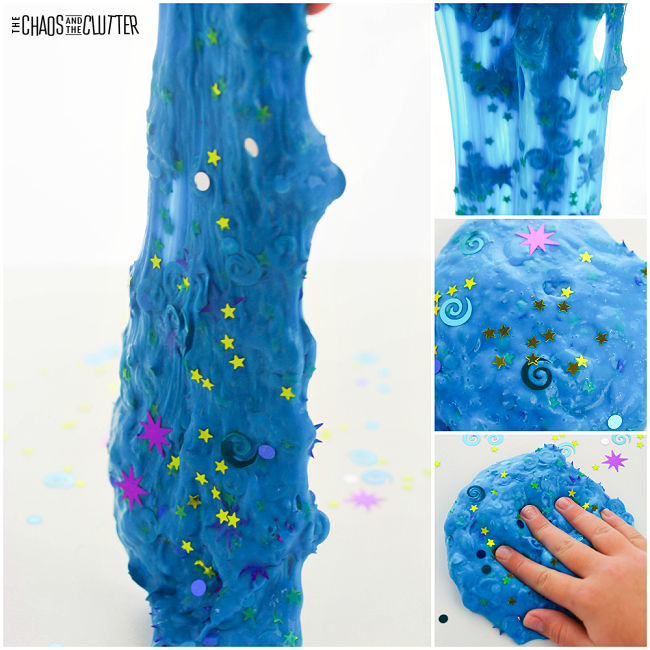
Slime can be stored in a resealable bag or airtight container when not being used.

As with any sensory play, adult supervision should be used both while making the slime and while interacting with it afterwards. Hands should be washed thoroughly after playing with this or any other slime.

Ideas for using this slime as a party favour:

  • Gift this in a sealed sandwich bag decorated with superhero stickers.
  • Or use special slime gift containers and attach a mini superhero figure to the top of the lid with a hot glue gun.
  • Set up a station to have the kids participate in making the slime at the party. This is best if the party is for older kids or teens. 

hand presses into blue slime with coloured confetti in it
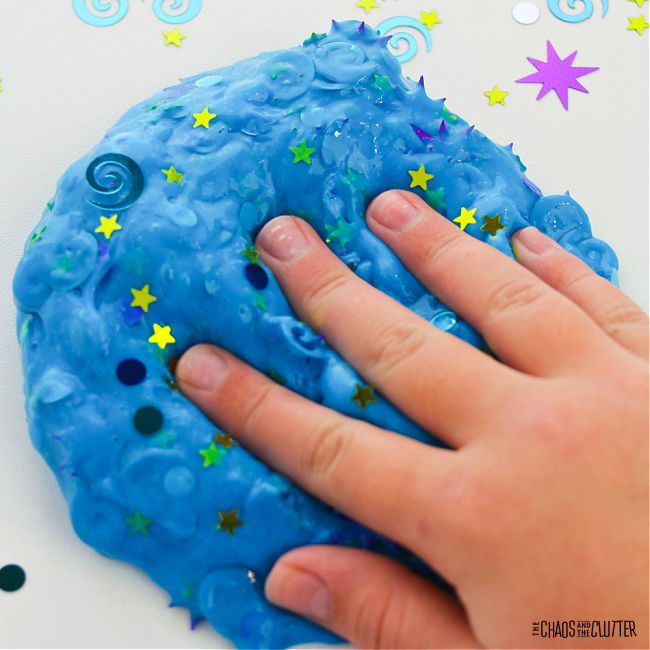
Are you looking for other easy sensory play recipes to make at home? Join us for a five day email series on Sensory Activities and Solutions and get a free sample of our Sensory Play Recipes eBook.

Check out some of our other slime recipes:

Camo Slime

Unicorn Fluffy Slime

Textured Butter Slime

Filed Under: Crafts and Activities Tagged With: sensory play, slime

Lego Challenge for Kids

a pile of building blocks with some in a small bowl and printed instruction cards

By Sharla Kostelyk

Lego offers so many learning opportunities. Playing with building blocks helps kids with math concepts, engineering, communication, as well as simpler things such as colours and shapes. Using Lego Challenge Cards is a great way to encourage this learning.building blocks scattered on the floor with a printed card. Text reads "LEGO Challenge Cards"
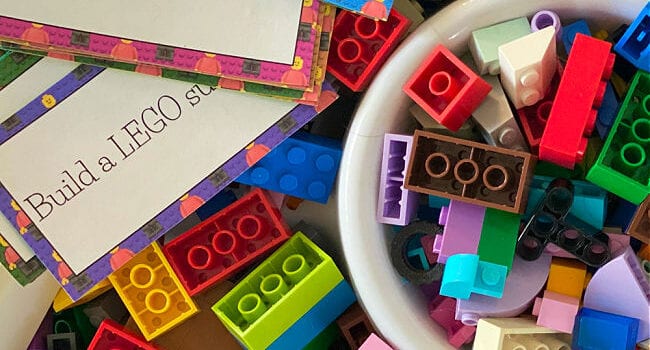
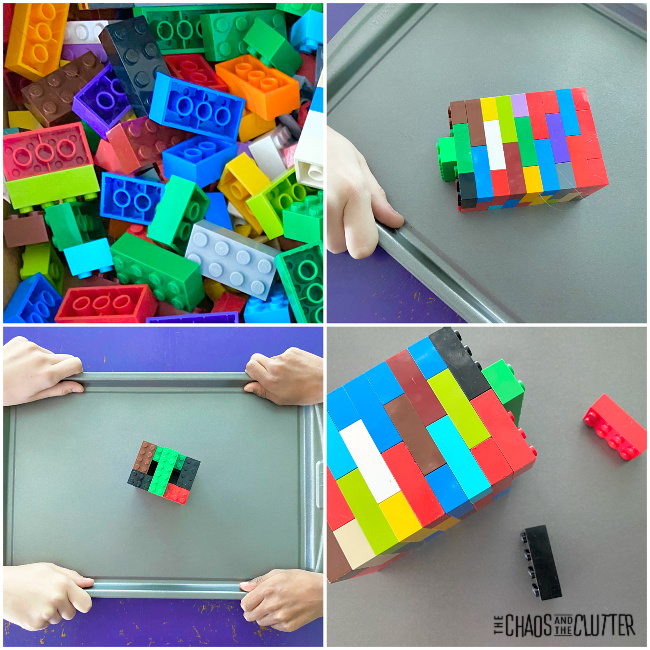
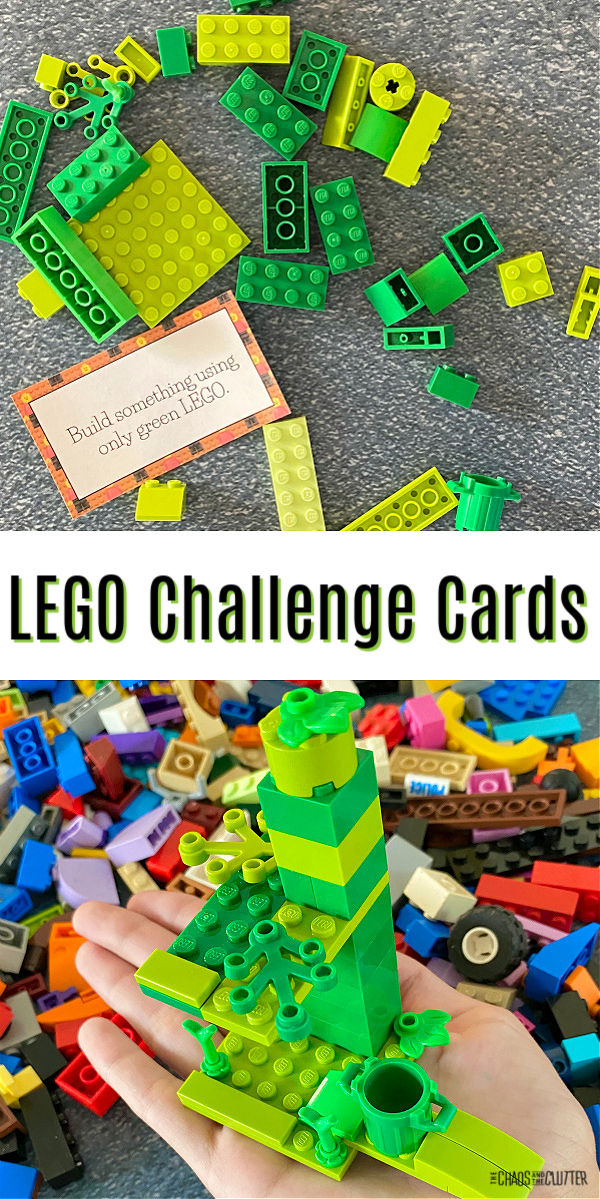
Lego is something that I often incorporated in our homeschooling. Whether is was a tool for teaching how earthquakes work, practising letter recognition, including it in a sensory bottle, or just having the kids build and create with it while I read them their history lessons, it was a regular learning tool. We even occasionally had Lego shaped snacks!

My own kids’ enjoyment and learning thanks to creating with blocks is what led me to want to create this activity for other families to enjoy. These can be used as a boredom buster at home or to enhance skills in the classroom.

Lego Challenge Cards:

Supplies needed:

  • LEGO Challenge Cards (download here)
  • scissors
  • building blocks

Directions:

  1. Download and print off the Lego Challenge Cards. 
  2. Cut them out.
  3. Kids can then follow the prompts on the cards to create things using the building blocks. collage of photos of building blocks and creations made with those blocks

I kept some of the cards open ended in order to inspire creativity. There are also ideas included to foster team work and communication and to encourage thinking outside the box.

Examples of some of the challenges:

  • Build a boat that floats.
  • Build your name in LEGO.
  • Build something blindfolded.
  • Build something in one minute.
  • Build something using 5 different sized LEGO.
  • Build a LEGO pizza.
  • Build a small tower and balance it on your head.
  • Build something by following the instructions of a partner.
  • Build something with just one hand.

There are a total of 24 challenge cards in this printable set. Each one is designed to keep kids engaged and thinking. green tower built of Lego with other coloured building blocks in the background

Learning Opportunities from using Lego Challenge Cards:

    • following instructions
    • reading comprehension
    • colours 
    • shapes
    • geometry
    • building
    • math
    • engineering concepts (balance, gravity, weight distribution)
    • fine motor
    • hand eye coordination
    • cooperation and communication (if playing with others)

a pile of building blocks with some in a small bowl and printed instruction cards
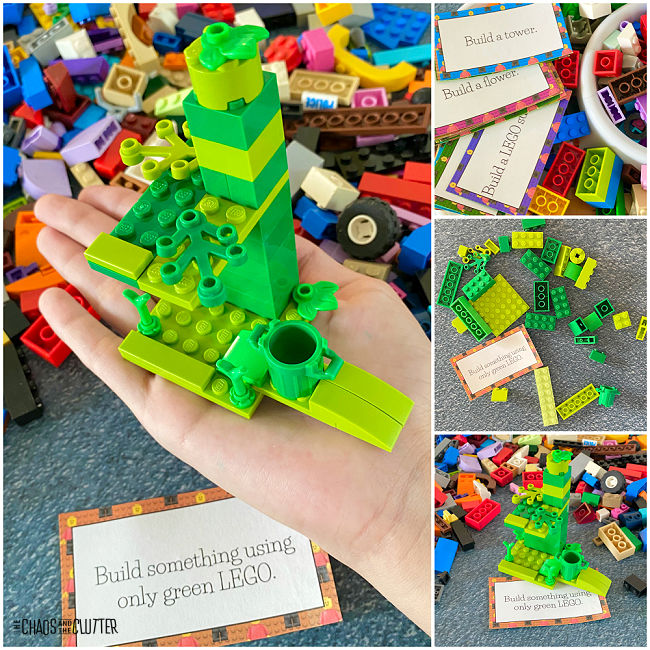
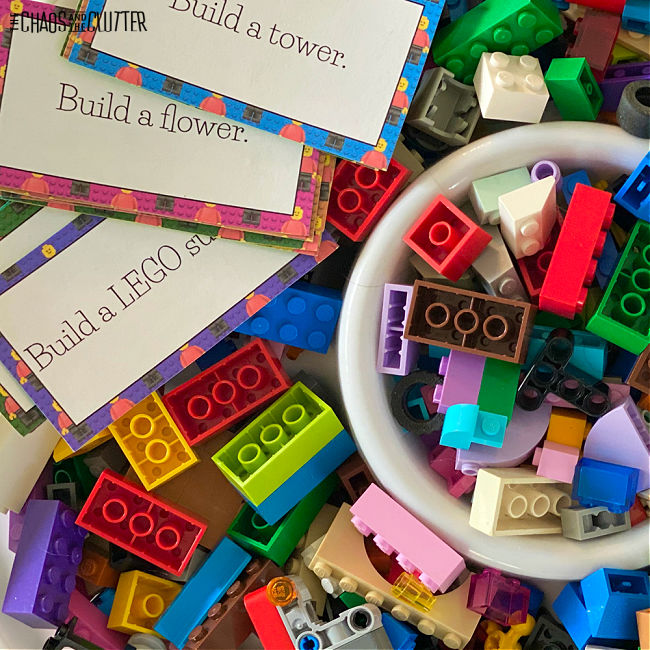
Sign up to receive the complete set of LEGO Challenge Cards free and be entered in our 5 Secrets to Powerful Connection email series.

Check out some of our other LEGO themed activities:

LEGO Sensory Bottle

Earthquake Science Experiment

LEGO Letter Practise Activity

Filed Under: Crafts and Activities, Homeschooling, Printables

  • « Go to Previous Page
  • Page 1
  • Interim pages omitted …
  • Page 13
  • Page 14
  • Page 15
  • Page 16
  • Page 17
  • Interim pages omitted …
  • Page 128
  • Go to Next Page »

Primary Sidebar

Categories

We are a participant in the Amazon Services LLC Associates Program, an affiliate advertising program designed to provide a means for us to earn fees by linking to Amazon.com and affiliated sites.

Copyright © 2026 • The Chaos and the Clutter • Site Design by Jeni @ The Blog Maven

Return to top of page

Copyright © 2026 · Chaos and the Clutter 2.0 on Genesis Framework · WordPress · Log in